# Feature-Sliced Design ## th - [ตัวอย่าง (Examples)](/examples.md): รายการเว็บไซต์ที่สร้างด้วย Feature-Sliced Design - [🧭 การนำทาง (Navigation)](/nav.md): Feature-Sliced Design Navigation help page - [เวอร์ชันของ Feature-Sliced Design](/versions.md): Feature-Sliced Design Versions page listing all documented site versions - [💫 Community](/community.md): Community resources, additional materials - [Team](/community/team.md): Core-team - [ทางเลือกอื่นๆ](/docs/about/alternatives.md): ประวัติความเป็นมาของแนวทางการออกแบบสถาปัตยกรรม (Architecture Approaches) - [พันธกิจ (Mission)](/docs/about/mission.md): ในส่วนนี้เราจะอธิบายเป้าหมายและข้อจำกัดในการนำระเบียบวิธีนี้ไปใช้ ซึ่งเป็นสิ่งที่เรายึดถือในการพัฒนาระเบียบวิธีนี้ - [แรงบันดาลใจ (Motivation)](/docs/about/motivation.md): ไอเดียหลักของ Feature-Sliced Design คือการอำนวยความสะดวกและลดต้นทุนในการพัฒนาโปรเจกต์ที่ซับซ้อน โดยอิงจาก การรวบรวมผลการวิจัยและการหารือประสบการณ์จากนักพัฒนาที่หลากหลาย - [การผลักดันในบริษัท](/docs/about/promote/for-company.md): โปรเจกต์และบริษัทจำเป็นต้องมี Methodology มั้ย? - [การผลักดันในทีม](/docs/about/promote/for-team.md): - การ Onboard คนใหม่ - [มุมมองการ Integration](/docs/about/promote/integration.md): สรุป - [การนำไปใช้บางส่วน (Partial Application)](/docs/about/promote/partial-application.md): จะนำ Methodology ไปใช้แค่บางส่วนได้มั้ย? มันสมเหตุสมผลรึเปล่า? แล้วถ้าฉันไม่สนใจมันล่ะ? - [Abstractions (นามธรรม)](/docs/about/understanding/abstractions.md): กฎของ Leaky Abstractions - [เกี่ยวกับสถาปัตยกรรม](/docs/about/understanding/architecture.md): ปัญหา - [ประเภทของความรู้ในโปรเจกต์](/docs/about/understanding/knowledge-types.md): เราสามารถแบ่งแยก "ประเภทของความรู้" ในโปรเจกต์ได้ดังนี้: - [การตั้งชื่อ (Naming)](/docs/about/understanding/naming.md): นักพัฒนาแต่ละคนมีประสบการณ์และบริบทที่ต่างกัน ซึ่งอาจนำไปสู่ความเข้าใจผิดในทีมเมื่อเรียก Entities เดียวกันด้วยชื่อที่ต่างกัน ตัวอย่างเช่น: - [ขับเคลื่อนด้วยความต้องการ (Needs driven)](/docs/about/understanding/needs-driven.md): — คุณระบุเป้าหมายไม่ได้เหรอว่าฟีเจอร์ใหม่นี้จะแก้ปัญหาอะไร? หรือปัญหาคือตัวโจทย์เองก็ยังไม่ได้ตั้งมาให้ชัด? **ประเด็นคือ Methodology นี้ช่วยดึงเอานิยามของงานและเป้าหมายที่เป็นปัญหาออกมาให้เห็นชัดขึ้น** - [สัญญาณของสถาปัตยกรรม (Signals of architecture)](/docs/about/understanding/signals.md): ถ้ามีข้อจำกัดในฝั่งสถาปัตยกรรม แสดงว่ามีเหตุผลที่ชัดเจนสำหรับสิ่งนั้น และมีผลกระทบถ้าเพิกเฉยมัน - [แนวทางเรื่องแบรนด์ (Branding Guidelines)](/docs/branding.md): อัตลักษณ์ทางภาพ (Visual Identity) ของ FSD ขึ้นอยู่กับ Core-concepts ของมัน: Layered, Sliced self-contained parts, Parts & Compose, Segmented - [Decomposition cheatsheet](/docs/get-started/cheatsheet.md): เก็บหน้านี้ไว้เป็นโพยดูแบบด่วนๆ เวลาที่ต้องตัดสินใจว่าจะแบ่งส่วน UI ยังไงดี ด้านล่างมีเวอร์ชัน PDF ให้โหลดด้วยนะ จะปริ้นท์ออกมาแปะฝาบ้านหรือเอาไว้หนุนนอนก็ได้ตามสะดวก - [คำถามที่พบบ่อย (FAQ)](/docs/get-started/faq.md): ถ้ามีคำถามเพิ่มเติม แวะไปคุยกันได้ที่ Telegram chat, Discord community, และ GitHub Discussions - [ภาพรวม (Overview)](/docs/get-started/overview.md): Feature-Sliced Design (FSD) คือแนวทางการออกแบบสถาปัตยกรรมสำหรับ frontend application พูดง่ายๆ ก็คือ เป็นการรวบรวมกฎและข้อตกลงในการจัดระเบียบโค้ดนั่นเอง เป้าหมายหลักคือทำให้โปรเจกต์เข้าใจง่ายและมีความเสถียร (Stable) เสมอ แม้ว่าความต้องการทางธุรกิจจะเปลี่ยนไปบ่อยแค่ไหนก็ตาม 🚀 - [บทเรียน (Tutorial)](/docs/get-started/tutorial.md): ส่วนที่ 1: ร่างบนกระดาษ (On paper) - [การจัดการ API Requests](/docs/guides/examples/api-requests.md): handling-api-requests} - [การยืนยันตัวตน (Authentication)](/docs/guides/examples/auth.md): โดยทั่วไป การ Authentication ประกอบด้วยขั้นตอนต่อไปนี้: - [Autocomplete](/docs/guides/examples/autocompleted.md): เกี่ยวกับการ Decomposition ตาม Layers - [Browser API](/docs/guides/examples/browser-api.md): เกี่ยวกับการทำงานกับ Browser API: localStorage, audio Api, bluetooth API, ฯลฯ - [CMS](/docs/guides/examples/cms.md): ฟีเจอร์อาจจะแตกต่างกัน - [Feedback](/docs/guides/examples/feedback.md): Errors, Alerts, Notifications, ... - [i18n](/docs/guides/examples/i18n.md): วางไว้ที่ไหน? ทำงานกับมันยังไง? - [Metric](/docs/guides/examples/metric.md): เกี่ยวกับวิธีการ Initialize metrics ในแอปพลิเคชัน - [Monorepositories](/docs/guides/examples/monorepo.md): เกี่ยวกับการประยุกต์ใช้กับ Mono repositories, BFF, และ Microapps - [Page layouts (เลย์เอาต์ของหน้า)](/docs/guides/examples/page-layout.md): ไกด์นี้จะสำรวจเรื่อง Abstraction ของ Page layout — เมื่อหลายๆ หน้าใช้โครงสร้างรวมๆ เหมือนกัน และต่างกันแค่เนื้อหาหลัก - [Desktop/Touch platforms](/docs/guides/examples/platforms.md): เกี่ยวกับการประยุกต์ใช้ Methodology สำหรับ Desktop/Touch - [SSR (Server-Side Rendering)](/docs/guides/examples/ssr.md): เกี่ยวกับการ Implement SSR โดยใช้ Methodology นี้ - [Theme (ธีม)](/docs/guides/examples/theme.md): ฉันควรวางโค้ดเกี่ยวกับธีมและ Palette ไว้ที่ไหน? - [Types (ชนิดข้อมูล)](/docs/guides/examples/types.md): ไกด์นี้เกี่ยวข้องกับ Data types จากภาษาที่มี Type อย่าง TypeScript และอธิบายว่ามันอยู่ตรงไหนใน FSD - [White Labels](/docs/guides/examples/white-labels.md): Figma, brand uikit, templates, ความสามารถในการปรับตัวกับแบรนด์ต่างๆ - [Cross-import](/docs/guides/issues/cross-imports.md): Cross-import คือการ import ระหว่าง slices ที่แตกต่างกันแต่อยู่ใน layer เดียวกัน - [Desegmentation](/docs/guides/issues/desegmented.md): Desegmentation (หรือที่รู้จักว่า Horizontal Slicing หรือ Packaging by Layer) คือรูปแบบการจัดระเบียบโค้ดที่ไฟล์ถูกจัดกลุ่มตามบทบาททางเทคนิค (Technical Roles) แทนที่จะเป็น Business Domains ที่มันรับผิดชอบ นี่หมายความว่าโค้ดที่มีฟังก์ชันทางเทคนิคคล้ายกันจะถูกเก็บไว้ที่เดียวกัน ไม่ว่ามันจะจัดการ Business logic อะไรก็ตาม - [Excessive Entities](/docs/guides/issues/excessive-entities.md): Layer entities ใน Feature-Sliced Design เป็นหนึ่งใน Layer ล่างๆ ที่มีไว้สำหรับ Business logic เป็นหลัก นั่นทำให้มันเข้าถึงได้ง่าย — ทุก Layers ยกเว้น shared สามารถเข้าถึงมันได้ อย่างไรก็ตาม ความเป็น Global ของมันหมายความว่าการเปลี่ยนแปลงใน entities อาจส่งผลกระทบวงกว้าง ต้องใช้การ Design อย่างระมัดระวังเพื่อหลีกเลี่ยงการ Refactor ที่ราคาแพง - [Routing](/docs/guides/issues/routes.md): สถานการณ์ - [การย้ายจากสถาปัตยกรรมที่ทำเอง (Custom Architecture)](/docs/guides/migration/from-custom.md): ไกด์นี้อธิบายแนวทางที่อาจเป็นประโยชน์เมื่อย้ายจาก Custom self-made architecture มาเป็น Feature-Sliced Design - [การย้ายจาก v1 ไป v2](/docs/guides/migration/from-v1.md): ทำไมถึงต้อง v2? - [การย้ายจาก v2.0 ไป v2.1](/docs/guides/migration/from-v2-0.md): การเปลี่ยนแปลงหลักใน v2.1 คือ Mental model ใหม่สำหรับการแยกส่วน Interface (Decomposition) — โดยเริ่มจาก Pages - [การใช้ร่วมกับ Electron](/docs/guides/tech/with-electron.md): แอปพลิเคชัน Electron มีสถาปัตยกรรมพิเศษที่ประกอบด้วยหลาย Processes ซึ่งมีความรับผิดชอบต่างกัน การใช้ FSD ในบริบทนี้ต้องมีการปรับโครงสร้างให้เข้ากับธรรมชาติของ Electron - [การใช้ร่วมกับ Next.js](/docs/guides/tech/with-nextjs.md): FSD สามารถใช้ร่วมกับ Next.js ได้ทั้งเวอร์ชัน App Router และ Pages Router หากคุณแก้ปัญหาความขัดแย้งหลักได้ — นั่นคือเรื่องโฟลเดอร์ app และ pages - [การใช้ร่วมกับ NuxtJS](/docs/guides/tech/with-nuxtjs.md): เป็นไปได้ที่จะใช้ FSD ในโปรเจกต์ NuxtJS แต่จะเกิดความขัดแย้งเนื่องจากความแตกต่างระหว่างข้อกำหนดโครงสร้างโปรเจกต์ของ NuxtJS และหลักการของ FSD: - [การใช้ร่วมกับ React Query](/docs/guides/tech/with-react-query.md): ปัญหาเรื่อง "จะวาง Keys ไว้ที่ไหน" - [การใช้ร่วมกับ SvelteKit](/docs/guides/tech/with-sveltekit.md): เป็นไปได้ที่จะใช้ FSD ในโปรเจกต์ SvelteKit แต่จะเกิดความขัดแย้งเนื่องจากความแตกต่างระหว่างข้อกำหนดโครงสร้างของโปรเจกต์ SvelteKit และหลักการของ FSD: - [เอกสารสำหรับ LLMs](/docs/llms.md): หน้านี้รวบรวมลิงก์และคำแนะนำสำหรับ LLM crawlers - [Layers (เลเยอร์)](/docs/reference/layers.md): Layers เป็นระดับแรกของลำดับชั้นการจัดระเบียบใน Feature-Sliced Design จุดประสงค์คือเพื่อแยกโค้ดตามระดับความรับผิดชอบที่มันต้องการและจำนวน Modules อื่นๆ ในแอปที่มันพึ่งพา ทุก Layer มีความหมายทาง Semantic พิเศษที่จะช่วยคุณตัดสินใจว่าควรจัดสรรความรับผิดชอบให้โค้ดของคุณมากแค่ไหน - [Public API](/docs/reference/public-api.md): Public API คือ สัญญา (Contract) ระหว่างกลุ่มของ Modules (เช่น Slice) กับโค้ดที่จะมาใช้งานมัน มันยังทำหน้าที่เป็นประตู (Gate) ที่อนุญาตให้เข้าถึง Object บางอย่างเท่านั้น และต้องผ่านทาง Public API นั้นๆ เท่านั้น - [Slices และ Segments](/docs/reference/slices-segments.md): Slices - [Feature-Sliced Design](/index.md): Architectural methodology for frontend projects --- # Full Documentation Content v2 ![](/th/assets/ideal-img/tiny-bunny.dd60f55.640.png) Tiny Bunny Mini Game Mini-game "21 points" in the universe of the visual novel "Tiny Bunny". reactredux-toolkittypescript [Website](https://sanua356.github.io/tiny-bunny/)[Source](https://github.com/sanua356/tiny-bunny) --- # 🧭 การนำทาง (Navigation) ## เส้นทางเดิม (Legacy routes) หลังจากมีการปรับโครงสร้างเอกสารใหม่ บางเส้นทางอาจมีการเปลี่ยนแปลง คุณสามารถหาหน้าที่ต้องการได้จากด้านล่างนี้ แต่เรายังมีระบบเปลี่ยนทาง (redirect) จากลิงก์เดิมเพื่อความเข้ากันได้อยู่ ### 🚀 Get Started ⚡️ Simplified and merged [Tutorial](/th/docs/get-started/tutorial.md) [**old**:](/th/docs/get-started/tutorial.md) [/docs/get-started/quick-start](/th/docs/get-started/tutorial.md) [**new**: ](/th/docs/get-started/tutorial.md) [/docs/get-started/tutorial](/th/docs/get-started/tutorial.md) [Basics](/th/docs/get-started/overview.md) [**old**:](/th/docs/get-started/overview.md) [/docs/get-started/basics](/th/docs/get-started/overview.md) [**new**: ](/th/docs/get-started/overview.md) [/docs/get-started/overview](/th/docs/get-started/overview.md) [Decompose Cheatsheet](/th/docs/get-started/cheatsheet.md) [**old**:](/th/docs/get-started/cheatsheet.md) [/docs/get-started/tutorial/decompose; /docs/get-started/tutorial/design-mockup; /docs/get-started/onboard/cheatsheet](/th/docs/get-started/cheatsheet.md) [**new**: ](/th/docs/get-started/cheatsheet.md) [/docs/get-started/cheatsheet](/th/docs/get-started/cheatsheet.md) ### 🍰 Alternatives ⚡️ Moved and merged to /about/alternatives as advanced materials [Architecture approaches alternatives](/th/docs/about/alternatives.md) [**old**:](/th/docs/about/alternatives.md) [/docs/about/alternatives/big-ball-of-mud; /docs/about/alternatives/design-principles; /docs/about/alternatives/ddd; /docs/about/alternatives/clean-architecture; /docs/about/alternatives/frameworks; /docs/about/alternatives/atomic-design; /docs/about/alternatives/smart-dumb-components; /docs/about/alternatives/feature-driven](/th/docs/about/alternatives.md) [**new**: ](/th/docs/about/alternatives.md) [/docs/about/alternatives](/th/docs/about/alternatives.md) ### 🍰 Promote & Understanding ⚡️ Moved to /about as advanced materials [Knowledge types](/th/docs/about/understanding/knowledge-types.md) [**old**:](/th/docs/about/understanding/knowledge-types.md) [/docs/reference/knowledge-types](/th/docs/about/understanding/knowledge-types.md) [**new**: ](/th/docs/about/understanding/knowledge-types.md) [/docs/about/understanding/knowledge-types](/th/docs/about/understanding/knowledge-types.md) [Needs driven](/th/docs/about/understanding/needs-driven.md) [**old**:](/th/docs/about/understanding/needs-driven.md) [/docs/concepts/needs-driven](/th/docs/about/understanding/needs-driven.md) [**new**: ](/th/docs/about/understanding/needs-driven.md) [/docs/about/understanding/needs-driven](/th/docs/about/understanding/needs-driven.md) [About architecture](/th/docs/about/understanding/architecture.md) [**old**:](/th/docs/about/understanding/architecture.md) [/docs/concepts/architecture](/th/docs/about/understanding/architecture.md) [**new**: ](/th/docs/about/understanding/architecture.md) [/docs/about/understanding/architecture](/th/docs/about/understanding/architecture.md) [Naming adaptability](/th/docs/about/understanding/naming.md) [**old**:](/th/docs/about/understanding/naming.md) [/docs/concepts/naming-adaptability](/th/docs/about/understanding/naming.md) [**new**: ](/th/docs/about/understanding/naming.md) [/docs/about/understanding/naming](/th/docs/about/understanding/naming.md) [Signals of architecture](/th/docs/about/understanding/signals.md) [**old**:](/th/docs/about/understanding/signals.md) [/docs/concepts/signals](/th/docs/about/understanding/signals.md) [**new**: ](/th/docs/about/understanding/signals.md) [/docs/about/understanding/signals](/th/docs/about/understanding/signals.md) [Abstractions of architecture](/th/docs/about/understanding/abstractions.md) [**old**:](/th/docs/about/understanding/abstractions.md) [/docs/concepts/abstractions](/th/docs/about/understanding/abstractions.md) [**new**: ](/th/docs/about/understanding/abstractions.md) [/docs/about/understanding/abstractions](/th/docs/about/understanding/abstractions.md) ### 📚 Reference guidelines (isolation & units) ⚡️ Moved to /reference as theoretical materials (old concepts) [Decouple of entities](/th/docs/reference/layers.md#import-rule-on-layers) [**old**:](/th/docs/reference/layers.md#import-rule-on-layers) [/docs/concepts/decouple-entities](/th/docs/reference/layers.md#import-rule-on-layers) [**new**: ](/th/docs/reference/layers.md#import-rule-on-layers) [/docs/reference/layers#import-rule-on-layers](/th/docs/reference/layers.md#import-rule-on-layers) [Low Coupling & High Cohesion](/th/docs/reference/slices-segments.md#zero-coupling-high-cohesion) [**old**:](/th/docs/reference/slices-segments.md#zero-coupling-high-cohesion) [/docs/concepts/low-coupling](/th/docs/reference/slices-segments.md#zero-coupling-high-cohesion) [**new**: ](/th/docs/reference/slices-segments.md#zero-coupling-high-cohesion) [/docs/reference/slices-segments#zero-coupling-high-cohesion](/th/docs/reference/slices-segments.md#zero-coupling-high-cohesion) [Cross-communication](/th/docs/reference/layers.md#import-rule-on-layers) [**old**:](/th/docs/reference/layers.md#import-rule-on-layers) [/docs/concepts/cross-communication](/th/docs/reference/layers.md#import-rule-on-layers) [**new**: ](/th/docs/reference/layers.md#import-rule-on-layers) [/docs/reference/layers#import-rule-on-layers](/th/docs/reference/layers.md#import-rule-on-layers) [App splitting](/th/docs/reference/layers.md) [**old**:](/th/docs/reference/layers.md) [/docs/concepts/app-splitting](/th/docs/reference/layers.md) [**new**: ](/th/docs/reference/layers.md) [/docs/reference/layers](/th/docs/reference/layers.md) [Decomposition](/th/docs/reference/layers.md) [**old**:](/th/docs/reference/layers.md) [/docs/reference/units/decomposition](/th/docs/reference/layers.md) [**new**: ](/th/docs/reference/layers.md) [/docs/reference/layers](/th/docs/reference/layers.md) [Units](/th/docs/reference/layers.md) [**old**:](/th/docs/reference/layers.md) [/docs/reference/units](/th/docs/reference/layers.md) [**new**: ](/th/docs/reference/layers.md) [/docs/reference/layers](/th/docs/reference/layers.md) [Layers](/th/docs/reference/layers.md) [**old**:](/th/docs/reference/layers.md) [/docs/reference/units/layers](/th/docs/reference/layers.md) [**new**: ](/th/docs/reference/layers.md) [/docs/reference/layers](/th/docs/reference/layers.md) [Layer overview](/th/docs/reference/layers.md) [**old**:](/th/docs/reference/layers.md) [/docs/reference/layers/overview](/th/docs/reference/layers.md) [**new**: ](/th/docs/reference/layers.md) [/docs/reference/layers](/th/docs/reference/layers.md) [App layer](/th/docs/reference/layers.md) [**old**:](/th/docs/reference/layers.md) [/docs/reference/units/layers/app](/th/docs/reference/layers.md) [**new**: ](/th/docs/reference/layers.md) [/docs/reference/layers](/th/docs/reference/layers.md) [Processes layer](/th/docs/reference/layers.md) [**old**:](/th/docs/reference/layers.md) [/docs/reference/units/layers/processes](/th/docs/reference/layers.md) [**new**: ](/th/docs/reference/layers.md) [/docs/reference/layers](/th/docs/reference/layers.md) [Pages layer](/th/docs/reference/layers.md) [**old**:](/th/docs/reference/layers.md) [/docs/reference/units/layers/pages](/th/docs/reference/layers.md) [**new**: ](/th/docs/reference/layers.md) [/docs/reference/layers](/th/docs/reference/layers.md) [Widgets layer](/th/docs/reference/layers.md) [**old**:](/th/docs/reference/layers.md) [/docs/reference/units/layers/widgets](/th/docs/reference/layers.md) [**new**: ](/th/docs/reference/layers.md) [/docs/reference/layers](/th/docs/reference/layers.md) [Widgets layer](/th/docs/reference/layers.md) [**old**:](/th/docs/reference/layers.md) [/docs/reference/layers/widgets](/th/docs/reference/layers.md) [**new**: ](/th/docs/reference/layers.md) [/docs/reference/layers](/th/docs/reference/layers.md) [Features layer](/th/docs/reference/layers.md) [**old**:](/th/docs/reference/layers.md) [/docs/reference/units/layers/features](/th/docs/reference/layers.md) [**new**: ](/th/docs/reference/layers.md) [/docs/reference/layers](/th/docs/reference/layers.md) [Entities layer](/th/docs/reference/layers.md) [**old**:](/th/docs/reference/layers.md) [/docs/reference/units/layers/entities](/th/docs/reference/layers.md) [**new**: ](/th/docs/reference/layers.md) [/docs/reference/layers](/th/docs/reference/layers.md) [Shared layer](/th/docs/reference/layers.md) [**old**:](/th/docs/reference/layers.md) [/docs/reference/units/layers/shared](/th/docs/reference/layers.md) [**new**: ](/th/docs/reference/layers.md) [/docs/reference/layers](/th/docs/reference/layers.md) [Segments](/th/docs/reference/slices-segments.md) [**old**:](/th/docs/reference/slices-segments.md) [/docs/reference/units/segments](/th/docs/reference/slices-segments.md) [**new**: ](/th/docs/reference/slices-segments.md) [/docs/reference/slices-segments](/th/docs/reference/slices-segments.md) ### 🎯 Bad Practices handbook ⚡️ Moved to /guides as practice materials [Cross-imports](/th/docs/guides/issues/cross-imports.md) [**old**:](/th/docs/guides/issues/cross-imports.md) [/docs/concepts/issues/cross-imports](/th/docs/guides/issues/cross-imports.md) [**new**: ](/th/docs/guides/issues/cross-imports.md) [/docs/guides/issues/cross-imports](/th/docs/guides/issues/cross-imports.md) [Desegmented](/th/docs/guides/issues/desegmented.md) [**old**:](/th/docs/guides/issues/desegmented.md) [/docs/concepts/issues/desegmented](/th/docs/guides/issues/desegmented.md) [**new**: ](/th/docs/guides/issues/desegmented.md) [/docs/guides/issues/desegmented](/th/docs/guides/issues/desegmented.md) [Routes](/th/docs/guides/issues/routes.md) [**old**:](/th/docs/guides/issues/routes.md) [/docs/concepts/issues/routes](/th/docs/guides/issues/routes.md) [**new**: ](/th/docs/guides/issues/routes.md) [/docs/guides/issues/routes](/th/docs/guides/issues/routes.md) ### 🎯 Examples ⚡️ Grouped and simplified into /guides/examples as practical examples [Viewer logic](/th/docs/guides/examples/auth.md) [**old**:](/th/docs/guides/examples/auth.md) [/docs/guides/examples/viewer](/th/docs/guides/examples/auth.md) [**new**: ](/th/docs/guides/examples/auth.md) [/docs/guides/examples/auth](/th/docs/guides/examples/auth.md) [Monorepo](/th/docs/guides/examples/monorepo.md) [**old**:](/th/docs/guides/examples/monorepo.md) [/docs/guides/monorepo](/th/docs/guides/examples/monorepo.md) [**new**: ](/th/docs/guides/examples/monorepo.md) [/docs/guides/examples/monorepo](/th/docs/guides/examples/monorepo.md) [White Labels](/th/docs/guides/examples/white-labels.md) [**old**:](/th/docs/guides/examples/white-labels.md) [/docs/guides/white-labels](/th/docs/guides/examples/white-labels.md) [**new**: ](/th/docs/guides/examples/white-labels.md) [/docs/guides/examples/white-labels](/th/docs/guides/examples/white-labels.md) ### 🎯 Migration ⚡️ Grouped and simplified into /guides/migration as migration guidelines [Migration from V1](/th/docs/guides/migration/from-v1.md) [**old**:](/th/docs/guides/migration/from-v1.md) [/docs/guides/migration-from-v1](/th/docs/guides/migration/from-v1.md) [**new**: ](/th/docs/guides/migration/from-v1.md) [/docs/guides/migration/from-v1](/th/docs/guides/migration/from-v1.md) [Migration from Legacy](/th/docs/guides/migration/from-custom.md) [**old**:](/th/docs/guides/migration/from-custom.md) [/docs/guides/migration-from-legacy](/th/docs/guides/migration/from-custom.md) [**new**: ](/th/docs/guides/migration/from-custom.md) [/docs/guides/migration/from-custom](/th/docs/guides/migration/from-custom.md) ### 🎯 Tech ⚡️ Grouped into /guides/tech as tech-specific usage guidelines [Usage with NextJS](/th/docs/guides/tech/with-nextjs.md) [**old**:](/th/docs/guides/tech/with-nextjs.md) [/docs/guides/usage-with-nextjs](/th/docs/guides/tech/with-nextjs.md) [**new**: ](/th/docs/guides/tech/with-nextjs.md) [/docs/guides/tech/with-nextjs](/th/docs/guides/tech/with-nextjs.md) ### Rename 'legacy' to 'custom' ⚡️ 'Legacy' is derogatory, we don't get to call people's projects legacy [Rename 'legacy' to custom](/th/docs/guides/migration/from-custom.md) [**old**:](/th/docs/guides/migration/from-custom.md) [/docs/guides/migration/from-legacy](/th/docs/guides/migration/from-custom.md) [**new**: ](/th/docs/guides/migration/from-custom.md) [/docs/guides/migration/from-custom](/th/docs/guides/migration/from-custom.md) ### Deduplication of Reference ⚡️ Cleaned up the Reference section and deduplicated the material [Isolation of modules](/th/docs/reference/layers.md#import-rule-on-layers) [**old**:](/th/docs/reference/layers.md#import-rule-on-layers) [/docs/reference/isolation](/th/docs/reference/layers.md#import-rule-on-layers) [**new**: ](/th/docs/reference/layers.md#import-rule-on-layers) [/docs/reference/layers#import-rule-on-layers](/th/docs/reference/layers.md#import-rule-on-layers) --- # เวอร์ชันของ Feature-Sliced Design ### Feature-Sliced Design v2.1 (Current) สามารถดูเอกสารสำหรับเวอร์ชันปัจจุบันที่เผยแพร่อยู่ได้ที่นี่ | v2.1 | [Release Notes](https://github.com/feature-sliced/documentation/releases/tag/v2.1) | [Documentation](/th/docs/get-started/overview.md) | [Migration from v1](/th/docs/guides/migration/from-v1.md) | [Migration from v2.0](/th/docs/guides/migration/from-v1.md) | | ---- | ---------------------------------------------------------------------------------- | ------------------------------------------------- | --------------------------------------------------------- | ----------------------------------------------------------- | ### Feature Slices v1 (Legacy) สามารถดูเอกสารสำหรับเวอร์ชันเก่าของ feature-slices ได้ที่นี่ | v1.0 | [Documentation](https://feature-sliced.github.io/featureslices.dev/v1.0.html) | | ---- | ----------------------------------------------------------------------------- | | v0.1 | [Documentation](https://feature-sliced.github.io/featureslices.dev/v0.1.html) | ### Feature Driven (Legacy) สามารถดูเอกสารสำหรับเวอร์ชันเก่าของ feature-driven ได้ที่นี่ | v0.1 | [Documentation](https://github.com/feature-sliced/documentation/tree/rc/feature-driven) | | ------------- | --------------------------------------------------------------------------------------- | | Example (kof) | [Github](https://github.com/kof/feature-driven-architecture) | --- # 💫 Community Community resources, additional materials ## Main[​](#main "ลิงก์ตรงไปยังหัวข้อ") [Awesome Resources](https://github.com/feature-sliced/awesome) [A curated list of awesome FSD videos, articles, packages](https://github.com/feature-sliced/awesome) [Team](/th/community/team.md) [Core-team, Champions, Contributors, Companies](/th/community/team.md) [Brandbook](/th/docs/branding.md) [Recommendations for FSD's branding usage](/th/docs/branding.md) [Contributing](#) [HowTo, Workflow, Support](#) --- # Team WIP บทความนี้อยู่ระหว่างการเขียน หากต้องการให้บทความนี้เสร็จเร็วขึ้น คุณสามารถ: * 📢 แบ่งปันความคิดเห็นของคุณ [ที่บทความ (คอมเมนต์/รีแอกชัน)](https://github.com/feature-sliced/documentation/issues/192) * 💬 รวบรวมเนื้อหา [ที่เกี่ยวข้องจากแชท](https://t.me/feature_sliced) * ⚒️ ร่วมสนับสนุน [ในรูปแบบอื่นๆ](https://github.com/feature-sliced/documentation/blob/master/CONTRIBUTING.md)
*🍰 Stay tuned!* ## Core-team[​](#core-team "ลิงก์ตรงไปยังหัวข้อ") ### Champions[​](#champions "ลิงก์ตรงไปยังหัวข้อ") ## Contributors[​](#contributors "ลิงก์ตรงไปยังหัวข้อ") ## Companies[​](#companies "ลิงก์ตรงไปยังหัวข้อ") --- # ทางเลือกอื่นๆ WIP บทความนี้อยู่ระหว่างการเขียน หากต้องการให้บทความนี้เสร็จเร็วขึ้น คุณสามารถ: * 📢 แบ่งปันความคิดเห็นของคุณ [ที่บทความ (คอมเมนต์/รีแอกชัน)](https://github.com/feature-sliced/documentation/issues/62) * 💬 รวบรวมเนื้อหา [ที่เกี่ยวข้องจากแชท](https://t.me/feature_sliced) * ⚒️ ร่วมสนับสนุน [ในรูปแบบอื่นๆ](https://github.com/feature-sliced/documentation/blob/master/CONTRIBUTING.md)
*🍰 Stay tuned!* ประวัติความเป็นมาของแนวทางการออกแบบสถาปัตยกรรม (Architecture Approaches) ## Big Ball of Mud[​](#big-ball-of-mud "ลิงก์ตรงไปยังหัวข้อ") WIP บทความนี้อยู่ระหว่างการเขียน หากต้องการให้บทความนี้เสร็จเร็วขึ้น คุณสามารถ: * 📢 แบ่งปันความคิดเห็นของคุณ [ที่บทความ (คอมเมนต์/รีแอกชัน)](https://github.com/feature-sliced/documentation/issues/258) * 💬 รวบรวมเนื้อหา [ที่เกี่ยวข้องจากแชท](https://t.me/feature_sliced) * ⚒️ ร่วมสนับสนุน [ในรูปแบบอื่นๆ](https://github.com/feature-sliced/documentation/blob/master/CONTRIBUTING.md)
*🍰 Stay tuned!* > มันคืออะไร? ทำไมถึงพบบ่อย? เมื่อไหร่ที่เริ่มสร้างปัญหา? จะทำอย่างไรและ FSD ช่วยเรื่องนี้ได้อย่างไร? * [(Article) Oleg Isonen - Last words on UI architecture before an AI takes over](https://oleg008.medium.com/last-words-on-ui-architecture-before-an-ai-takes-over-468c78f18f0d) * [(Report) Julia Nikolaeva, iSpring - Big Ball of Mud and other problems of the monolith, we have handled](http://youtu.be/gna4Ynz1YNI) * [(Article) DD - Big Ball of mud](https://thedomaindrivendesign.io/big-ball-of-mud/) ## Smart & Dumb components[​](#smart--dumb-components "ลิงก์ตรงไปยังหัวข้อ") WIP บทความนี้อยู่ระหว่างการเขียน หากต้องการให้บทความนี้เสร็จเร็วขึ้น คุณสามารถ: * 📢 แบ่งปันความคิดเห็นของคุณ [ที่บทความ (คอมเมนต์/รีแอกชัน)](https://github.com/feature-sliced/documentation/issues/214) * 💬 รวบรวมเนื้อหา [ที่เกี่ยวข้องจากแชท](https://t.me/feature_sliced) * ⚒️ ร่วมสนับสนุน [ในรูปแบบอื่นๆ](https://github.com/feature-sliced/documentation/blob/master/CONTRIBUTING.md)
*🍰 Stay tuned!* > เกี่ยวกับแนวทางนี้ ความสามารถในการนำไปใช้ในฝั่ง Frontend และจุดยืนของระเบียบวิธี (Methodology) เกี่ยวกับความล้าสมัย และมุมมองใหม่จากระเบียบวิธีนี้ ทำไมแนวทาง component-containers ถึงไม่ค่อยเวิร์ค? * [(Article) Den Abramov-Presentation and Container Components (TLDR: deprecated)](https://medium.com/@dan_abramov/smart-and-dumb-components-7ca2f9a7c7d0) ## หลักการออกแบบ (Design Principles)[​](#หลักการออกแบบ-design-principles "ลิงก์ตรงไปยังหัวข้อ") WIP บทความนี้อยู่ระหว่างการเขียน หากต้องการให้บทความนี้เสร็จเร็วขึ้น คุณสามารถ: * 📢 แบ่งปันความคิดเห็นของคุณ [ที่บทความ (คอมเมนต์/รีแอกชัน)](https://github.com/feature-sliced/documentation/issues/59) * 💬 รวบรวมเนื้อหา [ที่เกี่ยวข้องจากแชท](https://t.me/feature_sliced) * ⚒️ ร่วมสนับสนุน [ในรูปแบบอื่นๆ](https://github.com/feature-sliced/documentation/blob/master/CONTRIBUTING.md)
*🍰 Stay tuned!* > เรากำลังพูดถึงเรื่องอะไร และจุดยืนของ FSD SOLID, GRASP, KISS, YAGNI, ... - และทำไมหลักการพวกนี้ถึงทำงานร่วมกันได้ไม่ค่อยดีในทางปฏิบัติ และระเบียบวิธีนี้รวบรวมแนวปฏิบัติเหล่านี้ไว้ด้วยกันได้อย่างไร * [(Talk) Ilya Azin - Feature-Sliced Design (fragment about Design Principles)](https://youtu.be/SnzPAr_FJ7w?t=380) ## DDD[​](#ddd "ลิงก์ตรงไปยังหัวข้อ") WIP บทความนี้อยู่ระหว่างการเขียน หากต้องการให้บทความนี้เสร็จเร็วขึ้น คุณสามารถ: * 📢 แบ่งปันความคิดเห็นของคุณ [ที่บทความ (คอมเมนต์/รีแอกชัน)](https://github.com/feature-sliced/documentation/issues/1) * 💬 รวบรวมเนื้อหา [ที่เกี่ยวข้องจากแชท](https://t.me/feature_sliced) * ⚒️ ร่วมสนับสนุน [ในรูปแบบอื่นๆ](https://github.com/feature-sliced/documentation/blob/master/CONTRIBUTING.md)
*🍰 Stay tuned!* > เกี่ยวกับแนวทางนี้ และทำไมถึงใช้งานจริงได้ยาก ข้อแตกต่างคืออะไร มันช่วยปรับปรุงการนำไปใช้ได้อย่างไร และรับแนวปฏิบัติส่วนไหนมาใช้บ้าง * [(Article) DDD, Hexagonal, Onion, Clean, CQRS, ... How I put it all together](https://herbertograca.com/2017/11/16/explicit-architecture-01-ddd-hexagonal-onion-clean-cqrs-how-i-put-it-all-together/) * [(Talk) Ilya Azin - Feature-Sliced Design (fragment about Clean Architecture, DDD)](https://youtu.be/SnzPAr_FJ7w?t=528) ## Clean Architecture[​](#clean-architecture "ลิงก์ตรงไปยังหัวข้อ") WIP บทความนี้อยู่ระหว่างการเขียน หากต้องการให้บทความนี้เสร็จเร็วขึ้น คุณสามารถ: * 📢 แบ่งปันความคิดเห็นของคุณ [ที่บทความ (คอมเมนต์/รีแอกชัน)](https://github.com/feature-sliced/documentation/issues/165) * 💬 รวบรวมเนื้อหา [ที่เกี่ยวข้องจากแชท](https://t.me/feature_sliced) * ⚒️ ร่วมสนับสนุน [ในรูปแบบอื่นๆ](https://github.com/feature-sliced/documentation/blob/master/CONTRIBUTING.md)
*🍰 Stay tuned!* > เกี่ยวกับแนวทางนี้ ความสามารถในการนำไปใช้ในฝั่ง Frontend และจุดยืนของ FSD มีความคล้ายคลึงกันอย่างไร (ในหลายๆ จุด) และแตกต่างกันอย่างไร * [(Thread) About use-case/interactor in the methodology](https://t.me/feature_sliced/3897) * [(Thread) About DI in the methodology](https://t.me/feature_sliced/4592) * [(Article) Alex Bespoyasov - Clean Architecture on frontend](https://bespoyasov.me/blog/clean-architecture-on-frontend/) * [(Article) DDD, Hexagonal, Onion, Clean, CQRS, ... How I put it all together](https://herbertograca.com/2017/11/16/explicit-architecture-01-ddd-hexagonal-onion-clean-cqrs-how-i-put-it-all-together/) * [(Talk) Ilya Azin - Feature-Sliced Design (fragment about Clean Architecture, DDD)](https://youtu.be/SnzPAr_FJ7w?t=528) * [(Article) Misconceptions of Clean Architecture](http://habr.com/ru/company/mobileup/blog/335382/) ## เฟรมเวิร์ก (Frameworks)[​](#เฟรมเวิร์ก-frameworks "ลิงก์ตรงไปยังหัวข้อ") WIP บทความนี้อยู่ระหว่างการเขียน หากต้องการให้บทความนี้เสร็จเร็วขึ้น คุณสามารถ: * 📢 แบ่งปันความคิดเห็นของคุณ [ที่บทความ (คอมเมนต์/รีแอกชัน)](https://github.com/feature-sliced/documentation/issues/58) * 💬 รวบรวมเนื้อหา [ที่เกี่ยวข้องจากแชท](https://t.me/feature_sliced) * ⚒️ ร่วมสนับสนุน [ในรูปแบบอื่นๆ](https://github.com/feature-sliced/documentation/blob/master/CONTRIBUTING.md)
*🍰 Stay tuned!* > ความสามารถในการนำไปใช้ในฝั่ง Frontend ทำไมเฟรมเวิร์กถึงแก้ปัญหาไม่ได้ทั้งหมด ทำไมถึงไม่มีแนวทางเดียวที่ใช้ได้กับทุกอย่าง และจุดยืนของ FSD ความเป็น Framework-agnostic (ไม่ยึดติดกับเฟรมเวิร์ก) และแนวทางแบบ Conventional * [(Article) About the reasons for creating the methodology (fragment about frameworks)](/th/docs/about/motivation.md) * [(Thread) About the applicability of the methodology for different frameworks](https://t.me/feature_sliced/3867) ## Atomic Design[​](#atomic-design "ลิงก์ตรงไปยังหัวข้อ") ### มันคืออะไร?[​](#มันคืออะไร "ลิงก์ตรงไปยังหัวข้อ") ใน Atomic Design ขอบเขตความรับผิดชอบจะถูกแบ่งออกเป็นเลเยอร์ที่เป็นมาตรฐาน Atomic Design แบ่งออกเป็น **5 เลเยอร์** (จากบนลงล่าง): 1. `pages` - ฟังก์ชันการทำงานคล้ายกับเลเยอร์ `pages` ใน FSD 2. `templates` - คอมโพเนนต์ที่กำหนดโครงสร้างของหน้าเว็บโดยไม่ยึดติดกับเนื้อหาเฉพาะเจาะจง 3. `organisms` - โมดูลที่ประกอบด้วย molecules และมี Business Logic 4. `molecules` - คอมโพเนนต์ที่ซับซ้อนขึ้น ซึ่งปกติจะไม่มี Business Logic 5. `atoms` - UI คอมโพเนนต์พื้นฐานที่ไม่มี Business Logic โมดูลในเลเยอร์หนึ่งจะโต้ตอบกับโมดูลในเลเยอร์ที่ต่ำกว่าเท่านั้น ซึ่งคล้ายกับ FSD นั่นคือ molecules สร้างจาก atoms, organisms สร้างจาก molecules, templates สร้างจาก organisms และ pages สร้างจาก templates Atomic Design ยังเน้นการใช้ Public API ภายในโมดูลเพื่อการแยกส่วน (Isolation) ด้วย ### การนำไปใช้กับ Frontend[​](#การนำไปใช้กับ-frontend "ลิงก์ตรงไปยังหัวข้อ") Atomic Design ค่อนข้างแพร่หลายในโปรเจกต์ต่างๆ แต่มักจะเป็นที่นิยมในหมู่นักออกแบบเว็บมากกว่านักพัฒนา นักออกแบบเว็บมักใช้ Atomic Design เพื่อสร้างดีไซน์ที่สเกลได้และดูแลง่าย ในส่วนของการพัฒนา Atomic Design มักจะถูกนำมาผสมผสานกับระเบียบวิธีทางสถาปัตยกรรมอื่นๆ อย่างไรก็ตาม เนื่องจาก Atomic Design เน้นไปที่ UI คอมโพเนนต์และการประกอบกันของคอมโพเนนต์เหล่านั้น ปัญหาจึงเกิดขึ้นเมื่อต้อง implement Business Logic เข้าไปในสถาปัตยกรรม ปัญหาคือ Atomic Design ไม่ได้กำหนดระดับความรับผิดชอบของ Business Logic ไว้อย่างชัดเจน ทำให้ Logic กระจายไปตามคอมโพเนนต์และเลเวลต่างๆ ซึ่งทำให้การดูแลรักษาและการทดสอบทำได้ยาก Business Logic จะเริ่มเบลอๆ ไม่ชัดเจน ทำให้แยกความรับผิดชอบได้ยาก และทำให้ โค้ดมีความเป็นโมดูล (Modular) และนำกลับมาใช้ใหม่ (Reusable) ได้น้อยลง ### มันเกี่ยวข้องกับ FSD อย่างไร?[​](#มันเกี่ยวข้องกับ-fsd-อย่างไร "ลิงก์ตรงไปยังหัวข้อ") ในบริบทของ FSD องค์ประกอบบางอย่างของ Atomic Design สามารถนำมาใช้สร้าง UI คอมโพเนนต์ที่ยืดหยุ่นและสเกลได้ เลเยอร์ `atoms` และ `molecules` สามารถ implement ได้ใน `shared/ui` ของ FSD ซึ่งช่วยให้การนำกลับมาใช้ใหม่และ การดูแลรักษา UI element พื้นฐานง่ายขึ้น ``` ├── shared │ ├── ui │ │ ├── atoms │ │ ├── molecules │ ... ``` การเปรียบเทียบระหว่าง FSD และ Atomic Design แสดงให้เห็นว่าทั้งสองระเบียบวิธีต่างมุ่งเน้นความเป็นโมดูล (Modularity) และการนำกลับมาใช้ใหม่ (Reusability) แต่เน้นคนละด้าน Atomic Design เน้นไปที่ visual components และการประกอบกัน ส่วน FSD เน้นไปที่การแบ่งฟังก์ชันการทำงานของแอปพลิเคชันออกเป็นโมดูลอิสระและการเชื่อมต่อระหว่างโมดูลเหล่านั้น * [Atomic Design Methodology](https://atomicdesign.bradfrost.com/table-of-contents/) * [(Thread) About applicability in shared / ui](https://t.me/feature_sliced/1653) * [(Video) Briefly about Atomic Design](https://youtu.be/Yi-A20x2dcA) * [(Talk) Ilya Azin - Feature-Sliced Design (fragment about Atomic Design)](https://youtu.be/SnzPAr_FJ7w?t=587) ## Feature Driven[​](#feature-driven "ลิงก์ตรงไปยังหัวข้อ") WIP บทความนี้อยู่ระหว่างการเขียน หากต้องการให้บทความนี้เสร็จเร็วขึ้น คุณสามารถ: * 📢 แบ่งปันความคิดเห็นของคุณ [ที่บทความ (คอมเมนต์/รีแอกชัน)](https://github.com/feature-sliced/documentation/issues/219) * 💬 รวบรวมเนื้อหา [ที่เกี่ยวข้องจากแชท](https://t.me/feature_sliced) * ⚒️ ร่วมสนับสนุน [ในรูปแบบอื่นๆ](https://github.com/feature-sliced/documentation/blob/master/CONTRIBUTING.md)
*🍰 Stay tuned!* > เกี่ยวกับแนวทางนี้ ความสามารถในการนำไปใช้ในฝั่ง Frontend และจุดยืนของ FSD ความเข้ากันได้ ประวัติการพัฒนา และการเปรียบเทียบ * [(Talk) Oleg Isonen - Feature Driven Architecture](https://youtu.be/BWAeYuWFHhs) * [Feature Driven-Short specification (from the point of view of FSD)](https://github.com/feature-sliced/documentation/tree/rc/feature-driven) --- # พันธกิจ (Mission) ในส่วนนี้เราจะอธิบายเป้าหมายและข้อจำกัดในการนำระเบียบวิธีนี้ไปใช้ ซึ่งเป็นสิ่งที่เรายึดถือในการพัฒนาระเบียบวิธีนี้ * เรามองว่าเป้าหมายของเราคือความสมดุลระหว่างอุดมการณ์และความเรียบง่าย * เราไม่สามารถสร้าง "กระสุนเงิน" (Silver Bullet) ที่ตอบโจทย์ทุกคนได้ **แต่อย่างไรก็ตาม ระเบียบวิธีนี้ควรจะเข้าถึงได้ง่ายและเป็นประโยชน์สำหรับนักพัฒนากลุ่มกว้าง** ## เป้าหมาย[​](#เป้าหมาย "ลิงก์ตรงไปยังหัวข้อ") ### ความชัดเจนที่เข้าใจง่ายสำหรับนักพัฒนากลุ่มกว้าง[​](#ความชัดเจนที่เข้าใจง่ายสำหรับนักพัฒนากลุ่มกว้าง "ลิงก์ตรงไปยังหัวข้อ") ระเบียบวิธีควรจะเข้าถึงได้ง่าย สำหรับคนส่วนใหญ่ในทีมโปรเจกต์ *เพราะถึงจะมีเครื่องมือล้ำยุคแค่ไหน ก็คงไม่พอ ถ้ามีแค่ระดับ Senior/Lead เท่านั้นที่เข้าใจระเบียบวิธีนี้* ### การแก้ปัญหาในชีวิตประจำวัน[​](#การแก้ปัญหาในชีวิตประจำวัน "ลิงก์ตรงไปยังหัวข้อ") ระเบียบวิธีควรจะระบุเหตุผลและวิธีแก้ปัญหาที่เราเจอกันทุกวันในการพัฒนาโปรเจกต์ **และยังต้องมีเครื่องมือสนับสนุน (CLI, Linters) มาช่วยด้วย** เพื่อให้นักพัฒนาสามารถใช้แนวทางที่ *ผ่านการทดสอบในสนามจริง (Battle-tested)* ซึ่งช่วยให้ก้าวข้ามปัญหาเดิมๆ เรื่องสถาปัตยกรรมและการพัฒนาไปได้ > *@sergeysova: ลองจินตนาการว่านักพัฒนาเขียนโค้ดตามกรอบของระเบียบวิธีนี้ แล้วเจอปัญหาน้อยลง 10 เท่า เพียงเพราะมีคนอื่นช่วยคิดวิธีแก้ปัญหาหลายๆ อย่างมาให้แล้ว* ## ข้อจำกัด[​](#ข้อจำกัด "ลิงก์ตรงไปยังหัวข้อ") เราไม่อยาก *ยัดเยียดมุมมองของเรา* และในขณะเดียวกันเราก็เข้าใจว่า *นิสัยหลายอย่างของเราในฐานะนักพัฒนา มักจะเป็นอุปสรรคในแต่ละวัน* ทุกคนมีระดับประสบการณ์ในการออกแบบและพัฒนาระบบที่ต่างกัน **ดังนั้น จึงควรทำความเข้าใจเรื่องต่อไปนี้:** * **สิ่งที่จะไม่เกิดขึ้น**: ง่ายมากๆ, ชัดเจนสุดๆ, เหมาะสำหรับทุกคน > *@sergeysova: คอนเซปต์บางอย่างไม่สามารถเข้าใจได้โดยสัญชาตญาณ จนกว่าคุณจะเจอปัญหาและใช้เวลาเป็นปีๆ ในการแก้มัน* > > * *ในโลกคณิตศาสตร์: ทฤษฎีกราฟ* > * *ในฟิสิกส์: กลศาสตร์ควอนตัม* > * *ในการเขียนโปรแกรม: สถาปัตยกรรมแอปพลิเคชัน* * **สิ่งที่เป็นไปได้และควรจะเป็น**: ความเรียบง่าย, ความสามารถในการขยาย (Extensibility) ## ดูเพิ่มเติม[​](#ดูเพิ่มเติม "ลิงก์ตรงไปยังหัวข้อ") * [ปัญหาด้านสถาปัตยกรรม](/th/docs/about/understanding/architecture.md#problems) --- # แรงบันดาลใจ (Motivation) ไอเดียหลักของ **Feature-Sliced Design** คือการอำนวยความสะดวกและลดต้นทุนในการพัฒนาโปรเจกต์ที่ซับซ้อน โดยอิงจาก [การรวบรวมผลการวิจัยและการหารือประสบการณ์จากนักพัฒนาที่หลากหลาย](https://github.com/feature-sliced/documentation/discussions) ชัดเจนว่านี่ไม่ใช่ "กระสุนเงิน" (Silver Bullet) และแน่นอนว่าระเบียบวิธีนี้ก็มี [ขอบเขตการใช้งาน](/th/docs/about/mission.md) ของมันเอง อย่างไรก็ตาม ก็ยังมีคำถามที่สมเหตุสมผลเกี่ยวกับ *ความเป็นไปได้ของระเบียบวิธีนี้โดยรวม* note มีรายละเอียดเพิ่มเติมที่ [พูดคุยกันในการอภิปราย](https://github.com/feature-sliced/documentation/discussions/27) ## ทำไมโซลูชันที่มีอยู่ถึงยังไม่พอ?[​](#ทำไมโซลูชันที่มีอยู่ถึงยังไม่พอ "ลิงก์ตรงไปยังหัวข้อ") > ปกติมักจะมีข้อโต้แย้งเหล่านี้: > > * *"ทำไมต้องมี Methodology ใหม่ด้วย ในเมื่อเรามีแนวทางและหลักการออกแบบที่มีมานานแล้วอย่าง `SOLID`, `KISS`, `YAGNI`, `DDD`, `GRASP`, `DRY` ฯลฯ"* > * *"ปัญหาทุกอย่างแก้ได้ด้วยเอกสารโปรเจกต์ที่ดี การทดสอบ และกระบวนการที่เป็นระบบ"* > * *"ปัญหาคงไม่เกิดถ้านักพัฒนาทุกคนทำตามข้อข้างบนทั้งหมด"* > * *"ทุกอย่างถูกคิดค้นมาก่อนคุณแล้ว คุณแค่ใช้มันไม่เป็น"* > * *"ใช้ {ชื่อเฟรมเวิร์ก} สิ - ทุกอย่างถูกกำหนดมาให้คุณแล้ว"* ### แค่หลักการอย่างเดียวไม่พอ[​](#แค่หลักการอย่างเดียวไม่พอ "ลิงก์ตรงไปยังหัวข้อ") **การมีแค่หลักการ (Principles) ไม่เพียงพอที่จะออกแบบสถาปัตยกรรมที่ดี** ไม่ใช่ทุกคนที่จะรู้หลักการทั้งหมด และมีคนน้อยลงไปอีกที่เข้าใจและนำไปประยุกต์ใช้ได้อย่างถูกต้อง *หลักการออกแบบมักจะกว้างเกินไป และไม่ได้ให้คำตอบที่เจาะจงสำหรับคำถามที่ว่า: "จะออกแบบโครงสร้างและสถาปัตยกรรมของแอปพลิเคชันที่ยืดหยุ่นและสเกลได้ยังไง?"* ### กระบวนการไม่ได้ได้ผลเสมอไป[​](#กระบวนการไม่ได้ได้ผลเสมอไป "ลิงก์ตรงไปยังหัวข้อ") *เอกสาร/การทดสอบ/กระบวนการ* แน่นอนว่าเป็นสิ่งที่ดี แต่น่าเสียดาย ที่ถึงแม้จะลงทุนลงแรงไปเยอะ - **มันก็ไม่ได้แก้ปัญหาที่เกิดจากสถาปัตยกรรมและการพาคนใหม่เข้าโปรเจกต์ได้เสมอไป** * เวลาในการเริ่มงานของนักพัฒนาแต่ละคนไม่ได้ลดลงมากนัก เพราะเอกสารมักจะเยอะมาก หรือไม่ก็ไม่อัปเดต * การต้องคอยเช็คตลอดเวลาว่าทุกคนเข้าใจสถาปัตยกรรมตรงกันหรือไม่ ก็ต้องใช้ทรัพยากรเยอะมาก * อย่าลืมเรื่อง Bus-factor ด้วย (ความเสี่ยงเมื่อคนรู้ข้อมูลสำคัญหายไป) ### เฟรมเวิร์กที่มีอยู่นำไปใช้ไม่ได้ทุกที่[​](#เฟรมเวิร์กที่มีอยู่นำไปใช้ไม่ได้ทุกที่ "ลิงก์ตรงไปยังหัวข้อ") * โซลูชันที่มีอยู่มักมีกำแพงการเรียนรู้ที่สูง (High Entry Threshold) ซึ่งทำให้หาคนมาทำงานด้วยยาก * บ่อยครั้งที่การเลือกเทคโนโลยีถูกกำหนดไปแล้วก่อนที่จะเจอปัญหาหนักๆ ในโปรเจกต์ ดังนั้นคุณต้องสามารถ "ทำงานกับสิ่งที่มีอยู่" ได้ - **โดยไม่ยึดติดกับเทคโนโลยี** > Q: *"ในโปรเจกต์ `React/Vue/Redux/Effector/Mobx/{YOUR_TECH}` ของเรา - ฉันจะสร้างโครงสร้างของ Entities และความสัมพันธ์ระหว่างพวกมันให้ดีขึ้นได้ยังไง?"* ### ผลลัพธ์ที่ได้[​](#ผลลัพธ์ที่ได้ "ลิงก์ตรงไปยังหัวข้อ") เราจะได้โปรเจกต์ที่ *"มีความเฉพาะตัวสูงเหมือนเกล็ดหิมะ"* ซึ่งแต่ละโปรเจกต์ต้องใช้เวลาเรียนรู้นาน และความรู้ที่ได้ก็ยากที่จะเอาไปใช้กับโปรเจกต์อื่น > @sergeysova: *"นี่คือสถานการณ์ที่เป็นอยู่ในวงการ Frontend Development ตอนนี้: Lead แต่ละคนจะคิดค้นสถาปัตยกรรมและโครงสร้างโปรเจกต์ที่แตกต่างกัน โดยที่ยังไม่ชัวร์ว่าโครงสร้างพวกนี้จะผ่านบททดสอบของกาลเวลาหรือไม่ ผลที่ได้คือ มีแค่ 2 คนนอกจากเขาที่พัฒนาโปรเจกต์ต่อได้ และนักพัฒนาใหม่ทุกคนต้องมานั่งเรียนรู้ใหม่หมด"* ## ทำไมนักพัฒนาถึงต้องการ Methodology?[​](#ทำไมนักพัฒนาถึงต้องการ-methodology "ลิงก์ตรงไปยังหัวข้อ") ### โฟกัสที่ Business Features ไม่ใช่ปัญหา Architecture[​](#โฟกัสที่-business-features-ไม่ใช่ปัญหา-architecture "ลิงก์ตรงไปยังหัวข้อ") ระเบียบวิธีนี้ช่วยให้คุณประหยัดทรัพยากรในการออกแบบสถาปัตยกรรมที่สเกลได้และยืดหยุ่น แล้วเอาเวลาไปทุ่มให้กับการพัฒนาฟังก์ชันหลักแทน ในขณะเดียวกัน โซลูชันทางสถาปัตยกรรมก็มีมาตรฐานที่ใช้ได้ข้ามโปรเจกต์ *อีกประเด็นคือ ระเบียบวิธีควรได้รับความไว้วางใจจากคอมมูนิตี้ เพื่อให้นักพัฒนาคนอื่นสามารถทำความคุ้นเคยและพึ่งพามันในการแก้ปัญหาโปรเจกต์ของเขาได้ภายในเวลาที่มี* ### โซลูชันที่พิสูจน์แล้วด้วยประสบการณ์[​](#โซลูชันที่พิสูจน์แล้วด้วยประสบการณ์ "ลิงก์ตรงไปยังหัวข้อ") ระเบียบวิธีนี้ออกแบบมาเพื่อนักพัฒนาที่มองหา *โซลูชันที่ผ่านการพิสูจน์แล้วสำหรับการออกแบบ Business Logic ที่ซับซ้อน* *อย่างไรก็ตาม ระเบียบวิธีนี้โดยรวมคือชุดของ Best-practices และบทความที่พูดถึงปัญหาและเคสต่างๆ ระหว่างการพัฒนา ดังนั้น มันจึงมีประโยชน์สำหรับนักพัฒนาคนอื่นๆ ด้วย ที่ต้องเจอกับปัญหาระหว่างการพัฒนาและการออกแบบ* ### สุขภาพของโปรเจกต์ (Project Health)[​](#สุขภาพของโปรเจกต์-project-health "ลิงก์ตรงไปยังหัวข้อ") ระเบียบวิธีจะช่วยให้ *แก้ปัญหาและติดตามปัญหาของโปรเจกต์ได้ล่วงหน้า โดยไม่ต้องใช้ทรัพยากรจำนวนมหาศาล* **บ่อยครั้งที่ Technical Debt สะสมพอกพูนตามกาลเวลา และความรับผิดชอบในการแก้ไขก็ตกอยู่ที่ทั้ง Lead และทีม** ระเบียบวิธีจะช่วย *เตือน* ถึงปัญหาที่เป็นไปได้ในการสเกลและการพัฒนาโปรเจกต์ล่วงหน้า ## ทำไมธุรกิจถึงต้องการ Methodology?[​](#ทำไมธุรกิจถึงต้องการ-methodology "ลิงก์ตรงไปยังหัวข้อ") ### Onboarding ที่รวดเร็ว[​](#onboarding-ที่รวดเร็ว "ลิงก์ตรงไปยังหัวข้อ") ด้วยระเบียบวิธีนี้ คุณสามารถจ้างคนที่ **คุ้นเคยกับแนวทางนี้อยู่แล้ว และไม่ต้องมาเทรนใหม่** *ผู้คนเริ่มเข้าใจและสร้างประโยชน์ให้โปรเจกต์ได้เร็วขึ้น และมีความมั่นใจเพิ่มขึ้นในการหาคนสำหรับ Iteration ต่อไปของโปรเจกต์* ### โซลูชันที่พิสูจน์แล้วด้วยประสบการณ์[​](#โซลูชันที่พิสูจน์แล้วด้วยประสบการณ์-1 "ลิงก์ตรงไปยังหัวข้อ") ด้วยระเบียบวิธีนี้ ธุรกิจจะได้รับ *โซลูชันสำหรับปัญหาส่วนใหญ่ที่เกิดขึ้นระหว่างการพัฒนาระบบ* เนื่องจากส่วนใหญ่ธุรกิจต้องการเฟรมเวิร์กหรือโซลูชันที่ช่วยแก้ปัญหาส่วนใหญ่ระหว่างการพัฒนาโปรเจกต์ได้ ### การนำไปใช้ในระยะต่างๆ ของโปรเจกต์[​](#การนำไปใช้ในระยะต่างๆ-ของโปรเจกต์ "ลิงก์ตรงไปยังหัวข้อ") ระเบียบวิธีสามารถสร้างประโยชน์ให้โปรเจกต์ *ทั้งในระยะ Support และ Development และรวมถึงระยะ MVP ด้วย* ใช่ สิ่งสำคัญที่สุดสำหรับ MVP คือ *"ฟีเจอร์ ไม่ใช่สถาปัตยกรรมที่วางเผื่ออนาคต"* แต่ถึงแม้จะมีเดดไลน์ที่จำกัด การรู้ Best-practices จากระเบียบวิธี จะช่วยให้คุณ *"เจ็บตัวน้อยที่สุด"* เมื่อออกแบบระบบเวอร์ชัน MVP โดยหาจุดกึ่งกลางที่สมเหตุสมผลได้ (แทนที่จะปั้นฟีเจอร์แบบ "มั่วๆ") *เรื่องการทดสอบก็พูดได้แบบเดียวกัน* ## เมื่อไหร่ที่เราไม่ต้องการ Methodology นี้?[​](#เมื่อไหร่ที่เราไม่ต้องการ-methodology-นี้ "ลิงก์ตรงไปยังหัวข้อ") * ถ้าโปรเจกต์จะมีชีวิตอยู่แค่ช่วงสั้นๆ * ถ้าโปรเจกต์ไม่ต้องการสถาปัตยกรรมที่รองรับการดูแลรักษา (Support) * ถ้าธุรกิจมองไม่เห็นความเชื่อมโยงระหว่าง Codebase และความเร็วในการส่งมอบฟีเจอร์ * ถ้าสิ่งที่สำคัญกว่าสำหรับธุรกิจคือการปิดงานให้เร็วที่สุด โดยไม่มีการซัพพอร์ตต่อ ### ขนาดของธุรกิจ[​](#ขนาดของธุรกิจ "ลิงก์ตรงไปยังหัวข้อ") * **ธุรกิจขนาดเล็ก** - มักต้องการโซลูชันสำเร็จรูปที่เร็วมากๆ เฉพาะเมื่อธุรกิจโตขึ้น (อย่างน้อยก็เกือบขนาดกลาง) เขาถึงจะเข้าใจว่าเพื่อให้ลูกค้าใช้งานต่อเนื่อง จำเป็นต้องใส่ใจเรื่องคุณภาพและความเสถียรของโซลูชันที่พัฒนาด้วย * **ธุรกิจขนาดกลาง** - ปกติจะเข้าใจปัญหาส่วนใหญ่ของการพัฒนา และถึงแม้จะต้อง *"เร่งปั่นฟีเจอร์"* เขาก็ยังจัดสรรเวลาสำหรับการปรับปรุงคุณภาพ การ Refactor และการทดสอบ (และแน่นอน - สถาปัตยกรรมที่ขยายได้) * **ธุรกิจขนาดใหญ่** - ปกติจะมีผู้ใช้งานเยอะ มีพนักงานเยอะ และมีชุดแนวปฏิบัติของตัวเองที่กว้างขวาง และอาจจะมีแนวทางสถาปัตยกรรมของตัวเองด้วย ดังนั้นไอเดียที่จะเอาของคนอื่นมาใช้จึงอาจจะไม่เกิดขึ้นบ่อยนัก ## แผนงาน (Plans)[​](#แผนงาน-plans "ลิงก์ตรงไปยังหัวข้อ") เป้าหมายหลัก [ระบุไว้ที่นี่](/th/docs/about/mission.md#goals) แต่นอกจากนั้น ยังคุ้มค่าที่จะพูดถึงความคาดหวังของเราที่มีต่อระเบียบวิธีนี้ในอนาคต ### การรวมประสบการณ์[​](#การรวมประสบการณ์ "ลิงก์ตรงไปยังหัวข้อ") ตอนนี้เรากำลังพยายามรวมประสบการณ์ที่หลากหลายของ `core-team` และผลลัพธ์คือระเบียบวิธีที่แข็งแกร่งจากการปฏิบัติจริง แน่นอนว่าเราอาจจะได้ Angular 3.0 เป็นผลลัพธ์ แต่มันสำคัญกว่ามากที่จะ **สืบสวนปัญหาที่แท้จริงของการออกแบบสถาปัตยกรรมของระบบที่ซับซ้อน** *และใช่ - เรามีข้อติชมเกี่ยวกับระเบียบวิธีเวอร์ชันปัจจุบัน แต่เราต้องการทำงานร่วมกันเพื่อไปถึงโซลูชันเดียวที่เหมาะสมที่สุด (โดยคำนึงถึงประสบการณ์ของคอมมูนิตี้ด้วย)* ### ชีวิตนอกเหนือจาก Specification[​](#ชีวิตนอกเหนือจาก-specification "ลิงก์ตรงไปยังหัวข้อ") ถ้าทุกอย่างไปได้สวย ระเบียบวิธีจะไม่จำกัดอยู่แค่ Specification และ Toolkit * อาจจะมีรายงาน (Reports) และบทความ (Articles) * อาจจะมี `CODE_MODEs` สำหรับการย้าย (Migration) ไปยังเทคโนโลยีอื่นๆ ของโปรเจกต์ที่เขียนตามระเบียบวิธี * เป็นไปได้ว่าในท้ายที่สุด เราจะสามารถเข้าถึงผู้ดูแล (Maintainers) ของโซลูชันเทคโนโลยีใหญ่ๆ ได้ * *โดยเฉพาะ React เมื่อเทียบกับเฟรมเวิร์กอื่น - นี่คือปัญหาหลัก เพราะมันไม่ได้บอกวิธีแก้ปัญหาบางอย่าง* ## ดูเพิ่มเติม[​](#ดูเพิ่มเติม "ลิงก์ตรงไปยังหัวข้อ") * [(Discussion) Don't need a methodology?](https://github.com/feature-sliced/documentation/discussions/27) * [About the methodology's mission: goals and limitations](/th/docs/about/mission.md) * [Types of knowledge in the project](/th/docs/about/understanding/knowledge-types.md) --- # การผลักดันในบริษัท WIP บทความนี้อยู่ระหว่างการเขียน หากต้องการให้บทความนี้เสร็จเร็วขึ้น คุณสามารถ: * 📢 แบ่งปันความคิดเห็นของคุณ [ที่บทความ (คอมเมนต์/รีแอกชัน)](https://github.com/feature-sliced/documentation/issues/206) * 💬 รวบรวมเนื้อหา [ที่เกี่ยวข้องจากแชท](https://t.me/feature_sliced) * ⚒️ ร่วมสนับสนุน [ในรูปแบบอื่นๆ](https://github.com/feature-sliced/documentation/blob/master/CONTRIBUTING.md)
*🍰 Stay tuned!* ## โปรเจกต์และบริษัทจำเป็นต้องมี Methodology มั้ย?[​](#โปรเจกต์และบริษัทจำเป็นต้องมี-methodology-มั้ย "ลิงก์ตรงไปยังหัวข้อ") > เกี่ยวกับความสมเหตุสมผลในการนำไปใช้ และหน้าที่ความรับผิดชอบ ## จะเสนอ Methodology ให้ธุรกิจยอมรับได้ยังไง?[​](#จะเสนอ-methodology-ให้ธุรกิจยอมรับได้ยังไง "ลิงก์ตรงไปยังหัวข้อ") ## จะเตรียมตัวและหาเหตุผลสนับสนุนแผนการย้ายมาใช้ Methodology นี้ยังไง?[​](#จะเตรียมตัวและหาเหตุผลสนับสนุนแผนการย้ายมาใช้-methodology-นี้ยังไง "ลิงก์ตรงไปยังหัวข้อ") --- # การผลักดันในทีม WIP บทความนี้อยู่ระหว่างการเขียน หากต้องการให้บทความนี้เสร็จเร็วขึ้น คุณสามารถ: * 📢 แบ่งปันความคิดเห็นของคุณ [ที่บทความ (คอมเมนต์/รีแอกชัน)](https://github.com/feature-sliced/documentation/issues/182) * 💬 รวบรวมเนื้อหา [ที่เกี่ยวข้องจากแชท](https://t.me/feature_sliced) * ⚒️ ร่วมสนับสนุน [ในรูปแบบอื่นๆ](https://github.com/feature-sliced/documentation/blob/master/CONTRIBUTING.md)
*🍰 Stay tuned!* * การ Onboard คนใหม่ * แนวทางการพัฒนา Development Guidelines ("จะหาโมดูล N ได้ที่ไหน", ฯลฯ...) * แนวทางใหม่สำหรับการจัดการงาน (Tasks) ## ดูเพิ่มเติม[​](#ดูเพิ่มเติม "ลิงก์ตรงไปยังหัวข้อ") * [(Thread) The simplicity of the old approaches and the importance of mindfulness](https://t.me/feature_sliced/3360) * [(Thread) About the convenience of searching by layers](https://t.me/feature_sliced/1918) --- # มุมมองการ Integration ## สรุป[​](#สรุป "ลิงก์ตรงไปยังหัวข้อ") 5 นาทีแรก (ภาษารัสเซีย): [YouTube video player](https://www.youtube.com/embed/TFA6zRO_Cl0?start=2110) ## นอกจากนี้[​](#นอกจากนี้ "ลิงก์ตรงไปยังหัวข้อ") **ข้อดี**: * [ภาพรวม](/th/docs/get-started/overview.md) * การทำ CodeReview * การ Onboard คนใหม่ **ข้อเสีย:** * ความซับซ้อนทางความคิด (Mental complexity) * กำแพงการเรียนรู้สูง (High entry threshold) * นรกของ Layers ("Layers hell") * ปัญหาทั่วไปของแนวทางแบบ Feature-based --- # การนำไปใช้บางส่วน (Partial Application) WIP บทความนี้อยู่ระหว่างการเขียน หากต้องการให้บทความนี้เสร็จเร็วขึ้น คุณสามารถ: * 📢 แบ่งปันความคิดเห็นของคุณ [ที่บทความ (คอมเมนต์/รีแอกชัน)](https://github.com/feature-sliced/documentation/issues/199) * 💬 รวบรวมเนื้อหา [ที่เกี่ยวข้องจากแชท](https://t.me/feature_sliced) * ⚒️ ร่วมสนับสนุน [ในรูปแบบอื่นๆ](https://github.com/feature-sliced/documentation/blob/master/CONTRIBUTING.md)
*🍰 Stay tuned!* > จะนำ Methodology ไปใช้แค่บางส่วนได้มั้ย? มันสมเหตุสมผลรึเปล่า? แล้วถ้าฉันไม่สนใจมันล่ะ? --- # Abstractions (นามธรรม) WIP บทความนี้อยู่ระหว่างการเขียน หากต้องการให้บทความนี้เสร็จเร็วขึ้น คุณสามารถ: * 📢 แบ่งปันความคิดเห็นของคุณ [ที่บทความ (คอมเมนต์/รีแอกชัน)](https://github.com/feature-sliced/documentation/issues/186) * 💬 รวบรวมเนื้อหา [ที่เกี่ยวข้องจากแชท](https://t.me/feature_sliced) * ⚒️ ร่วมสนับสนุน [ในรูปแบบอื่นๆ](https://github.com/feature-sliced/documentation/blob/master/CONTRIBUTING.md)
*🍰 Stay tuned!* ## กฎของ Leaky Abstractions[​](#กฎของ-leaky-abstractions "ลิงก์ตรงไปยังหัวข้อ") ## ทำไมถึงมี Abstractions เยอะจัง?[​](#ทำไมถึงมี-abstractions-เยอะจัง "ลิงก์ตรงไปยังหัวข้อ") > Abstractions ช่วยจัดการกับความซับซ้อนของโปรเจกต์ คำถามคือ - Abstractions พวกนี้จะเป็นแค่ของเฉพาะโปรเจกต์นี้ หรือเราจะพยายามสร้าง General Abstractions ที่อิงตามธรรมชาติของ Frontend? > สถาปัตยกรรมและแอปพลิเคชันโดยธรรมชาติมีความซับซ้อนอยู่แล้ว คำถามเดียวคือเราจะกระจายและอธิบายความซับซ้อนนี้ให้ดีขึ้นได้อย่างไร ## เกี่ยวกับขอบเขตความรับผิดชอบ[​](#เกี่ยวกับขอบเขตความรับผิดชอบ "ลิงก์ตรงไปยังหัวข้อ") > เกี่ยวกับ Abstractions ทางเลือก (Optional abstractions) ## ดูเพิ่มเติม[​](#ดูเพิ่มเติม "ลิงก์ตรงไปยังหัวข้อ") * [About the need for new layers](https://t.me/feature_sliced/2801) * [About the difficulty in understanding the methodology and layers](https://t.me/feature_sliced/2619) --- # เกี่ยวกับสถาปัตยกรรม ## ปัญหา[​](#ปัญหา "ลิงก์ตรงไปยังหัวข้อ") โดยปกติ การคุยเรื่องสถาปัตยกรรมจะเกิดขึ้นเมื่อการพัฒนาเริ่มหยุดชะงักเพราะปัญหาบางอย่างในโปรเจกต์ ### Bus-factor & การ Onboarding[​](#bus-factor--การ-onboarding "ลิงก์ตรงไปยังหัวข้อ") มีคนจำนวนจำกัดที่เข้าใจโปรเจกต์และสถาปัตยกรรมของมัน **ตัวอย่าง:** * *"ยากมากที่จะเพิ่มคนเข้ามาช่วยพัฒนา"* * *"สำหรับทุกปัญหา ทุกคนมีความเห็นคนละทางว่าจะเลี่ยงยังไง" (แอบอิจฉา Angular นิดๆ นะ)* * *"ไม่เข้าใจเลยว่าเกิดอะไรขึ้นในก้อน Monolith ใหญ่นี้"* ### ผลกระทบที่แฝงอยู่และควบคุมไม่ได้[​](#ผลกระทบที่แฝงอยู่และควบคุมไม่ได้ "ลิงก์ตรงไปยังหัวข้อ") มี Side effects แฝงเยอะมากระหว่างการพัฒนา/Refactoring *("ทุกอย่างขึ้นอยู่กับทุกอย่าง")* **ตัวอย่าง:** * *"Feature นี้ Import Feature นั้น"* * *"อัปเดต Store ของหน้านึง อีกหน้านึงพังเฉย"* * *"Logic กระจายไปทั่วแอป ตามหาไม่เจอเลยว่าเริ่มตรงไหน จบตรงไหน"* ### การ Reuse Logic ที่ควบคุมไม่ได้[​](#การ-reuse-logic-ที่ควบคุมไม่ได้ "ลิงก์ตรงไปยังหัวข้อ") ยากที่จะนำกลับมาใช้ใหม่/แก้ไข Logic ที่มีอยู่ ในขณะเดียวกัน มักจะมี [สองขั้วที่สุดโต่ง](https://github.com/feature-sliced/documentation/discussions/14): * เขียน Logic ใหม่หมดสำหรับแต่ละ Module *(ทำให้มีโค้ดซ้ำซ้อนใน Codebase)* * หรือมีแนวโน้มที่จะยัดทุก Module ลงในโฟลเดอร์ `shared` จนกลายเป็นถังขยะใหญ่ๆ *(ซึ่งส่วนใหญ่ถูกใช้แค่ที่เดียว)* **ตัวอย่าง:** * *"ฉันมี Business Logic เดียวกัน **N** แบบในโปรเจกต์ ซึ่งฉันก็ต้องจ่ายค่าดูแลมันทั้งหมด"* * *"มี Component ปุ่ม/Pop-up/... 6 แบบในโปรเจกต์"* * *"กองขยะของ Helpers"* ## ความต้องการ (Requirements)[​](#ความต้องการ-requirements "ลิงก์ตรงไปยังหัวข้อ") ดังนั้น ดูเหมือนจะเป็นเหตุเป็นผลที่จะนำเสนอ *ความต้องการที่พึงประสงค์สำหรับสถาปัตยกรรมในอุดมคติ:* note ที่ไหนที่บอกว่า "ง่าย" หมายถึง "ค่อนข้างง่ายสำหรับนักพัฒนากลุ่มกว้าง" เพราะชัดเจนว่า [เป็นไปไม่ได้ที่จะทำ Solution ที่สมบูรณ์แบบสำหรับทุกคนครับ](/th/docs/about/mission.md#limitations) ### ความชัดเจน (Explicitness)[​](#ความชัดเจน-explicitness "ลิงก์ตรงไปยังหัวข้อ") * ควรจะ **ง่ายต่อการเชี่ยวชาญและอธิบาย** โปรเจกต์และสถาปัตยกรรมให้ทีมเข้าใจ * โครงสร้างควรสะท้อน **คุณค่าทางธุรกิจของโปรเจกต์** จริงๆ * ต้องมี **Side effects และความเชื่อมโยง** ระหว่าง Abstractions ที่ชัดเจน * ควรจะ **ง่ายต่อการตรวจจับ Logic ที่ซ้ำซ้อน** โดยไม่รบกวนการ Implement ที่เป็นเอกลักษณ์ * ไม่ควรมีการ **กระจัดกระจายของ Logic** ไปทั่วโปรเจกต์ * ไม่ควรมี **Abstractions และกฎที่หลากหลายเกินไป** สำหรับสถาปัตยกรรมที่ดี ### การควบคุม (Control)[​](#การควบคุม-control "ลิงก์ตรงไปยังหัวข้อ") * สถาปัตยกรรมที่ดีควร **เร่งความเร็วในการแก้โจทย์ และการเพิ่มฟีเจอร์** * ควรจะเป็นไปได้ที่จะควบคุมการพัฒนาของโปรเจกต์ * ควรจะง่ายที่จะ **ขยาย, แก้ไข, ลบโค้ด** * ต้องรักษา **การแยกส่วนและการ Decompose** ของฟังก์ชันการทำงาน * แต่ละ Component ของระบบต้อง **แทนที่ได้และลบออกได้ง่าย** * *[ไม่ต้อง Optimize เพื่อการเปลี่ยนแปลง](https://youtu.be/BWAeYuWFHhs?t=1631) - เราทำนายอนาคตไม่ได้* * *[Optimize เพื่อการลบดีกว่า](https://youtu.be/BWAeYuWFHhs?t=1666) - โดยอิงจากบริบทที่มีอยู่แล้ว* ### การปรับตัว (Adaptability)[​](#การปรับตัว-adaptability "ลิงก์ตรงไปยังหัวข้อ") * สถาปัตยกรรมที่ดีควรนำไปใช้ได้ **กับโปรเจกต์ส่วนใหญ่** * *กับ Infrastructure Solutions ที่มีอยู่* * *ในทุกขั้นตอนของการพัฒนา* * ไม่ควรยึดติดกับ Framework และ Platform * ควรจะเป็นไปได้ที่จะ **สเกลโปรเจกต์และทีมได้ง่าย** และสามารถพัฒนาแบบขนานกันได้ * ควรจะง่ายที่จะ **ปรับตัวตาม Requirement และสถานการณ์ที่เปลี่ยนไป** ## ดูเพิ่มเติม[​](#ดูเพิ่มเติม "ลิงก์ตรงไปยังหัวข้อ") * [(React Berlin Talk) Oleg Isonen - Feature Driven Architecture](https://youtu.be/BWAeYuWFHhs) * [(React SPB Meetup #1) Sergey Sova - Feature Slices](https://t.me/feature_slices) * [(Article) About project modularization](https://alexmngn.medium.com/why-react-developers-should-modularize-their-applications-d26d381854c1) * [(Article) About Separation of Concerns and structuring by features](https://ryanlanciaux.com/blog/2017/08/20/a-feature-based-approach-to-react-development/) --- # ประเภทของความรู้ในโปรเจกต์ เราสามารถแบ่งแยก "ประเภทของความรู้" ในโปรเจกต์ได้ดังนี้: * **ความรู้พื้นฐาน (Fundamental knowledge)**
ความรู้ที่ไม่ค่อยเปลี่ยนแปลงตามกาลเวลา เช่น อัลกอริทึม, วิทยาการคอมพิวเตอร์, กลไกของภาษาโปรแกรมและ API ของมัน * **Technology stack**
ความรู้เกี่ยวกับชุดของ Technical Solutions ที่ใช้ในโปรเจกต์ รวมถึงภาษาโปรแกรม, Frameworks, และ Libraries * **ความรู้เฉพาะโปรเจกต์ (Project knowledge)**
ความรู้ที่เฉพาะเจาะจงกับโปรเจกต์ปัจจุบันและไม่มีค่าเมื่ออยู่นอกโปรเจกต์ ความรู้นี้จำเป็นสำหรับนักพัฒนาที่เพิ่งเข้ามาใหม่เพื่อให้สามารถเริ่มงานได้อย่างมีประสิทธิภาพ note **Feature-Sliced Design** ถูกออกแบบมาเพื่อลดการพึ่งพา "Project knowledge", รับผิดชอบมากขึ้น, และทำให้การ Onboard สมาชิกใหม่ในทีมง่ายขึ้น ## ดูเพิ่มเติม[​](#see-also "ลิงก์ตรงไปยังหัวข้อ") * [(Video 🇷🇺) Ilya Klimov - On Types of Knowledge](https://youtu.be/4xyb_tA-uw0?t=249) --- # การตั้งชื่อ (Naming) นักพัฒนาแต่ละคนมีประสบการณ์และบริบทที่ต่างกัน ซึ่งอาจนำไปสู่ความเข้าใจผิดในทีมเมื่อเรียก Entities เดียวกันด้วยชื่อที่ต่างกัน ตัวอย่างเช่น: * Components สำหรับแสดงผล อาจเรียกว่า "ui", "components", "ui-kit", "views", … * โค้ดที่นำมาใช้ซ้ำทั่วทั้งแอปพลิเคชัน อาจเรียกว่า "core", "shared", "app", … * โค้ด Business logic อาจเรียกว่า "store", "model", "state", … ## การตั้งชื่อใน Feature-Sliced Design[​](#naming-in-fsd "ลิงก์ตรงไปยังหัวข้อ") ระเบียบวิธีนี้ใช้คำศัพท์เฉพาะ เช่น: * "app", "process", "page", "feature", "entity", "shared" เป็นชื่อ Layers * "ui', "model", "lib", "api", "config" เป็นชื่อ Segments การยึดตามคำศัพท์เหล่านี้สำคัญมาก เพื่อป้องกันความสับสนระหว่างสมาชิกในทีมและนักพัฒนาใหม่ที่เข้าร่วมโปรเจกต์ การใช้ชื่อที่เป็นมาตรฐานยังช่วยเมิื่อขอความช่วยเหลือจากคอมมูนิตี้ด้วย ## ความขัดแย้งของการตั้งชื่อ (Naming Conflicts)[​](#when-can-naming-interfere "ลิงก์ตรงไปยังหัวข้อ") ความขัดแย้งของการตั้งชื่ออาจเกิดขึ้นเมื่อคำศัพท์ที่ใช้ใน FSD methodology ทับซ้อนกับคำศัพท์ที่ใช้ในธุรกิจ: * `FSD#process` vs process จำลองในแอปพลิเคชัน * `FSD#page` vs หน้า log * `FSD#model` vs โมเดลรถยนต์ ตัวอย่างเช่น นักพัฒนาที่เห็นคำว่า "process" ในโค้ด อาจเสียเวลาเพิ่มในการพยายามทำความเข้าใจว่าหมายถึง process ไหน **การชนกันแบบนี้อาจขัดขวางกระบวนการพัฒนาได้** เมื่อ Glossary ของโปรเจกต์มีคำศัพท์ที่เฉพาะเจาะจงกับ FSD จำเป็นอย่างยิ่งที่จะต้องระมัดระวังเมื่อหารือคำศัพท์เหล่านี้กับทีมและผู้ที่ไม่เกี่ยวข้องทางเทคนิค เพื่อสื่อสารกับทีมอย่างมีประสิทธิภาพ แนะนำให้ใช้คำย่อ "FSD" นำหน้าคำศัพท์ของ Methodology ตัวอย่างเช่น เมื่อพูดถึง process คุณอาจพูดว่า "เราเอา process นี้ไปไว้ที่ layer features ของ FSD ได้นะ" ในทางกลับกัน เมื่อสื่อสารกับ Stakeholders ที่ไม่ใช่สายเทคนิค ควรจำกัดการใช้คำศัพท์ FSD และละเว้นการพูดถึงโครงสร้างภายในของ Codebase ## ดูเพิ่มเติม[​](#see-also "ลิงก์ตรงไปยังหัวข้อ") * [(Discussion) Adaptability of naming](https://github.com/feature-sliced/documentation/discussions/16) * [(Discussion) Entity Naming Survey](https://github.com/feature-sliced/documentation/discussions/31#discussioncomment-464894) * [(Discussion) "processes" vs "flows" vs ...](https://github.com/feature-sliced/documentation/discussions/20) * [(Discussion) "model" vs "store" vs ...](https://github.com/feature-sliced/documentation/discussions/68) --- # ขับเคลื่อนด้วยความต้องการ (Needs driven) TL;DR — *คุณระบุเป้าหมายไม่ได้เหรอว่าฟีเจอร์ใหม่นี้จะแก้ปัญหาอะไร? หรือปัญหาคือตัวโจทย์เองก็ยังไม่ได้ตั้งมาให้ชัด? **ประเด็นคือ Methodology นี้ช่วยดึงเอานิยามของงานและเป้าหมายที่เป็นปัญหาออกมาให้เห็นชัดขึ้น*** — *โปรเจกต์ไม่ได้อยู่นิ่งๆ - Requirement และฟังก์ชันการทำงานเปลี่ยนตลอดเวลา นานวันเข้า โค้ดก็เละตุ้มเป๊ะ เพราะตอนเริ่ม โปรเจกต์ถูกออกแบบมาแค่ตามความต้องการแรกเริ่ม **และหน้าที่ของสถาปัตยกรรมที่ดีคือต้องพร้อมรับมือกับเงื่อนไขการพัฒนาที่เปลี่ยนแปลงไป*** ## ทำไม? (Why?)[​](#ทำไม-why "ลิงก์ตรงไปยังหัวข้อ") เพื่อที่จะเลือกชื่อที่ชัดเจนให้กับ Entity และเข้าใจส่วนประกอบของมัน **คุณต้องเข้าใจให้ชัดก่อนว่าโจทย์ข้อไหนจะถูกแก้ด้วยโค้ดกองนี้** > *@sergeysova: ระหว่างการพัฒนา เราพยายามตั้งชื่อให้แต่ละ Entity หรือ Function เพื่อสะท้อนความตั้งใจและความหมายของโค้ดที่กำลังทำงานอยู่ให้ชัดเจน* *เพราะถ้าไม่เข้าใจโจทย์ ก็เป็นไปไม่ได้เลยที่จะเขียน Test ที่ถูกต้องและครอบคลุมเคสสำคัญๆ, ใส่ Error handling ที่ช่วยผู้ใช้ในจุดที่ถูกต้อง, หรือแม้แต่เรื่องพื้นฐานอย่างการไม่ขัดจังหวะ Flow ของผู้ใช้เพียงเพราะ Error เล็กๆ น้อยๆ ที่แก้ได้* ## เรากำลังพูดถึงโจทย์อะไร?[​](#เรากำลังพูดถึงโจทย์อะไร "ลิงก์ตรงไปยังหัวข้อ") Frontend พัฒนาแอปพลิเคชันและอินเตอร์เฟสสำหรับผู้ใช้ปลายทาง (End users) ดังนั้นเราจึงแก้โจทย์ของผู้บริโภคเหล่านี้ เมื่อคนคนนึงมาหาเรา **เขาต้องการแก้ความเจ็บปวดบางอย่าง หรือตอบสนองความต้องการบางอย่าง** *หน้าที่ของ Managers และ Analysts คือการระบุความต้องการนี้ออกมา และให้นักพัฒนา Implement โดยคำนึงถึงธรรมชาติของการทำเว็บ (เน็ตหลุด, Backend error, พิมพ์ผิด, จิ้มพลาด)* **เป้าหมายนี้แหละ ที่ผู้ใช้มาหาเรา คือโจทย์ของนักพัฒนา** > *ปัญหาเล็กๆ หนึ่งข้อที่ถูกแก้ คือหนึ่ง Feature ในระเบียบวิธี Feature-Sliced Design — คุณต้องหั่น (Cut) ขอบเขตงานทั้งหมดของโปรเจกต์ออกเป็นเป้าหมายเล็กๆ* ## มันส่งผลกับการพัฒนายังไง?[​](#มันส่งผลกับการพัฒนายังไง "ลิงก์ตรงไปยังหัวข้อ") ### การแตกงาน (Task decomposition)[​](#การแตกงาน-task-decomposition "ลิงก์ตรงไปยังหัวข้อ") เมื่อนักพัฒนาเริ่ม Implement งาน เพื่อให้เข้าใจและดูแลโค้ดได้ง่าย เขาจะ **หั่นมันออกเป็นระยะๆ** ในหัว: * ก่อนอื่น *แบ่งเป็น Top-level entities* และ *Implement พวกมัน* * จากนั้น Entities พวกนี้ *ก็ถูกแบ่งย่อยลงไปอีก* * และทำแบบนี้ไปเรื่อยๆ *ในกระบวนการแบ่งเป็น Entities นักพัฒนาจะถูกบังคับให้ตั้งชื่อที่สะท้อนไอเดียของเขา และช่วยให้คนอ่านโค้ดเข้าใจว่าโค้ดนี้แก้โจทย์อะไร* *ในขณะเดียวกัน เราก็ไม่ลืมว่าเรากำลังพยายามช่วยลดความเจ็บปวดหรือตอบสนองความต้องการของผู้ใช้* ### เข้าใจแก่นของงาน (Understanding the essence of the task)[​](#เข้าใจแก่นของงาน-understanding-the-essence-of-the-task "ลิงก์ตรงไปยังหัวข้อ") แต่การจะตั้งชื่อที่ชัดเจนให้ Entity ได้ **นักพัฒนาต้องรู้มากพอเกี่ยวกับจุดประสงค์ของมัน** * เขาจะใช้ Entity นี้ยังไง * มัน Implement ส่วนไหนของโจทย์ผู้ใช้, เอาไปใช้ที่อื่นได้อีกมั้ย * มันเอาไปใช้กับโจทย์อื่นได้รึเปล่า * และอื่นๆ สรุปได้ไม่ยาก: **ในขณะที่นักพัฒนากำลังไตร่ตรองชื่อของ Entities ภายใต้กรอบของ Methodology เขาจะสามารถเจอโจทย์ที่ตั้งมาไม่ชัดเจนได้ตั้งแต่ก่อนเริ่มเขียนโค้ดด้วยซ้ำ** > จะตั้งชื่อ Entity ยังไงถ้ายังไม่เข้าใจดีพอว่ามันแก้โจทย์อะไรได้บ้าง, แล้วจะแบ่งงานเป็น Entities ได้ยังไงถ้ายังไม่เข้าใจมันดีพอ? ## จะกำหนดยังไงดี? (How to formulate it?)[​](#จะกำหนดยังไงดี-how-to-formulate-it "ลิงก์ตรงไปยังหัวข้อ") **เพื่อกำหนดโจทย์ที่ถูกแก้ด้วย Features คุณต้องเข้าใจตัวโจทย์เองก่อน** และนี่เป็นความรับผิดชอบของ Project Manager และ Analysts *Methodology ทำได้แค่บอกนักพัฒนาว่าโจทย์ไหนที่ Product Manager ควรให้ความสำคัญ* > *@sergeysova: Frontend ทั้งหมดโดยหลักการคือการแสดงผลข้อมูล, Component ใดๆ ก็ตาม อย่างแรกสุดคือแสดงผล, ดังนั้นโจทย์แค่ "ให้แสดงอะไรบางอย่างให้ผู้ใช้ดู" จึงไม่มีคุณค่าในทางปฏิบัติ* > > *แม้จะไม่นับรวมธรรมชาติของ Frontend ก็ยังถามได้ว่า "ทำไมฉันต้องแสดงให้คุณดู", ถามไปเรื่อยๆ จนกว่าจะเจอความเจ็บปวดหรือความต้องการของผู้บริโภค* ทันทีที่เราเข้าถึงความต้องการพื้นฐานหรือจุดเจ็บปวด (Pain points) เราก็สามารถย้อนกลับมาดูได้ว่า **Product หรือ Service ของคุณจะช่วยผู้ใช้ให้บรรลุเป้าหมายได้อย่างไร** งานใหม่ๆ ใน Tracker ของคุณมุ่งเป้าไปที่การแก้ปัญหาทางธุรกิจ และธุรกิจก็พยายามแก้ปัญหาของผู้ใช้ในขณะเดียวกันก็หาเงินจากมันด้วย นั่นหมายความว่าแต่ละงานมีเป้าหมายบางอย่าง แม้ว่าจะไม่ได้เขียนไว้ในคำอธิบายก็ตาม ***นักพัฒนาต้องเข้าใจอย่างชัดเจนว่างานนี้มีเป้าหมายอะไร**, แต่ไม่ใช่ทุกบริษัทจะสามารถสร้างกระบวนการที่สมบูรณ์แบบได้ (ถึงแม้นั่นจะเป็นอีกเรื่องนึง) แต่อย่างน้อย นักพัฒนาก็สามารถ "Ping" หา Manager ที่เกี่ยวข้องเพื่อหาคำตอบและทำงานในส่วนของตัวเองให้มีประสิทธิภาพได้* ## แล้วประโยชน์คืออะไร? (And what is the benefit?)[​](#แล้วประโยชน์คืออะไร-and-what-is-the-benefit "ลิงก์ตรงไปยังหัวข้อ") ทีนี้มาดูกระบวนการทั้งหมดตั้งแต่ต้นจนจบกัน ### 1. เข้าใจโจทย์ของผู้ใช้[​](#1-เข้าใจโจทย์ของผู้ใช้ "ลิงก์ตรงไปยังหัวข้อ") เมื่อนักพัฒนาเข้าใจ Pain point และวิธีที่ธุรกิจจะตอบโจทย์นั้น เขาสามารถเสนอ Solution ที่ธุรกิจอาจนึกไม่ถึงเนื่องจากข้อจำกัดทางเทคนิคของการทำเว็บ > แต่แน่นอน ทั้งหมดนี้จะเวิร์คก็ต่อเมื่อนักพัฒนาไม่ได้เมินเฉยต่อสิ่งที่กำลังทำและเหตุผลที่ทำ ไม่งั้น *จะมี Methodology และแนวทางต่างๆ ไปทำไม?* ### 2. การจัดโครงสร้างและลำดับ[​](#2-การจัดโครงสร้างและลำดับ "ลิงก์ตรงไปยังหัวข้อ") ด้วยความเข้าใจในโจทย์ **โครงสร้างที่ชัดเจนจะเกิดขึ้นทั้งในหัว ใน Task งาน และในโค้ด** ### 3. เข้าใจ Feature และส่วนประกอบของมัน[​](#3-เข้าใจ-feature-และส่วนประกอบของมัน "ลิงก์ตรงไปยังหัวข้อ") **หนึ่ง Feature คือหนึ่งฟังก์ชันที่มีประโยชน์สำหรับผู้ใช้** * เมื่อหลาย Features ถูก Implement ใน Feature เดียว นี่คือ **การละเมิดเส้นแบ่ง (Violation of borders)** * Feature สามารถแบ่งไม่ได้และโตขึ้นเรื่อยๆ - **อันนี้ไม่แย่** * **ที่แย่** - คือเมื่อ Feature ไม่ตอบคำถามที่ว่า *"คุณค่าทางธุรกิจสำหรับผู้ใช้คืออะไร?"* * จะไม่มี Feature ที่ชื่อ "map-office" (แผนที่-ออฟฟิศ) * แต่ `booking-meeting-on-the-map` (จองห้องประชุมบนแผนที่), `search-for-an-employee` (ค้นหาพนักงาน), `change-of-workplace` (เปลี่ยนที่นั่งทำงาน) - **อันนี้ได้** > *@sergeysova: ประเด็นคือ Feature ควรมีแค่โค้ดที่ Implement ตัวฟังก์ชันการทำงานนั้นๆ*, โดยไม่มีรายละเอียดที่ไม่จำเป็นและ Internal solutions (ในอุดมคตินะ)\* > > *เปิดโค้ด Feature มา **แล้วเห็นเฉพาะสิ่งที่เกี่ยวกับโจทย์** - ไม่มีอะไรเกินกว่านั้น* ### 4. กำไร (Profit)[​](#4-กำไร-profit "ลิงก์ตรงไปยังหัวข้อ") ธุรกิจน้อยมากที่จะกลับลำ 180 องศา ซึ่งหมายความว่า **ภาพสะท้อนของโจทย์ธุรกิจที่อยู่ในโค้ด Frontend คือกำไรที่สำคัญมาก** *แล้วคุณจะไม่ต้องมานั่งอธิบายให้สมาชิกทีมใหม่ฟังว่าโค้ดนั้นโค้ดนี้ทำอะไร และโดยทั่วไปทำไมถึงเพิ่มมันเข้ามา - **ทุกอย่างจะถูกอธิบายผ่านโจทย์ธุรกิจที่สะท้อนออกมาในโค้ดอยู่แล้ว*** > สิ่งที่เรียกว่า ["Business Language" ใน Domain Driven Development](https://thedomaindrivendesign.io/developing-the-ubiquitous-language) *** ## กลับสู่โลกความจริง (Back to reality)[​](#กลับสู่โลกความจริง-back-to-reality "ลิงก์ตรงไปยังหัวข้อ") ถ้า Process ธุรกิจเป็นที่เข้าใจและมีการตั้งชื่อที่ดีในขั้นตอน Design - *มันก็ไม่ยากเท่าไหร่ที่จะส่งต่อความเข้าใจและ Logic นี้ไปสู่โค้ด* **อย่างไรก็ตาม ในทางปฏิบัติ** งานและฟังก์ชันมักจะถูกพัฒนาแบบ "โคตร" Iterative (ทำไปแก้ไป) และ (หรือ) ไม่มีเวลามาคิดเรื่อง Design ให้ละเอียด **ผลก็คือ Feature ที่สมเหตุสมผลในวันนี้ ถ้าขยาย Feature นี้ในอีกหนึ่งเดือน อาจจะต้องรื้อโปรเจกต์ใหม่เลยก็ได้** > *\[[จากการอภิปราย](https://t.me/sergeysova/318)]: นักพัฒนาพยายามคิดล่วงหน้า 2-3 step โดยคำนึงถึงความต้องการในอนาคต แต่ตรงนี้เขาก็ต้องพึ่งประสบการณ์ของตัวเอง* > > *วิศวกรที่เก๋ามักจะมองข้ามช็อตไป 10 step ทันที และเข้าใจว่า Feature ไหนควรแบ่ง หรือควรรวมกับอันไหน* > > *แต่บางครั้งก็เจองานที่ต้องงัดประสบการณ์มาสู้ และไม่รู้จะไปหาความเข้าใจมาจากไหนว่าจะ Decompose (แตกงาน) ยังไงให้ฉลาด และส่งผลเสียในอนาคตน้อยที่สุด* ## บทบาทของ Methodology[​](#บทบาทของ-methodology "ลิงก์ตรงไปยังหัวข้อ") **Methodology ช่วยแก้ปัญหาของนักพัฒนา เพื่อให้ง่ายต่อการแก้ปัญหาของผู้ใช้** ไม่มี Solution ไหนที่แก้ปัญหาของนักพัฒนาเพื่อนักพัฒนาเท่านั้น แต่เพื่อให้นักพัฒนาแก้โจทย์ของเขาได้ **คุณต้องเข้าใจโจทย์ของผู้ใช้** - ถ้ากลับกัน (เข้าใจแต่โจทย์ตัวเอง) มันจะไม่เวิร์ค ### ความต้องการของ Methodology[​](#ความต้องการของ-methodology "ลิงก์ตรงไปยังหัวข้อ") เริ่มชัดเจนแล้วว่าเราต้องระบุความต้องการอย่างน้อยสองข้อสำหรับ **Feature-Sliced Design**: 1. Methodology ควรอบอกว่า **จะสร้าง Features, Processes และ Entities อย่างไร** * ซึ่งหมายความว่ามันควรจะอธิบายอย่างชัดเจนว่า *จะแบ่งโค้ดระหว่างพวกมันยังไง* และนั่นหมายความว่าการตั้งชื่อ Entities เหล่านี้ควรถูกกำหนดไว้ใน Specification ด้วย 2. Methodology ควรช่วยให้สถาปัตยกรรม **[ปรับตัวตาม Requirement ของโปรเจกต์ที่เปลี่ยนแปลงได้ง่าย](/th/docs/about/understanding/architecture.md#adaptability)** ## ดูเพิ่มเติม[​](#ดูเพิ่มเติม "ลิงก์ตรงไปยังหัวข้อ") * [(Post) Stimulation for a clear formulation of tasks (+ discussion)](https://t.me/sergeysova/318) > ***บทความนี้** คือการดัดแปลงจากการอภิปรายนี้, คุณสามารถอ่านเวอร์ชันเต็มแบบไม่ตัดทอนได้ที่ลิงก์* * [(Discussion) How to break the functionality and what it is](https://t.me/atomicdesign/18972) * [(Article) "How to better organize your applications"](https://alexmngn.medium.com/how-to-better-organize-your-react-applications-2fd3ea1920f1) --- # สัญญาณของสถาปัตยกรรม (Signals of architecture) WIP บทความนี้อยู่ระหว่างการเขียน หากต้องการให้บทความนี้เสร็จเร็วขึ้น คุณสามารถ: * 📢 แบ่งปันความคิดเห็นของคุณ [ที่บทความ (คอมเมนต์/รีแอกชัน)](https://github.com/feature-sliced/documentation/issues/194) * 💬 รวบรวมเนื้อหา [ที่เกี่ยวข้องจากแชท](https://t.me/feature_sliced) * ⚒️ ร่วมสนับสนุน [ในรูปแบบอื่นๆ](https://github.com/feature-sliced/documentation/blob/master/CONTRIBUTING.md)
*🍰 Stay tuned!* > ถ้ามีข้อจำกัดในฝั่งสถาปัตยกรรม แสดงว่ามีเหตุผลที่ชัดเจนสำหรับสิ่งนั้น และมีผลกระทบถ้าเพิกเฉยมัน > Methodology และสถาปัตยกรรม ส่งสัญญาณเตือนคุณ ส่วนจะจัดการยังไงก็ขึ้นอยู่กับความเสี่ยงที่คุณพร้อมจะรับและสิ่งที่เหมาะกับทีมที่สุด) ## ดูเพิ่มเติม[​](#ดูเพิ่มเติม "ลิงก์ตรงไปยังหัวข้อ") * [(Thread) About signals from architecture and dataflow](https://t.me/feature_sliced/2070) * [(Thread) About the fundamental nature of architecture](https://t.me/feature_sliced/2492) * [(Thread) About highlighting weak points](https://t.me/feature_sliced/3979) * [(Thread) How to understand that the data model is swollen](https://t.me/feature_sliced/4228) --- # แนวทางเรื่องแบรนด์ (Branding Guidelines) อัตลักษณ์ทางภาพ (Visual Identity) ของ FSD ขึ้นอยู่กับ Core-concepts ของมัน: `Layered`, `Sliced self-contained parts`, `Parts & Compose`, `Segmented` แต่เราก็ตั้งใจออกแบบ Identity ที่เรียบง่ายและสวยงาม ซึ่งควรสื่อถึงปรัชญาของ FSD และจดจำได้ง่าย **ได้โปรด ใช้ Identity ของ FSD "ตามที่เป็น (as-is)" โดยไม่ต้องปรับเปลี่ยน แต่ใช้ Assets ของเราเพื่อความสะดวกของคุณ** Brand guide นี้จะช่วยให้คุณใช้ Identity ของ FSD ได้อย่างถูกต้อง ความเข้ากันได้ (Compatibility) FSD เคยมี [Legacy identity อื่น](https://drive.google.com/drive/folders/11Y-3qZ_C9jOFoW2UbSp11YasOhw4yBdl?usp=sharing) มาก่อน ดีไซน์เก่าไม่ได้สื่อสารถึง Core-concepts ของระเบียบวิธี และมันถูกสร้างเป็นฉบับร่าง (Draft) และควรได้รับการปรับปรุงให้เป็นปัจจุบัน สำหรับการใช้งานแบรนด์ที่เข้ากันได้และยั่งยืนในระยะยาว เราได้ทำการ Rebrand อย่างระมัดระวังมาเป็นเวลาหนึ่งปี (2021-2022) **เพื่อให้คุณมั่นใจได้เมื่อใช้ Identity ของ FSD 🍰** *แต่ขอให้เลือกใช้ Identity ปัจจุบัน ไม่ใช่ของเก่า!* ## ชื่อ (Title)[​](#ชื่อ-title "ลิงก์ตรงไปยังหัวข้อ") * ✅ **ถูกต้อง:** `Feature-Sliced Design`, `FSD` * ❌ **ไม่ถูกต้อง:** `Feature-Sliced`, `Feature Sliced`, `FeatureSliced`, `feature-sliced`, `feature sliced`, `FS` ## อีโมจิ (Emoji)[​](#อีโมจิ-emoji "ลิงก์ตรงไปยังหัวข้อ") รูปเค้ก 🍰 สื่อถึง Core concepts ของ FSD ได้ค่อนข้างดี ดังนั้นจึงถูกเลือกเป็น Signature emoji ของเรา > ตัวอย่าง: *"🍰 Architectural design methodology for Frontend projects"* ## โลโก้ & พาเลทสี (Logo & Palette)[​](#โลโก้--พาเลทสี-logo--palette "ลิงก์ตรงไปยังหัวข้อ") FSD มีโลโก้ไม่กี่แบบสำหรับบริบทที่แตกต่างกัน แต่แนะนำให้เลือกใช้แบบ **Primary** เป็นหลัก | | | | | ------------------------------- | ------------------------------------------------------------------------------------------ | ---------------------------------------- | | Theme | Logo (Ctrl/Cmd + Click for download) | Usage | | primary
(#29BEDC, #517AED) | [![logo-primary](/th/img/brand/logo-primary.png)](/th/img/brand/logo-primary.png) | แนะนำในกรณีส่วนใหญ่ | | flat
(#3193FF) | [![logo-flat](/th/img/brand/logo-flat.png)](/th/img/brand/logo-flat.png) | สำหรับบริบทสีเดียว (One-color context) | | monochrome
(#FFF) | [![logo-monocrhome](/th/img/brand/logo-monochrome.png)](/th/img/brand/logo-monochrome.png) | สำหรับบริบทสีขาวดำ (Grayscale context) | | square
(#3193FF) | [![logo-square](/th/img/brand/logo-square.png)](/th/img/brand/logo-square.png) | สำหรับกรอบสี่เหลี่ยม (Square boundaries) | ## แบนเนอร์ & แผนผัง (Banners & Schemes)[​](#แบนเนอร์--แผนผัง-banners--schemes "ลิงก์ตรงไปยังหัวข้อ") [![banner-primary](/th/img/brand/banner-primary.jpg)](/th/img/brand/banner-primary.jpg) [![banner-monochrome](/th/img/brand/banner-monochrome.jpg)](/th/img/brand/banner-monochrome.jpg) ## Social Preview[​](#social-preview "ลิงก์ตรงไปยังหัวข้อ") กำลังดำเนินการ... ## Presentation template[​](#presentation-template "ลิงก์ตรงไปยังหัวข้อ") กำลังดำเนินการ... ## ดูเพิ่มเติม[​](#ดูเพิ่มเติม "ลิงก์ตรงไปยังหัวข้อ") * [Discussion (github)](https://github.com/feature-sliced/documentation/discussions/399) * [History of development with references (figma)](https://www.figma.com/file/RPphccpoeasVB0lMpZwPVR/FSD-Brand?node-id=0%3A1) --- # Decomposition cheatsheet เก็บหน้านี้ไว้เป็นโพยดูแบบด่วนๆ เวลาที่ต้องตัดสินใจว่าจะแบ่งส่วน UI ยังไงดี ด้านล่างมีเวอร์ชัน PDF ให้โหลดด้วยนะ จะปริ้นท์ออกมาแปะฝาบ้านหรือเอาไว้หนุนนอนก็ได้ตามสะดวก ## การเลือก Layer[​](#การเลือก-layer "ลิงก์ตรงไปยังหัวข้อ") [ดาวน์โหลด PDF](/th/assets/files/choosing-a-layer-en-12fdf3265c8fc4f6b58687352b81fce7.pdf) ![นิยามของ Layer ทั้งหมดและคำถามเช็คตัวเอง](/th/assets/images/choosing-a-layer-en-5b67f20bb921ba17d78a56c0dc7654a9.jpg) ## ตัวอย่าง[​](#ตัวอย่าง "ลิงก์ตรงไปยังหัวข้อ") ### Tweet[​](#tweet "ลิงก์ตรงไปยังหัวข้อ") ![decomposed-tweet-bordered-bgLight](/th/assets/images/decompose-twitter-7b9a50f879d763c49305b3bf0751ee35.png) ### GitHub[​](#github "ลิงก์ตรงไปยังหัวข้อ") ![decomposed-github-bordered](/th/assets/images/decompose-github-a0eeb839a4b5ef5c480a73726a4451b0.jpg) ## อ่านเพิ่มเติม[​](#อ่านเพิ่มเติม "ลิงก์ตรงไปยังหัวข้อ") * [(Thread) ตรรกะทั่วไปสำหรับ Features และ Entities](https://t.me/feature_sliced/4262) * [(Thread) การจัดการ Logic ที่บวมเกินไป (Decomposition of swollen logic)](https://t.me/feature_sliced/4210) * [(Thread) ทำความเข้าใจเรื่องขอบเขตความรับผิดชอบระว่างการ Decomposition](https://t.me/feature_sliced/4088) * [(Thread) การ Decompose วิดเจ็ต Product List](https://t.me/feature_sliced/3828) * [(Article) แนวทางต่างๆ ในการ Decompose Logic](https://www.pluralsight.com/guides/how-to-organize-your-react-+-redux-codebase) * [(Thread) ความแตกต่างระหว่าง Features และ Entities](https://t.me/feature_sliced/3776) * [(Thread) ความแตกต่างระหว่าง "สิ่งของ" และ Entities (2)](https://t.me/feature_sliced/3248) * [(Thread) การประยุกต์ใช้เกณฑ์สำหรับการ Decomposition](https://t.me/feature_sliced/3833) --- # คำถามที่พบบ่อย (FAQ) info ถ้ามีคำถามเพิ่มเติม แวะไปคุยกันได้ที่ [Telegram chat](https://t.me/feature_sliced), [Discord community](https://discord.gg/S8MzWTUsmp), และ [GitHub Discussions](https://github.com/feature-sliced/documentation/discussions) ### มี Toolkit หรือ Linter ให้ใช้ไหม?[​](#มี-toolkit-หรือ-linter-ให้ใช้ไหม "ลิงก์ตรงไปยังหัวข้อ") มีสิ! เรามี Linter ชื่อว่า [Steiger](https://github.com/feature-sliced/steiger) เอาไว้ช่วยเช็ค Architecture ของโปรเจกต์ และยังมี [Folder Generators](https://github.com/feature-sliced/awesome?tab=readme-ov-file#tools) ที่ใช้งานผ่าน CLI หรือ IDEs ได้ด้วย ### เอาพวก Layout/Template ของหน้าเว็บไว้ที่ไหนดี?[​](#เอาพวก-layouttemplate-ของหน้าเว็บไว้ที่ไหนดี "ลิงก์ตรงไปยังหัวข้อ") ถ้าต้องการแค่ Layout ที่เป็น Markup ธรรมดาๆ ก็เอาไว้ที่ `shared/ui` ได้เลย แต่ถ้าจำเป็นต้องใช้ Layer ที่สูงกว่านั้น ก็มีทางเลือกอยู่บ้าง: * ลองเช็คดูว่าจำเป็นต้องมี Layout จริงๆ ไหม? ถ้า Layout มันมีแค่ไม่กี่บรรทัด บางทีการเขียนซ้ำในแต่ละหน้าอาจจะสมเหตุสมผลกว่าการพยายามไป Abstract มันออกมา * ถ้าจำเป็นต้องใช้ Layout จริงๆ ก็สร้างเป็น Widgets หรือ Pages แยกออกมา แล้วค่อยเอามาประกอบกันใน Router Configuration ที่ App หรือจะใช้ Nested Routing ก็เป็นอีกทางเลือกที่น่าสนใจ ### Feature กับ Entity ต่างกันยังไง?[​](#feature-กับ-entity-ต่างกันยังไง "ลิงก์ตรงไปยังหัวข้อ") *Entity* คือคอนเซปต์ในโลกความเป็นจริงที่แอปของเราต้องทำงานด้วย ส่วน *Feature* คือการโต้ตอบ (Interaction) ที่สร้าง Value จริงๆ ให้กับผู้ใช้ พูดง่ายๆ คือสิ่งที่คนอยากจะทำกับ Entity ของเรานั่นเอง ดูข้อมูลเพิ่มเติมพร้อมตัวอย่างได้ที่หน้า Reference เกี่ยวกับ [Slices](/th/docs/reference/layers.md#entities) ### เอา Pages/Features/Entities มาซ้อนกันเองได้ไหม?[​](#เอา-pagesfeaturesentities-มาซ้อนกันเองได้ไหม "ลิงก์ตรงไปยังหัวข้อ") ทำได้ แต่การซ้อนกันนี้ควรเกิดขึ้นใน Layer ที่อยู่สูงกว่า เช่น ภายใน Widget เราสามารถ import Features สองตัวเข้ามา แล้วเอา Feature ตัวหนึ่งส่งเป็น props หรือ children ให้กับอีกตัวหนึ่งได้ แต่คุณไม่สามารถ import Feature ตัวหนึ่งเข้าไปใน Feature อีกตัวหนึ่งได้โดยตรง อันนี้ผิดกฎ [**Import rule on layers**](/th/docs/reference/layers.md#import-rule-on-layers) เต็มๆ ### แล้ว Atomic Design ล่ะ?[​](#แล้ว-atomic-design-ล่ะ "ลิงก์ตรงไปยังหัวข้อ") เวอร์ชันปัจจุบันของ Methodology นี้ไม่ได้บังคับว่าต้องใช้ หรือห้ามใช้ Atomic Design ร่วมกับ Feature-Sliced Design ยกตัวอย่างเช่น Atomic Design [สามารถนำมาปรับใช้ได้ดี](https://t.me/feature_sliced/1653) กับ `ui` segment ของ modules ต่างๆ ### มีแหล่งข้อมูล/บทความเกี่ยวกับ FSD ให้อ่านเพิ่มไหม?[​](#มีแหล่งข้อมูลบทความเกี่ยวกับ-fsd-ให้อ่านเพิ่มไหม "ลิงก์ตรงไปยังหัวข้อ") จัดไป! ลองดูที่นี่ได้เลย ### ทำไมถึงต้องใช้ Feature-Sliced Design?[​](#ทำไมถึงต้องใช้-feature-sliced-design "ลิงก์ตรงไปยังหัวข้อ") มันช่วยให้คุณและทีมมองเห็นภาพรวมของโปรเจกต์ได้เร็วขึ้น โดยเฉพาะในมุมของส่วนประกอบหลักที่สร้าง Value ให้กับระบบ การมี Architecture ที่เป็นมาตรฐานเดียวกันช่วยให้ Onboarding คนใหม่ได้ไวขึ้น แถมยังจบดราม่าเรื่องเถียงกันว่าจะวางโค้ดตรงไหนดีได้ด้วย ลองไปดูหน้า [Motivation](/th/docs/about/motivation.md) เพื่อทำความเข้าใจเพิ่มเดิมว่าทำไม FSD ถึงถูกสร้างขึ้นมา ### มือใหม่ต้องแคร์เรื่อง Architecture/Methodology ด้วยเหรอ?[​](#มือใหม่ต้องแคร์เรื่อง-architecturemethodology-ด้วยเหรอ "ลิงก์ตรงไปยังหัวข้อ") ค่อนไปทาง "ต้อง" มากกว่า "ไม่" *ปกติแล้ว ถ้าเราออกแบบและทำโปรเจกต์คนเดียว ทุกอย่างก็มักจะราบรื่นดี แต่พอหยุดทำไปสักพัก หรือมี Dev คนใหม่เข้ามาในทีม นั่นแหละปัญหาจะเริ่มพาลมาเยือน* ### จะจัดการ Authorization Context ยังไง?[​](#จะจัดการ-authorization-context-ยังไง "ลิงก์ตรงไปยังหัวข้อ") มีคำตอบไว้ให้แล้วที่ [หน้านี้](/th/docs/guides/examples/auth.md) --- # ภาพรวม (Overview) **Feature-Sliced Design** (FSD) คือแนวทางการออกแบบสถาปัตยกรรมสำหรับ frontend application พูดง่ายๆ ก็คือ เป็นการรวบรวมกฎและข้อตกลงในการจัดระเบียบโค้ดนั่นเอง เป้าหมายหลักคือทำให้โปรเจกต์เข้าใจง่ายและมีความเสถียร (Stable) เสมอ แม้ว่าความต้องการทางธุรกิจจะเปลี่ยนไปบ่อยแค่ไหนก็ตาม 🚀 นอกจากชุดข้อตกลงแล้ว FSD ยังมาพร้อมกับเครื่องมือช่วยทุ่นแรงอีกด้วย เรามี [linter](https://github.com/feature-sliced/steiger) เพื่อเช็คสถาปัตยกรรมของโปรเจกต์, [folder generators](https://github.com/feature-sliced/awesome?tab=readme-ov-file#tools) ผ่าน CLI หรือ IDEs รวมไปถึงคลัง [examples](/th/examples.md) อีกเพียบให้ศึกษา ## FSD เหมาะกับเราไหมนะ?[​](#is-it-right-for-me "ลิงก์ตรงไปยังหัวข้อ") FSD เอาไปใช้ได้กับโปรเจกต์และทีมทุกขนาดเลยนะ มันจะเข้ากับโปรเจกต์ของคุณเป๊ะๆ ถ้า: * คุณทำ **frontend** (UI บนเว็บ, มือถือ, หรือเดสก์ท็อป ฯลฯ) * คุณกำลังสร้าง **application** (ไม่ใช่ library) แค่นั้นแหละ! ไม่มีข้อจำกัดเลยว่าจะใช้ภาษาอะไร, UI framework ตัวไหน หรือ state manager อะไร นอกจากนี้ยังค่อยๆ ปรับใช้ทีละนิด (incrementally) ได้, ใช้ใน monorepos ก็ได้ แถมยังสเกลโปรเจกต์ได้ยาวๆ ด้วยการแตกแอปออกเป็น packages แล้วใช้ FSD แยกกันในแต่ละส่วน ถ้าคุณมีสถาปัตยกรรมเดิมอยู่แล้วและกำลังลังเลว่าจะย้ายมา FSD ดีไหม ลองเช็คดูว่าสถาปัตยกรรมปัจจุบัน **สร้างปัญหา** ให้ทีมหรือเปล่า? เช่น โปรเจกต์เริ่มใหญ่จนพันกันยุ่งเหยิง จะเพิ่มฟีเจอร์ใหม่ทีก็ลำบาก หรือคาดว่ากำลังจะมีคนใหม่เข้าทีมเยอะๆ ถ้าของเดิมยังเวิร์กดีอยู่ ก็อาจจะไม่คุ้มที่จะเปลี่ยนนะ แต่ถ้าตัดสินใจแล้วว่าจะย้าย ลองดูแนวทางที่หัวข้อ [Migration](/th/docs/guides/migration/from-custom.md) ได้เลย ## ตัวอย่างเบื้องต้น[​](#basic-example "ลิงก์ตรงไปยังหัวข้อ") นี่คือตัวอย่างโปรเจกต์ง่ายๆ ที่ใช้ FSD: * `📁 app` * `📁 pages` * `📁 shared` โฟลเดอร์ระดับบนสุดเหล่านี้เรียกว่า *Layers* (เลเยอร์) ลองเจาะลึกเข้าไปดูข้างในกัน: * `📂 app` * `📁 routes` * `📁 analytics` * `📂 pages` * `📁 home` * `📂 article-reader` * `📁 ui` * `📁 api` * `📁 settings` * `📂 shared` * `📁 ui` * `📁 api` โฟลเดอร์ข้างใน `📂 pages` เรียกว่า *Slices* (สไลซ์) ซึ่งจะแบ่งเลเยอร์ตามโดเมน (ในกรณีนี้คือแบ่งตามหน้า) ส่วนโฟลเดอร์ข้างใน `📂 app`, `📂 shared`, และ `📂 pages/article-reader` เรียกว่า *Segments* (เซกเมนต์) ซึ่งจะแบ่ง slices (หรือ layers) ตามหน้าที่ทางเทคนิค เช่น โค้ดส่วนนี้มีไว้ทำอะไร ## คอนเซปต์ต่าง ๆ[​](#concepts "ลิงก์ตรงไปยังหัวข้อ") Layers, slices, และ segments ถูกจัดเรียงเป็นลำดับชั้นแบบนี้: ![Hierarchy of FSD concepts, described below](/th/assets/images/visual_schema-e826067f573946613dcdc76e3f585082.jpg) จากภาพด้านบน: เสาหลักสามต้น เรียงจากซ้ายไปขวาคือ "Layers", "Slices", และ "Segments" เสา "Layers" ประกอบด้วย 7 ส่วน เรียงจากบนลงล่างได้แก่ "app", "processes", "pages", "widgets", "features", "entities", และ "shared" โดยส่วน "processes" ถูกขีดฆ่าไว้ ส่วน "entities" เชื่อมโยงกับเสาที่สอง "Slices" เพื่อสื่อว่าเสาที่สองคือเนื้อหาภายใน "entities" เสา "Slices" ประกอบด้วย 3 ส่วน เรียงจากบนลงล่างได้แก่ "user", "post", และ "comment" โดยส่วน "post" เชื่อมโยงกับเสาที่สาม "Segments" ในลักษณะเดียวกัน เสา "Segments" ประกอบด้วย 3 ส่วน เรียงจากบนลงล่างคือ "ui", "model", และ "api" ### Layers (เลเยอร์)[​](#layers "ลิงก์ตรงไปยังหัวข้อ") Layers เป็นมาตรฐานที่เหมือนกันในทุกโปรเจกต์ FSD คุณไม่จำเป็นต้องใช้ครบทุก layer แต่ชื่อของมันมีความสำคัญมาก ปัจจุบันมีทั้งหมด 7 layers (เรียงจากบนลงล่าง): 1. **App** — ทุกอย่างที่ทำให้แอปทำงานได้ — routing, entrypoints, global styles, providers 2. **Processes** (deprecated) — complex inter-page scenarios (เลิกใช้แล้ว) 3. **Pages** — หน้าเว็บเต็มๆ หรือส่วนใหญ่ของหน้าใน nested routing 4. **Widgets** — ชิ้นส่วนฟังก์ชันหรือ UI ขนาดใหญ่ที่จบในตัว มักจะครอบคลุม use case หนึ่งๆ ได้เบ็ดเสร็จ 5. **Features** — การ implement ฟีเจอร์ของโปรดักต์ที่ *นำไปใช้ซ้ำได้* (reused) คือการกระทำที่ส่งมอบคุณค่าทางธุรกิจให้ผู้ใช้ 6. **Entities** — business entities ที่โปรเจกต์ต้องจัดการ เช่น `user` หรือ `product` 7. **Shared** — โค้ดที่นำกลับมาใช้ซ้ำได้ โดยเฉพาะโค้ดที่ไม่ขึ้นกับ project/business logic (แต่ก็ไม่จำเป็นเสมอไปนะ) warning Layers **App** และ **Shared** จะต่างจาก layers อื่นตรงที่ไม่มี slices แต่จะแบ่งเป็น segments โดยตรงเลย ส่วน layers อื่นๆ ทั้งหมด — **Entities**, **Features**, **Widgets**, และ **Pages** — จะยังคงโครงสร้างเดิม คือต้องสร้าง slices ก่อน แล้วค่อยสร้าง segments ข้างใน เคล็ดลับของ layers คือ โมดูลใน layer หนึ่งจะสามารถรู้จักและ import โมดูลจาก layers ที่อยู่ **ต่ำกว่าอย่างเคร่งครัด** เท่านั้น ### Slices (สไลซ์)[​](#slices "ลิงก์ตรงไปยังหัวข้อ") ต่อมาคือ slices ซึ่งจะแบ่งโค้ดตาม business domain คุณมีอิสระเต็มที่ในการตั้งชื่อและจะสร้างกี่อันก็ได้ Slices ช่วยให้ code base เลื่อนดูง่ายขึ้น (navigate) เพราะมันจับกลุ่มโมดูลที่เกี่ยวข้องกันไว้ด้วยกัน Slices ไม่สามารถใช้งาน slices อื่นที่อยู่ใน layer เดียวกันได้ กฎนี้แหละที่ช่วยทำให้เกิด high cohesion และ low coupling ✨ ### Segments (เซกเมนต์)[​](#segments "ลิงก์ตรงไปยังหัวข้อ") Slices (รวมถึง layers App และ Shared) จะประกอบไปด้วย segments และ segments จะจัดกลุ่มโค้ดตามวัตถุประสงค์การใช้งาน ชื่อของ Segment ไม่ได้มีข้อบังคับตายตัวตามมาตรฐาน แต่ก็มีชื่อที่นิยมใช้กันบ่อยๆ ตามหน้าที่หลักๆ ดังนี้: * `ui` — ทุกอย่างที่เกี่ยวกับการแสดงผล UI: UI components, date formatters, styles ฯลฯ * `api` — การติดต่อกับ backend: request functions, data types, mappers ฯลฯ * `model` — data model: schemas, interfaces, stores, และ business logic * `lib` — library code ที่โมดูลอื่นๆ ใน slice นี้จำเป็นต้องใช้ * `config` — ไฟล์ configuration และ feature flags ปกติแล้ว segments เหล่านี้ก็เพียงพอสำหรับ layers ส่วนใหญ่ คุณอาจจะสร้าง segments ของตัวเองเพิ่มใน Shared หรือ App ก็ได้ ไม่ผิดกติกา ## ข้อดี[​](#advantages "ลิงก์ตรงไปยังหัวข้อ") * **ความเป็นระเบียบเดียวกัน (Uniformity)**
เมื่อโครงสร้างเป็นมาตรฐาน โปรเจกต์ต่าง ๆ ก็จะเป็นไปในทิศทางเดียวกัน ทำให้คนใหม่ที่เข้ามาเรียนรู้งานได้ง่ายขึ้นมาก * **มั่นคงต่อการเปลี่ยนแปลงและ Refactor**
โมดูลใน layer หนึ่งไม่สามารถใช้โมดูลอื่นใน layer เดียวกัน หรือ layer ที่อยู่เหนือกว่าได้
ทำให้เราสามารถแก้ไขส่วนต่างๆ แยกกันได้อย่างสบายใจ โดยไม่ต้องกลัวว่าจะไปกระทบส่วนอื่นแบบไม่รู้ตัว * **ควบคุมการใช้ซ้ำได้ดี (Controlled reuse of logic)**
ขึ้นอยู่กับ layer เราสามารถทำให้โค้ดนำไปใช้ซ้ำได้ง่าย หรือจะจำกัดขอบเขตให้เป็นแบบ local ก็ได้
ช่วยรักษาสมดุลระหว่างหลักการ **DRY** และการนำไปใช้งานจริง * **เน้นตอบโจทย์ธุรกิจและผู้ใช้**
แอปถูกแบ่งตาม business domains และสนับสนุนให้ใช้ภาษาทางธุรกิจในการตั้งชื่อ ทำให้เราสามารถลุยงาน Product ได้อย่างมีประสิทธิภาพ โดยไม่ต้องทำความเข้าใจส่วนอื่นที่ไม่เกี่ยวข้องทั้งหมด ## การปรับใช้ทีละส่วน[​](#incremental-adoption "ลิงก์ตรงไปยังหัวข้อ") ถ้าคุณมี codebase เดิมอยู่แล้วและอยากย้ายมาใช้ FSD เราแนะนำกลยุทธ์ตามนี้ ซึ่งเราพบว่าเวิร์กมากจากประสบการณ์ย้ายของพวกเราเอง: 1. เริ่มจากการค่อยๆ จัดระเบียบ layers App และ Shared ทีละโมดูล เพื่อสร้างรากฐานที่แข็งแรงก่อน 2. กระจาย UI ที่มีอยู่ทั้งหมดลงไปใน Widgets และ Pages แบบกว้างๆ ไปก่อน ถึงแม้จะมี dependencies ที่ผิดกฎการ import ของ FSD บ้างก็ไม่เป็นไร 3. เริ่มค่อยๆ แก้ไขการ import ที่ผิดกฎ และดึง Entities หรือ Features ออกมา ข้อแนะนำคือ อย่าเพิ่งเพิ่ม entities ใหญ่ๆ เข้ามาใหม่ในระหว่างที่กำลัง refactor หรือถ้าจะทำ feature ใหม่ก็ควร refactor เฉพาะส่วนที่เกี่ยวข้องเท่านั้นจะดีกว่า ## ขั้นตอนต่อไป[​](#next-steps "ลิงก์ตรงไปยังหัวข้อ") * **อยากเข้าใจวิธีคิดแบบ FSD ให้มากขึ้น?** ลองดูที่ [Tutorial](/th/docs/get-started/tutorial.md) * **ชอบเรียนรู้จากตัวอย่าง?** เรามีตัวอย่างเพียบในหัวข้อ [Examples](/th/examples.md) * **มีคำถามสงสัย?** แวะมาคุยกันได้ที่ [Telegram chat](https://t.me/feature_sliced) ให้คอมมูนิตี้ช่วยตอบได้เลย 😊 --- # บทเรียน (Tutorial) ## ส่วนที่ 1: ร่างบนกระดาษ (On paper)[​](#ส่วนที่-1-ร่างบนกระดาษ-on-paper "ลิงก์ตรงไปยังหัวข้อ") บทเรียนนี้จะพาไปดูแอป Real World หรือที่รู้จักกันในชื่อ Conduit เจ้า Conduit เนี่ยมันคือ [Medium](https://medium.com/) แบบย่อส่วน — ซึ่งให้เราอ่านและเขียนบทความได้ แถมยังคอมเมนต์บทความของชาวบ้านได้ด้วย ![Conduit home page](/th/assets/images/realworld-feed-anonymous-8cbba45f488931979f6c8da8968ad685.jpg) แอปนี้ค่อนข้างเล็ก เราเลยจะทำแบบเรียบง่ายและไม่แยกส่วน (decompose) เยอะเกินไป เป็นไปได้สูงว่าทั้งแอปจะใส่ลงใน 3 layers นี้ได้หมด: **App**, **Pages**, และ **Shared** แต่ถ้าไม่พอ เดี๋ยวเราค่อยเพิ่ม layers ทีหลังได้ พร้อมนะ? ### เริ่มจากลิสต์หน้าทั้งหมดออกมา[​](#เริ่มจากลิสต์หน้าทั้งหมดออกมา "ลิงก์ตรงไปยังหัวข้อ") ถ้าดูจากสกรีนช็อตข้างบน เราน่าจะมีหน้าพวกนี้แน่ๆ: * Home (ฟีดบทความ) * Sign in (เข้าสู่ระบบ) และ sign up (สมัครสมาชิก) * Article reader (หน้าอ่านบทความ) * Article editor (หน้าเขียนบทความ) * User profile viewer (หน้าดูโปรไฟล์) * User profile editor (ตั้งค่าผู้ใช้) แต่ละหน้าพวกนี้จะกลายเป็น *slice* (สไลซ์) ของตัวเองใน *layer* (เลเยอร์) Pages จำได้ไหมจากภาพรวม (overview) ที่บอกว่า slices ก็คือโฟลเดอร์ใน layers และ layers ก็คือโฟลเดอร์ที่มีชื่อตามที่กำหนดไว้ เช่น `pages` ดังนั้น โฟลเดอร์ Pages ของเราจะหน้าตาประมาณนี้: ``` 📂 pages/ 📁 feed/ 📁 sign-in/ 📁 article-read/ 📁 article-edit/ 📁 profile/ 📁 settings/ ``` จุดต่างสำคัญของ Feature-Sliced Design เมื่อเทียบกับโครงสร้างโค้ดแบบไม่มีกฎเกณฑ์ คือหน้าต่างๆ (Pages) จะอ้างอิงกันเองไม่ได้ นั่นคือ หน้าหนึ่งจะ import โค้ดจากอีกหน้าหนึ่งไม่ได้ นี่เป็นเพราะ **กฎการ import ของ layers**: *โมดูล (ไฟล์) ใน slice จะ import slices อื่นได้ก็ต่อเมื่อ slice นั้นอยู่ใน layers ที่ต่ำกว่าเท่านั้น* ในกรณีนี้ Page ถือเป็น slice ดังนั้นโมดูล (ไฟล์) ในหน้านี้จะอ้างอิงโค้ดจาก layers ที่อยู่ต่ำกว่าได้เท่านั้น แต่จะเอาจาก layer เดียวกัน (Pages) ไม่ได้ ### เจาะลึกหน้า Feed[​](#เจาะลึกหน้า-feed "ลิงก์ตรงไปยังหัวข้อ") ![Anonymous user’s perspective](/th/assets/images/realworld-feed-anonymous-8cbba45f488931979f6c8da8968ad685.jpg) *มุมมองของผู้ใช้ทั่วไป (Anonymous)* ![Authenticated user’s perspective](/th/assets/images/realworld-feed-authenticated-15427d9ff7baae009b47b501bee6c059.jpg) *
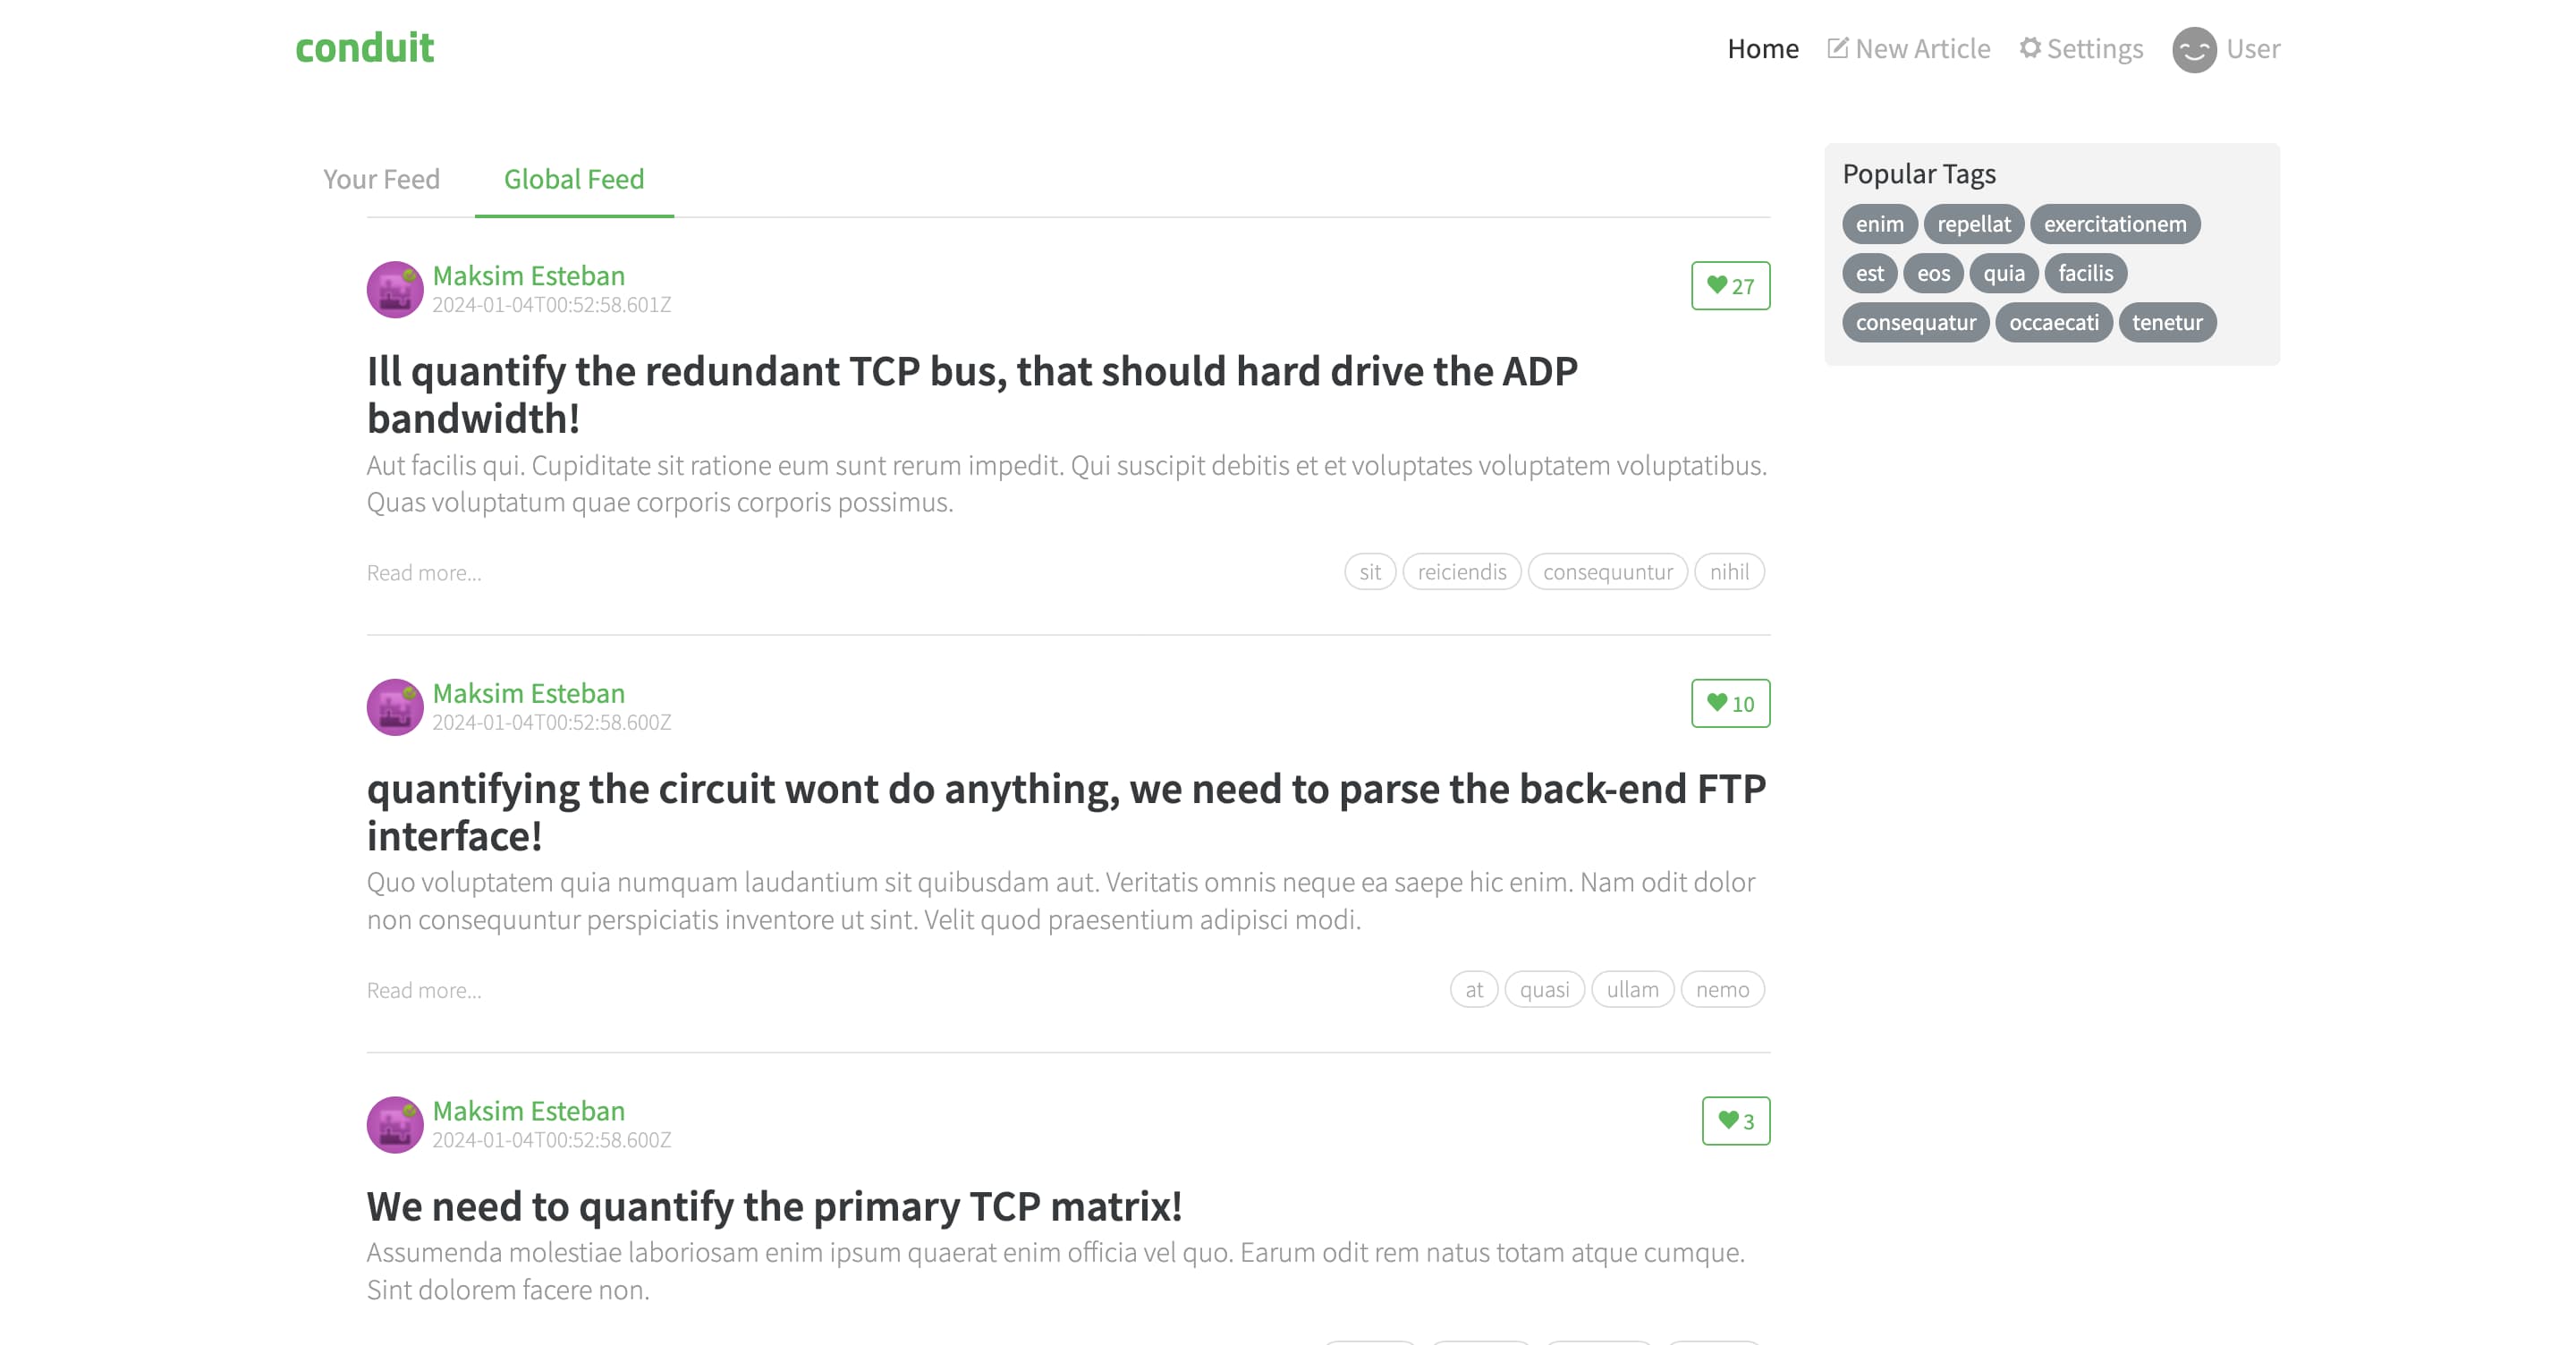
มุมมองของผู้ใช้ที่ล็อกอินแล้ว (Authenticated)* มี 3 ส่วนที่ขยับได้ (dynamic areas) บนหน้า feed: 1. ลิงก์ Sign-in พร้อมตัวบ่งบอกว่าล็อกอินอยู่หรือเปล่า 2. รายการ tags สำหรับกรอง feed 3. Feed บทความ (หนึ่งหรือสอง feed) โดยแต่ละบทความมีปุ่มกดไลก์ ลิงก์ Sign-in เป็นส่วนหนึ่งของ Header ที่ใช้ร่วมกันทุกหน้า เดี๋ยวเราค่อยกลับมาดูแยกอีกที #### รายการ tags[​](#รายการ-tags "ลิงก์ตรงไปยังหัวข้อ") การสร้างรายการ tags เราต้องดึง tags ที่มีมาแสดงผลแต่ละอันเป็น chip และเก็บ tags ที่เลือกไว้ในฝั่ง client การทำงานพวกนี้แบ่งเป็นหมวดหมู่ได้คือ "การคุยกับ API", "ส่วนติดต่อผู้ใช้ (UI)", และ "การจัดเก็บข้อมูล (Storage)" ตามลำดับ ใน Feature-Sliced Design โค้ดจะถูกแยกตามจุดประสงค์โดยใช้ *segments* (เซกเมนต์) ซึ่งก็คือโฟลเดอร์ใน slices นั่นเอง เราจะตั้งชื่ออะไรก็ได้ที่สื่อความหมาย แต่มีบางชื่อที่นิยมใช้กันเป็นมาตรฐาน: * 📂 `api/` สำหรับการติดต่อกับ backend * 📂 `ui/` สำหรับโค้ดที่จัดการเรื่องการแสดงผลและหน้าตา * 📂 `model/` สำหรับ storage และ business logic * 📂 `config/` สำหรับ feature flags, environment variables และการตั้งค่าอื่นๆ เราจะเอาโค้ดดึง tags ไว้ใน `api`, ตัว component tag ไว้ใน `ui`, และการโต้ตอบกับ storage ไว้ใน `model` #### บทความ (Articles)[​](#บทความ-articles "ลิงก์ตรงไปยังหัวข้อ") ใช้หลักการจัดกลุ่มเดียวกัน เราแยกองค์ประกอบของ article feed ออกเป็น 3 segments เหมือนกัน: * 📂 `api/`: ดึงข้อมูลบทความแบบแบ่งหน้า (pagination) พร้อมจำนวนไลก์; กดไลก์บทความ * 📂 `ui/`: * รายการแท็บ (แสดงแท็บพิเศษถ้าเลือก tag ไว้) * ตัวบทความ (individual article) * ตัวแบ่งหน้า (pagination) ที่ใช้งานได้จริง * 📂 `model/`: การเก็บข้อมูลฝั่ง client ของบทความที่โหลดมาแล้ว และหน้าปัจจุบัน (ถ้าต้องใช้) ### ใช้โค้ดทั่วไปซ้ำ (Reuse generic code)[​](#ใช้โค้ดทั่วไปซ้ำ-reuse-generic-code "ลิงก์ตรงไปยังหัวข้อ") หน้าเว็บส่วนใหญ่มักมีเจตนาต่างกันชัดเจน แต่บางอย่างก็เหมือนกันทั้งแอป เช่น UI kit ที่ต้องตรงตาม design language หรือรูปแบบการคุยกับ backend ที่เป็น REST API เหมือนกันหมด เนื่องจากการทำ slices นั้นเน้นให้แยกขาดจากกัน (isolated) การแชร์โค้ดจึงเป็นหน้าที่ของ layer ที่ต่ำกว่า นั่นคือ **Shared** Shared ต่างจาก layers อื่นตรงที่มันเก็บ segments ไม่ใช่ slices ทำให้ layer Shared เหมือนเป็นลูกผสมระหว่าง layer กับ slice ปกติแล้วโค้ดใน Shared จะไม่ได้วางแผนไว้ล่วงหน้า แต่มักจะถูกแยกออกมา (extracted) ระหว่างการพัฒนา เพราะตอนทำจริงเราถึงจะรู้ว่าโค้ดส่วนไหนที่ใช้ร่วมกันบ่อยๆ แต่การจดจำไว้ว่าโค้ดประเภทไหนควรอยู่ใน Shared ก็ช่วยได้เยอะ: * 📂 `ui/` — UI kit, หน้าตาล้วนๆ ไม่มี business logic เช่น ปุ่ม, modals, inputs * 📂 `api/` — wrappers สะดวกๆ สำหรับการยิง request (เช่น `fetch()` บน Web) และอาจรวมฟังก์ชันยิง request ตาม backend specification * 📂 `config/` — การแปลง environment variables * 📂 `i18n/` — การตั้งค่ารองรับหลายภาษา * 📂 `router/` — routing primitives และ route constants นี่เป็นแค่ตัวอย่าง segment names ใน Shared นะ คุณจะตัดบางอันออกหรือสร้างใหม่เองก็ได้ สิ่งสำคัญเดียวที่ต้องจำไว้ตอนสร้าง segments ใหม่คือ ชื่อ segment ควรสื่อถึง **จุดประสงค์ (ทำไม), ไม่ใช่เนื้อแท้ (คืออะไร)** ชื่ออย่าง "components", "hooks", "modals" *ไม่ควร* ใช้ เพราะมันบอกแค่ว่าไฟล์คืออะไร แต่ไม่ได้ช่วยให้ค้นหาโค้ดข้างในง่ายขึ้น การตั้งชื่อแบบนั้นจะทำให้ทีมต้องรื้อดูทุกไฟล์ในโฟลเดอร์ และยังทำให้โค้ดที่ไม่เกี่ยวข้องกันมาอยู่ใกล้กัน ซึ่งจะทำให้การ refactor กระทบวงกว้าง และทำให้ code review กับ testing ยากขึ้นด้วย ### กำหนด Public API ที่เข้มงวด[​](#กำหนด-public-api-ที่เข้มงวด "ลิงก์ตรงไปยังหัวข้อ") ในบริบทของ Feature-Sliced Design คำว่า *public API* หมายถึงการที่ slice หรือ segment ประกาศว่าโมดูลอื่นๆ ในโปรเจกต์สามารถ import อะไรจากมันได้บ้าง เช่น ใน JavaScript ก็อาจเป็นไฟล์ `index.js` ที่ re-export objects จากไฟล์อื่นๆ ใน slice วิธีนี้ทำให้เรามีอิสระในการ refactor โค้ดภายใน slice ตราบใดที่ข้อตกลงกับโลกภายนอก (public API) ยังเหมือนเดิม สำหรับ layer Shared ที่ไม่มี slices การแยก public API ให้แต่ละ segment มักจะสะดวกกว่าการรวมทุกอย่างไว้ใน index เดียวของ Shared วิธีนี้ช่วยให้ imports จาก Shared เป็นระเบียบตามเจตนาการใช้งาน ส่วน layers อื่นที่มี slices จะกลับกัน — การมี index เดียวต่อ slice มักจะเวิร์กกว่า แล้วให้ slice ตัดสินใจเองว่าจะแบ่ง segments ข้างในยังไงโดยที่โลกภายนอกไม่ต้องรู้ เพราะ layers อื่นมักจะมี exports น้อยกว่าเยอะ Slices/segments ของเราจะมองเห็นกันและกันแบบนี้: ``` 📂 pages/ 📁 feed/ 📄 index 📁 sign-in/ 📄 index 📁 article-read/ 📄 index 📁 … 📂 shared/ 📂 ui/ 📄 index 📂 api/ 📄 index 📁 … ``` อะไรที่ซ่อนอยู่ในโฟลเดอร์อย่าง `pages/feed` หรือ `shared/ui` จะรู้กันแค่ในโฟลเดอร์นั้น ไฟล์อื่นไม่ควรไปยุ่งกับโครงสร้างภายในของมัน ### บล็อก UI ขนาดใหญ่ที่ใช้ซ้ำ (Large reused blocks in the UI)[​](#บล็อก-ui-ขนาดใหญ่ที่ใช้ซ้ำ-large-reused-blocks-in-the-ui "ลิงก์ตรงไปยังหัวข้อ") ก่อนหน้านี้เราติดเรื่อง Header ที่โผล่ทุกหน้าไว้ การสร้างใหม่ทุกหน้าคงไม่เข้าท่า ดังนั้นการใช้ซ้ำคือคำตอบ เรามี Shared ไว้แชร์โค้ดอยู่แล้ว แต่เดี๋ยวก่อน! มีข้อควรระวังถ้าวาง UI ก้อนใหญ่ไว้ใน Shared — เพราะ layer Shared ไม่รู้เรื่อง layers ที่อยู่เหนือมันเลย ระหว่าง Shared กับ Pages ยังมีอีก 3 layers: Entities, Features, และ Widgets บางโปรเจกต์อาจมีของใน layers พวกนี้ที่จำเป็นต้องใช้ใน UI block ใหญ่ๆ นั้น ซึ่งหมายความว่าเราเอา block นั้นไปไว้ใน Shared ไม่ได้ ไม่งั้นมันจะ import ของจาก layers ข้างบน ซึ่งผิดกฎ นั่นเลยเป็นที่มาของ layer **Widgets** มันอยู่เหนือ Shared, Entities, และ Features ทำให้มันเรียกใช้ของทั้งหมดนี้ได้ ในกรณีเรา Header เรียบง่ายมาก — มีแค่โลโก้นิ่งๆ กับเมนูนำทาง (navigation) เมนูอาจต้องยิง request ไป API เพื่อเช็คว่าล็อกอินยัง แต่เรื่องนั้นจัดการได้ด้วยการ import จาก `api` segment ดังนั้น เราเอา Header ไว้ใน Shared ได้เลย ### เจาะลึกหน้าที่มีฟอร์ม (Close look at a page with a form)[​](#เจาะลึกหน้าที่มีฟอร์ม-close-look-at-a-page-with-a-form "ลิงก์ตรงไปยังหัวข้อ") มาดูหน้าที่มีไว้แก้ไขข้อมูลกันบ้าง ไม่ใช่แค่อ่านอย่างเดียว เช่น หน้าเขียนบทความ: ![Conduit post editor](/th/assets/images/realworld-editor-authenticated-10de4d01479270886859e08592045b1e.jpg) 
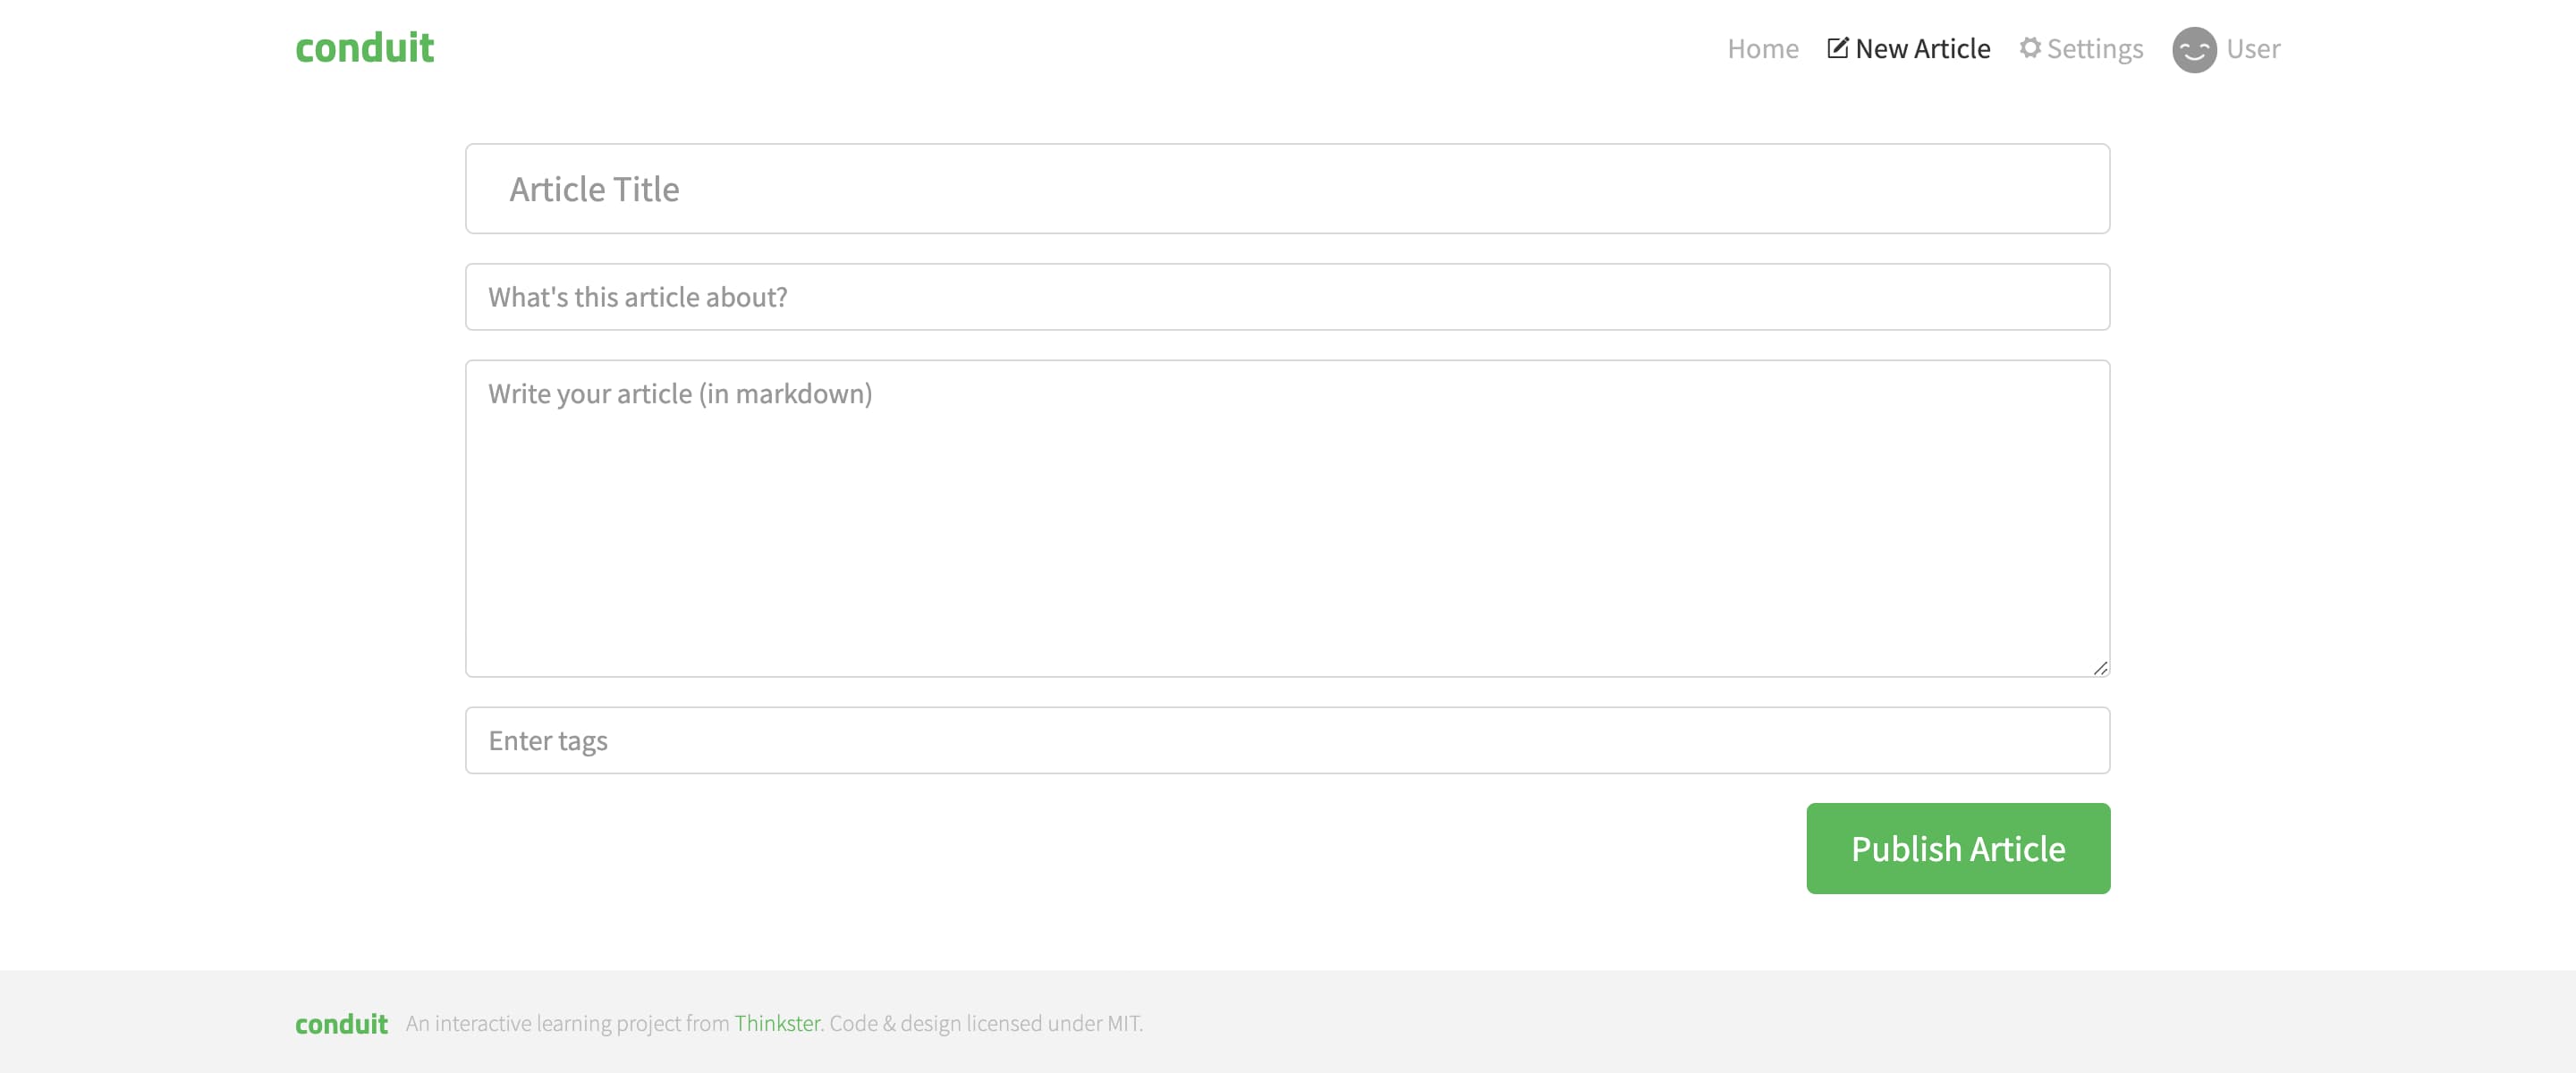
ดูเหมือนง่าย แต่มีหลายมิติของการทำแอปที่เรายังไม่ได้พูดถึง — การตรวจสอบความถูกต้องของฟอร์ม (form validation), สถานะ error, และการบันทึกข้อมูล (persistence) ถ้าเราจะสร้างหน้านี้ เราคงหยิบ inputs กับปุ่มจาก Shared มาประกอบเป็นฟอร์มใน `ui` segment ของหน้านี้ จากนั้นใน `api` segment เราจะกำหนด mutation request เพื่อสร้างบทความบน backend เพื่อตรวจสอบ request ก่อนส่ง เราต้องมี validation schema และที่ที่เหมาะจะวางมันคือ `model` segment เพราะมันคือ data model เราจะสร้างข้อความ error ที่นั่นและแสดงผลด้วย component อีกตัวใน `ui` segment เพื่อประสบการณ์การใช้งานที่ดีขึ้น เราอาจจะบันทึก inputs ไว้กันพลาด (ข้อมูลหาย) นี่ก็เป็นหน้าที่ของ `model` segment เหมือนกัน ### สรุป (Summary)[​](#สรุป-summary "ลิงก์ตรงไปยังหัวข้อ") เราได้สำรวจหลายหน้าและวางโครงสร้างคร่าวๆ ของแอปเราได้แล้ว: 1. Shared layer 1. `ui` จะเก็บ UI kit ที่ใช้ซ้ำได้ 2. `api` จะเก็บการติดต่อพื้นฐานกับ backend 3. ส่วนที่เหลือค่อยเพิ่มเมื่อจำเป็น 2. Pages layer — แต่ละหน้าแยกเป็น slice ต่างหาก 1. `ui` จะเก็บหน้าเว็บและส่วนประกอบทั้งหมดของหน้านั้น 2. `api` จะเก็บการดึงข้อมูลเฉพาะทาง โดยเรียกใช้ `shared/api` 3. `model` อาจเก็บข้อมูลฝั่ง client ที่เราจะแสดงผล ลุยสร้างกันเลยดีกว่า! ## ส่วนที่ 2: ลงมือโค้ด (In code)[​](#ส่วนที่-2-ลงมือโค้ด-in-code "ลิงก์ตรงไปยังหัวข้อ") ตอนนี้เรามีแผนแล้ว มาลงมือทำจริงกัน เราจะใช้ React และ [Remix](https://remix.run) มี template เตรียมไว้ให้แล้ว clone จาก GitHub เพื่อเริ่มต้นได้เลย: ติดตั้ง dependencies ด้วย `npm install` และเริ่ม development server ด้วย `npm run dev` เปิด แล้วจะเห็นแอปหน้าขาวๆ ### วางโครงร่างหน้าเว็บ (Lay out the pages)[​](#วางโครงร่างหน้าเว็บ-lay-out-the-pages "ลิงก์ตรงไปยังหัวข้อ") เริ่มจากสร้าง components เปล่าๆ สำหรับทุกหน้า รันคำสั่งนี้ในโปรเจกต์: ``` npx fsd pages feed sign-in article-read article-edit profile settings --segments ui ``` คำสั่งนี้จะสร้างโฟลเดอร์พวก `pages/feed/ui/` และไฟล์ index `pages/feed/index.ts` ให้ทุกหน้า ### เชื่อมต่อหน้า Feed[​](#เชื่อมต่อหน้า-feed "ลิงก์ตรงไปยังหัวข้อ") มาเชื่อม root route ของแอปเข้ากับหน้า feed สร้าง component `FeedPage.tsx` ใน `pages/feed/ui` แล้วใส่โค้ดนี้ลงไป: pages/feed/ui/FeedPage.tsx ``` export function FeedPage() { return (

conduit

A place to share your knowledge.

); } ``` จากนั้น re-export component นี้ใน public API ของหน้า feed ซึ่งก็คือไฟล์ `pages/feed/index.ts`: pages/feed/index.ts ``` export { FeedPage } from "./ui/FeedPage"; ``` ทีนี้เชื่อมมันเข้ากับ root route ใน Remix การ routing จะอ้างอิงตามไฟล์ (file-based) และไฟล์ route จะอยู่ในโฟลเดอร์ `app/routes` ซึ่งเข้ากับ Feature-Sliced Design ได้ดีเลย ใช้ component `FeedPage` ใน `app/routes/_index.tsx`: app/routes/\_index.tsx ``` import type { MetaFunction } from "@remix-run/node"; import { FeedPage } from "pages/feed"; export const meta: MetaFunction = () => { return [{ title: "Conduit" }]; }; export default FeedPage; ``` ถ้าคุณรัน dev server แล้วเปิดแอป ตอนนี้ควรจะเห็นแบนเนอร์ Conduit แล้ว! ![The banner of Conduit](/th/assets/images/conduit-banner-a20e38edcd109ee21a8b1426d93a66b3.jpg) ### API client[​](#api-client "ลิงก์ตรงไปยังหัวข้อ") เพื่อคุยกับ RealWorld backend เรามาสร้าง API client สะดวกๆ ใน Shared กัน สร้าง 2 segments คือ `api` สำหรับ client และ `config` สำหรับตัวแปรต่างๆ เช่น backend base URL: ``` npx fsd shared --segments api config ``` แล้วสร้าง `shared/config/backend.ts`: shared/config/backend.ts ``` export { mockBackendUrl as backendBaseUrl } from "mocks/handlers"; ``` shared/config/index.ts ``` export { backendBaseUrl } from "./backend"; ``` เนื่องจากโปรเจกต์ RealWorld มี [OpenAPI specification](https://github.com/gothinkster/realworld/blob/main/api/openapi.yml) เตรียมไว้ให้ เราเลยใช้ประโยชน์จาก auto-generated types ได้ เราจะใช้ [แพ็กเกจ `openapi-fetch`](https://openapi-ts.pages.dev/openapi-fetch/) ซึ่งมาพร้อมตัวสร้าง type รันคำสั่งเพื่อสร้าง API typings ล่าสุด: ``` npm run generate-api-types ``` จะได้ไฟล์ `shared/api/v1.d.ts` เราจะใช้ไฟล์นี้สร้าง typed API client ใน `shared/api/client.ts`: shared/api/client.ts ``` import createClient from "openapi-fetch"; import { backendBaseUrl } from "shared/config"; import type { paths } from "./v1"; export const { GET, POST, PUT, DELETE } = createClient({ baseUrl: backendBaseUrl }); ``` shared/api/index.ts ``` export { GET, POST, PUT, DELETE } from "./client"; ``` ### ข้อมูลจริงใน Feed[​](#ข้อมูลจริงใน-feed "ลิงก์ตรงไปยังหัวข้อ") ตอนนี้เราเพิ่มบทความลงใน feed ได้แล้วโดยดึงจาก backend เริ่มจากทำ component แสดงตัวอย่างบทความ (article preview) กัน สร้าง `pages/feed/ui/ArticlePreview.tsx` ใส่เนื้อหาตามนี้: pages/feed/ui/ArticlePreview\.tsx ``` export function ArticlePreview({ article }) { /* TODO */ } ``` เพราะเราเขียน TypeScript การมี typed article object คงจะดี ถ้าไปดูใน `v1.d.ts` ที่เจนมา จะเห็นว่า article object อยู่ที่ `components["schemas"]["Article"]` ดังนั้นสร้างไฟล์ data models ใน Shared แล้ว export models ออกมา: shared/api/models.ts ``` import type { components } from "./v1"; export type Article = components["schemas"]["Article"]; ``` shared/api/index.ts ``` export { GET, POST, PUT, DELETE } from "./client"; export type { Article } from "./models"; ``` กลับมาที่ article preview component ใส่ข้อมูลลงใน markup อัปเดตไฟล์ดังนี้: pages/feed/ui/ArticlePreview\.tsx ``` import { Link } from "@remix-run/react"; import type { Article } from "shared/api"; interface ArticlePreviewProps { article: Article; } export function ArticlePreview({ article }: ArticlePreviewProps) { return (
{article.author.username} {new Date(article.createdAt).toLocaleDateString(undefined, { dateStyle: "long", })}

{article.title}

{article.description}

Read more...
    {article.tagList.map((tag) => (
  • {tag}
  • ))}
); } ``` ปุ่มไลก์ตอนนี้ยังกดไม่ได้ เดี๋ยวเราค่อยมาแก้ตอนทำหน้า article reader และใส่ฟังก์ชันกดไลก์ ตอนนี้เราดึงบทความมาแสดงเป็นการ์ดเรียงกันได้แล้ว การดึงข้อมูลใน Remix ใช้ *loaders* — ฟังก์ชันฝั่ง server ที่ดึงเฉพาะสิ่งที่หน้าเว็บต้องการ Loaders คุยกับ API ในนามของหน้าเว็บ เราเลยเอามาไว้ใน `api` segment ของหน้า: pages/feed/api/loader.ts ``` import { json } from "@remix-run/node"; import { GET } from "shared/api"; export const loader = async () => { const { data: articles, error, response } = await GET("/articles"); if (error !== undefined) { throw json(error, { status: response.status }); } return json({ articles }); }; ``` เชื่อมต่อกับหน้าเว็บ ต้อง export ชื่อ `loader` จากไฟล์ route: pages/feed/index.ts ``` export { FeedPage } from "./ui/FeedPage"; export { loader } from "./api/loader"; ``` app/routes/\_index.tsx ``` import type { MetaFunction } from "@remix-run/node"; import { FeedPage } from "pages/feed"; export { loader } from "pages/feed"; export const meta: MetaFunction = () => { return [{ title: "Conduit" }]; }; export default FeedPage; ``` ขั้นตอนสุดท้ายคือแสดงการ์ดบทความเหล่านี้ใน feed อัปเดต `FeedPage` ของคุณ: pages/feed/ui/FeedPage.tsx ``` import { useLoaderData } from "@remix-run/react"; import type { loader } from "../api/loader"; import { ArticlePreview } from "./ArticlePreview"; export function FeedPage() { const { articles } = useLoaderData(); return (

conduit

A place to share your knowledge.

{articles.articles.map((article) => ( ))}
); } ``` ### การกรองด้วย Tag (Filtering by tag)[​](#การกรองด้วย-tag-filtering-by-tag "ลิงก์ตรงไปยังหัวข้อ") สำหรับ tags หน้าที่ของเราคือดึงมันจาก backend และเก็บ tag ที่เลือกอยู่ เราทำเรื่อง fetching เป็นแล้ว — ก็แค่ request ใน loader อีกตัว เราจะใช้ฟังก์ชันสะดวกๆ `promiseHash` จากแพ็กเกจ `remix-utils` ที่ติดตั้งไว้แล้ว อัปเดตไฟล์ loader `pages/feed/api/loader.ts` ตามนี้: pages/feed/api/loader.ts ``` import { json } from "@remix-run/node"; import type { FetchResponse } from "openapi-fetch"; import { promiseHash } from "remix-utils/promise"; import { GET } from "shared/api"; async function throwAnyErrors( responsePromise: Promise>, ) { const { data, error, response } = await responsePromise; if (error !== undefined) { throw json(error, { status: response.status }); } return data as NonNullable; } export const loader = async () => { return json( await promiseHash({ articles: throwAnyErrors(GET("/articles")), tags: throwAnyErrors(GET("/tags")), }), ); }; ``` อาจจะสังเกตเห็นว่าเราแยกส่วน error handling ออกไปเป็น generic function `throwAnyErrors` ดูมีประโยชน์ดี อาจจะต้องใช้ซ้ำวันหลัง แต่ตอนนี้พักไว้ก่อน มาที่รายการ tags มันต้อง interactive — คลิกที่ tag แล้ว tag นั้นต้องถูกเลือก ตามธรรมเนียม Remix เราจะใช้ URL search parameters เป็นที่เก็บค่า tag ที่เลือก ให้ browser จัดการ storage ไป เราไปโฟกัสเรื่องสำคัญดีกว่า อัปเดต `pages/feed/ui/FeedPage.tsx` ด้วยโค้ดนี้: pages/feed/ui/FeedPage.tsx ``` import { Form, useLoaderData } from "@remix-run/react"; import { ExistingSearchParams } from "remix-utils/existing-search-params"; import type { loader } from "../api/loader"; import { ArticlePreview } from "./ArticlePreview"; export function FeedPage() { const { articles, tags } = useLoaderData(); return (

conduit

A place to share your knowledge.

{articles.articles.map((article) => ( ))}

Popular Tags

{tags.tags.map((tag) => ( ))}
); } ``` จากนั้นเราต้องใช้ search parameter `tag` ใน loader ของเรา เปลี่ยนฟังก์ชัน `loader` ใน `pages/feed/api/loader.ts` เป็นแบบนี้: pages/feed/api/loader.ts ``` import { json, type LoaderFunctionArgs } from "@remix-run/node"; import type { FetchResponse } from "openapi-fetch"; import { promiseHash } from "remix-utils/promise"; import { GET } from "shared/api"; async function throwAnyErrors( responsePromise: Promise>, ) { const { data, error, response } = await responsePromise; if (error !== undefined) { throw json(error, { status: response.status }); } return data as NonNullable; } export const loader = async ({ request }: LoaderFunctionArgs) => { const url = new URL(request.url); const selectedTag = url.searchParams.get("tag") ?? undefined; return json( await promiseHash({ articles: throwAnyErrors( GET("/articles", { params: { query: { tag: selectedTag } } }), ), tags: throwAnyErrors(GET("/tags")), }), ); }; ``` เรียบร้อย ไม่ต้องมี `model` segment เลย Remix นี่ของดีจริงๆ ### การแบ่งหน้า (Pagination)[​](#การแบ่งหน้า-pagination "ลิงก์ตรงไปยังหัวข้อ") ในทำนองเดียวกัน เราทำ pagination ได้ ลองทำเองดูก็ได้นะ หรือจะก๊อปโค้ดข้างล่างนี้ก็ได้ ไม่มีใครว่าหรอก pages/feed/api/loader.ts ``` import { json, type LoaderFunctionArgs } from "@remix-run/node"; import type { FetchResponse } from "openapi-fetch"; import { promiseHash } from "remix-utils/promise"; import { GET } from "shared/api"; async function throwAnyErrors( responsePromise: Promise>, ) { const { data, error, response } = await responsePromise; if (error !== undefined) { throw json(error, { status: response.status }); } return data as NonNullable; } /** Amount of articles on one page. */ export const LIMIT = 20; export const loader = async ({ request }: LoaderFunctionArgs) => { const url = new URL(request.url); const selectedTag = url.searchParams.get("tag") ?? undefined; const page = parseInt(url.searchParams.get("page") ?? "", 10); return json( await promiseHash({ articles: throwAnyErrors( GET("/articles", { params: { query: { tag: selectedTag, limit: LIMIT, offset: !Number.isNaN(page) ? page * LIMIT : undefined, }, }, }), ), tags: throwAnyErrors(GET("/tags")), }), ); }; ``` pages/feed/ui/FeedPage.tsx ``` import { Form, useLoaderData, useSearchParams } from "@remix-run/react"; import { ExistingSearchParams } from "remix-utils/existing-search-params"; import { LIMIT, type loader } from "../api/loader"; import { ArticlePreview } from "./ArticlePreview"; export function FeedPage() { const [searchParams] = useSearchParams(); const { articles, tags } = useLoaderData(); const pageAmount = Math.ceil(articles.articlesCount / LIMIT); const currentPage = parseInt(searchParams.get("page") ?? "1", 10); return (

conduit

A place to share your knowledge.

{articles.articles.map((article) => ( ))}
    {Array(pageAmount) .fill(null) .map((_, index) => index + 1 === currentPage ? (
  • {index + 1}
  • ) : (
  • ), )}

Popular Tags

{tags.tags.map((tag) => ( ))}
); } ``` จบไปอีกเรื่อง ยังมีเรื่อง tab list ที่ทำคล้ายๆ กันได้ แต่พักไว้ก่อนจนกว่าจะทำ authentication เสร็จ พูดถึงก็มาพอดี! ### Authentication[​](#authentication "ลิงก์ตรงไปยังหัวข้อ") Authentication เกี่ยวข้องกับ 2 หน้า — หน้าหนึ่งล็อกอิน อีกหน้าลงทะเบียน ทั้งสองหน้าเหมือนกันมาก เลย make sense ที่จะเก็บไว้ใน slice เดียวกันคือ `sign-in` เพื่อให้แชร์โค้ดกันได้ถ้จำเป็น สร้าง `RegisterPage.tsx` ใน `ui` segment ของ `pages/sign-in` ตามนี้: pages/sign-in/ui/RegisterPage.tsx ``` import { Form, Link, useActionData } from "@remix-run/react"; import type { register } from "../api/register"; export function RegisterPage() { const registerData = useActionData(); return (

Sign up

Have an account?

{registerData?.error && (
    {registerData.error.errors.body.map((error) => (
  • {error}
  • ))}
)}
); } ``` เรามี import ที่พังต้องแก้ มันเกี่ยวข้องกับ segment ใหม่ สร้างเลย: ``` npx fsd pages sign-in -s api ``` แต่ก่อนจะ implement ส่วน backend ของการลงทะเบียน เราต้องมี infrastructure code ให้ Remix จัดการ sessions ก่อน อันนี้ไปที่ Shared เผื่อหน้าอื่นต้องใช้ ใส่โค้ดนี้ใน `shared/api/auth.server.ts` อันนี้เฉพาะทางของ Remix มากๆ ไม่ต้องกังวลมาก ก๊อป-วางได้เลย: shared/api/auth.server.ts ``` import { createCookieSessionStorage, redirect } from "@remix-run/node"; import invariant from "tiny-invariant"; import type { User } from "./models"; invariant( process.env.SESSION_SECRET, "SESSION_SECRET must be set for authentication to work", ); const sessionStorage = createCookieSessionStorage<{ user: User; }>({ cookie: { name: "__session", httpOnly: true, path: "/", sameSite: "lax", secrets: [process.env.SESSION_SECRET], secure: process.env.NODE_ENV === "production", }, }); export async function createUserSession({ request, user, redirectTo, }: { request: Request; user: User; redirectTo: string; }) { const cookie = request.headers.get("Cookie"); const session = await sessionStorage.getSession(cookie); session.set("user", user); return redirect(redirectTo, { headers: { "Set-Cookie": await sessionStorage.commitSession(session, { maxAge: 60 * 60 * 24 * 7, // 7 วัน }), }, }); } export async function getUserFromSession(request: Request) { const cookie = request.headers.get("Cookie"); const session = await sessionStorage.getSession(cookie); return session.get("user") ?? null; } export async function requireUser(request: Request) { const user = await getUserFromSession(request); if (user === null) { throw redirect("/login"); } return user; } ``` และ export `User` model จากไฟล์ `models.ts` ที่อยู่ข้างๆ กันด้วย: shared/api/models.ts ``` import type { components } from "./v1"; export type Article = components["schemas"]["Article"]; export type User = components["schemas"]["User"]; ``` ก่อนโค้ดนี้จะทำงานได้ ต้องตั้งค่า `SESSION_SECRET` environment variable ก่อน สร้างไฟล์ชื่อ `.env` ที่ root ของโปรเจกต์ เขียนว่า `SESSION_SECRET=` แล้วพิมพ์มั่วๆ ลงไปให้ได้ string ยาวๆ จะได้หน้าตาประมาณนี้: .env ``` SESSION_SECRET=dontyoudarecopypastethis ``` สุดท้าย เพิ่ม exports ใน public API เพื่อให้เรียกใช้โค้ดพวกนี้ได้: shared/api/index.ts ``` export { GET, POST, PUT, DELETE } from "./client"; export type { Article } from "./models"; export { createUserSession, getUserFromSession, requireUser } from "./auth.server"; ``` ตอนนี้เราเขียนโค้ดคุยกับ RealWorld backend เพื่อทำการลงทะเบียนจริงๆ ได้แล้ว เราจะเก็บไว้ใน `pages/sign-in/api` สร้างไฟล์ชื่อ `register.ts` แล้วใส่โค้ดนี้: pages/sign-in/api/register.ts ``` import { json, type ActionFunctionArgs } from "@remix-run/node"; import { POST, createUserSession } from "shared/api"; export const register = async ({ request }: ActionFunctionArgs) => { const formData = await request.formData(); const username = formData.get("username")?.toString() ?? ""; const email = formData.get("email")?.toString() ?? ""; const password = formData.get("password")?.toString() ?? ""; const { data, error } = await POST("/users", { body: { user: { email, password, username } }, }); if (error) { return json({ error }, { status: 400 }); } else { return createUserSession({ request: request, user: data.user, redirectTo: "/", }); } }; ``` pages/sign-in/index.ts ``` export { RegisterPage } from './ui/RegisterPage'; export { register } from './api/register'; ``` เกือบเสร็จแล้ว! เหลือแค่เชื่อมหน้ากับ action เข้ากับ route `/register` สร้าง `register.tsx` ใน `app/routes`: app/routes/register.tsx ``` import { RegisterPage, register } from "pages/sign-in"; export { register as action }; export default RegisterPage; ``` ถ้าตอนนี้ไปที่ คุณน่าจะสร้าง user ใหม่ได้แล้ว! ส่วนอื่นๆ ของแอปอาจจะยังไม่ตอบสนอง เดี๋ยวเรามาจัดการกัน ด้วยวิธีคล้ายๆ กัน เราทำหน้า login ได้ ลองทำดูหรือจะก๊อปโค้ดไปเลยก็ได้: pages/sign-in/api/sign-in.ts ``` import { json, type ActionFunctionArgs } from "@remix-run/node"; import { POST, createUserSession } from "shared/api"; export const signIn = async ({ request }: ActionFunctionArgs) => { const formData = await request.formData(); const email = formData.get("email")?.toString() ?? ""; const password = formData.get("password")?.toString() ?? ""; const { data, error } = await POST("/users/login", { body: { user: { email, password } }, }); if (error) { return json({ error }, { status: 400 }); } else { return createUserSession({ request: request, user: data.user, redirectTo: "/", }); } }; ``` pages/sign-in/ui/SignInPage.tsx ``` import { Form, Link, useActionData } from "@remix-run/react"; import type { signIn } from "../api/sign-in"; export function SignInPage() { const signInData = useActionData(); return (

Sign in

Need an account?

{signInData?.error && (
    {signInData.error.errors.body.map((error) => (
  • {error}
  • ))}
)}
); } ``` pages/sign-in/index.ts ``` export { RegisterPage } from './ui/RegisterPage'; export { register } from './api/register'; export { SignInPage } from './ui/SignInPage'; export { signIn } from './api/sign-in'; ``` app/routes/login.tsx ``` import { SignInPage, signIn } from "pages/sign-in"; export { signIn as action }; export default SignInPage; ``` ทีนี้มาเพิ่มทางเข้าให้ user เข้าถึงหน้าพวกนี้กัน ### Header (ส่วนหัว)[​](#header-ส่วนหัว "ลิงก์ตรงไปยังหัวข้อ") อย่างที่เราคุยกันในส่วนที่ 1 แอป header มักจะวางไว้ใน Widgets หรือไม่ก็ Shared เราจะเอาไว้ Shared เพราะมันง่ายมากและ business logic ทั้งหมดแยกออกไปได้ มาสร้างที่อยู่ให้มันกัน: ``` npx fsd shared ui ``` สร้าง `shared/ui/Header.tsx` ใส่เนื้อหาตามนี้: shared/ui/Header.tsx ``` import { useContext } from "react"; import { Link, useLocation } from "@remix-run/react"; import { CurrentUser } from "../api/currentUser"; export function Header() { const currentUser = useContext(CurrentUser); const { pathname } = useLocation(); return ( ); } ``` Export component นี้จาก `shared/ui`: shared/ui/index.ts ``` export { Header } from "./Header"; ``` ใน header เราพึ่งพา context ที่เก็บไว้ใน `shared/api` สร้างมันขึ้นมาด้วย: shared/api/currentUser.ts ``` import { createContext } from "react"; import type { User } from "./models"; export const CurrentUser = createContext(null); ``` shared/api/index.ts ``` export { GET, POST, PUT, DELETE } from "./client"; export type { Article } from "./models"; export { createUserSession, getUserFromSession, requireUser } from "./auth.server"; export { CurrentUser } from "./currentUser"; ``` ทีนี้เพิ่ม header เข้าไปในหน้าเว็บ เราอยากให้มันอยู่ทุกหน้า เลย make sense ที่จะเพิ่มมันใน root route และครอบ outlet (ที่ที่หน้าเว็บจะถูก render) ด้วย `CurrentUser` context provider ด้วยวิธีนี้ทั้งแอปและ header จะเข้าถึง user object ปัจจุบันได้ เราจะเพิ่ม loader เพื่อดึง user object จาก cookies มาจริงๆ ใส่โค้ดนี้ลงใน `app/root.tsx`: app/root.tsx ``` import { cssBundleHref } from "@remix-run/css-bundle"; import type { LinksFunction, LoaderFunctionArgs } from "@remix-run/node"; import { Links, LiveReload, Meta, Outlet, Scripts, ScrollRestoration, useLoaderData, } from "@remix-run/react"; import { Header } from "shared/ui"; import { getUserFromSession, CurrentUser } from "shared/api"; export const links: LinksFunction = () => [ ...(cssBundleHref ? [{ rel: "stylesheet", href: cssBundleHref }] : []), ]; export const loader = ({ request }: LoaderFunctionArgs) => getUserFromSession(request); export default function App() { const user = useLoaderData(); return (
); } ``` ถึงจุดนี้ คุณควรจะได้หน้าตาแบบนี้บนหน้า home: ![The feed page of Conduit, including the header, the feed, and the tags. The tabs are still missing.](/th/assets/images/realworld-feed-without-tabs-5da4c9072101ac20e82e2234bd3badbe.jpg) หน้า feed ของ Conduit รวม header, feed, และ tags แต่ tabs ยังหายไป ### Tabs (แท็บ)[​](#tabs-แท็บ "ลิงก์ตรงไปยังหัวข้อ") ตอนนี้เราตรวจจับสถานะ authentication ได้แล้ว มาทำ tabs และ post likes ให้เสร็จกัน จะได้จบเรื่องหน้า feed เราต้องใช้อีก form แต่ไฟล์หน้าเริ่มใหญ่แล้ว ย้าย forms พวกนี้ไปไฟล์ข้างเคียงกันดีกว่า สร้าง `Tabs.tsx`, `PopularTags.tsx`, และ `Pagination.tsx` ด้วยเนื้อหาตามนี้: pages/feed/ui/Tabs.tsx ``` import { useContext } from "react"; import { Form, useSearchParams } from "@remix-run/react"; import { CurrentUser } from "shared/api"; export function Tabs() { const [searchParams] = useSearchParams(); const currentUser = useContext(CurrentUser); return (
    {currentUser !== null && (
  • )}
  • {searchParams.has("tag") && (
  • {searchParams.get("tag")}
  • )}
); } ``` pages/feed/ui/PopularTags.tsx ``` import { Form, useLoaderData } from "@remix-run/react"; import { ExistingSearchParams } from "remix-utils/existing-search-params"; import type { loader } from "../api/loader"; export function PopularTags() { const { tags } = useLoaderData(); return (

Popular Tags

{tags.tags.map((tag) => ( ))}
); } ``` pages/feed/ui/Pagination.tsx ``` import { Form, useLoaderData, useSearchParams } from "@remix-run/react"; import { ExistingSearchParams } from "remix-utils/existing-search-params"; import { LIMIT, type loader } from "../api/loader"; export function Pagination() { const [searchParams] = useSearchParams(); const { articles } = useLoaderData(); const pageAmount = Math.ceil(articles.articlesCount / LIMIT); const currentPage = parseInt(searchParams.get("page") ?? "1", 10); return (
    {Array(pageAmount) .fill(null) .map((_, index) => index + 1 === currentPage ? (
  • {index + 1}
  • ) : (
  • ), )}
); } ``` ตอนนี้เราลดรูปหน้า feed ลงได้เยอะเลย: pages/feed/ui/FeedPage.tsx ``` import { useLoaderData } from "@remix-run/react"; import type { loader } from "../api/loader"; import { ArticlePreview } from "./ArticlePreview"; import { Tabs } from "./Tabs"; import { PopularTags } from "./PopularTags"; import { Pagination } from "./Pagination"; export function FeedPage() { const { articles } = useLoaderData(); return (

conduit

A place to share your knowledge.

{articles.articles.map((article) => ( ))}
); } ``` เราต้องรองรับแท็บใหม่ในฟังก์ชัน loader ด้วย: pages/feed/api/loader.ts ``` import { json, type LoaderFunctionArgs } from "@remix-run/node"; import type { FetchResponse } from "openapi-fetch"; import { promiseHash } from "remix-utils/promise"; import { GET, requireUser } from "shared/api"; async function throwAnyErrors( responsePromise: Promise>, ) { /* unchanged */ } /** Amount of articles on one page. */ export const LIMIT = 20; export const loader = async ({ request }: LoaderFunctionArgs) => { const url = new URL(request.url); const selectedTag = url.searchParams.get("tag") ?? undefined; const page = parseInt(url.searchParams.get("page") ?? "", 10); if (url.searchParams.get("source") === "my-feed") { const userSession = await requireUser(request); return json( await promiseHash({ articles: throwAnyErrors( GET("/articles/feed", { params: { query: { limit: LIMIT, offset: !Number.isNaN(page) ? page * LIMIT : undefined, }, }, headers: { Authorization: `Token ${userSession.token}` }, }), ), tags: throwAnyErrors(GET("/tags")), }), ); } return json( await promiseHash({ articles: throwAnyErrors( GET("/articles", { params: { query: { tag: selectedTag, limit: LIMIT, offset: !Number.isNaN(page) ? page * LIMIT : undefined, }, }, }), ), tags: throwAnyErrors(GET("/tags")), }), ); }; ``` ก่อนทิ้งหน้า feed ไป มาเพิ่มโค้ดจัดการไลก์กัน แก้ `ArticlePreview.tsx` เป็นแบบนี้: pages/feed/ui/ArticlePreview\.tsx ``` import { Form, Link } from "@remix-run/react"; import type { Article } from "shared/api"; interface ArticlePreviewProps { article: Article; } export function ArticlePreview({ article }: ArticlePreviewProps) { return (
{article.author.username} {new Date(article.createdAt).toLocaleDateString(undefined, { dateStyle: "long", })}

{article.title}

{article.description}

Read more...
    {article.tagList.map((tag) => (
  • {tag}
  • ))}
); } ``` โค้ดนี้จะส่ง POST request ไปที่ `/article/:slug` พร้อม `_action=favorite` เพื่อกดไลก์บทความ ตอนนี้ยังไม่ทำงานนะ แต่พอเราเริ่มทำหน้า article reader เราจะทำส่วนนี้ด้วย และแล้วเราก็ทำหน้า feed เสร็จอย่างเป็นทางการ! เย้! ### Article reader (หน้าอ่านบทความ)[​](#article-reader-หน้าอ่านบทความ "ลิงก์ตรงไปยังหัวข้อ") อย่างแรก ข้อมูล มาสร้าง loader กัน: ``` npx fsd pages article-read -s api ``` pages/article-read/api/loader.ts ``` import { json, type LoaderFunctionArgs } from "@remix-run/node"; import invariant from "tiny-invariant"; import type { FetchResponse } from "openapi-fetch"; import { promiseHash } from "remix-utils/promise"; import { GET, getUserFromSession } from "shared/api"; async function throwAnyErrors( responsePromise: Promise>, ) { const { data, error, response } = await responsePromise; if (error !== undefined) { throw json(error, { status: response.status }); } return data as NonNullable; } export const loader = async ({ request, params }: LoaderFunctionArgs) => { invariant(params.slug, "Expected a slug parameter"); const currentUser = await getUserFromSession(request); const authorization = currentUser ? { Authorization: `Token ${currentUser.token}` } : undefined; return json( await promiseHash({ article: throwAnyErrors( GET("/articles/{slug}", { params: { path: { slug: params.slug }, }, headers: authorization, }), ), comments: throwAnyErrors( GET("/articles/{slug}/comments", { params: { path: { slug: params.slug }, }, headers: authorization, }), ), }), ); }; ``` pages/article-read/index.ts ``` export { loader } from "./api/loader"; ``` เชื่อมต่อกับ route `/article/:slug` โดยสร้างไฟล์ route ชื่อ `article.$slug.tsx`: app/routes/article.$slug.tsx ``` export { loader } from "pages/article-read"; ``` ตัวหน้าเว็บประกอบด้วย 3 ส่วนหลัก — header ของบทความพร้อม actions (มี 2 จุด), เนื้อหาบทความ, และส่วน comments นี่คือ markup ของหน้า ไม่ค่อยมีอะไรน่าตื่นเต้นเท่าไหร่: pages/article-read/ui/ArticleReadPage.tsx ``` import { useLoaderData } from "@remix-run/react"; import type { loader } from "../api/loader"; import { ArticleMeta } from "./ArticleMeta"; import { Comments } from "./Comments"; export function ArticleReadPage() { const { article } = useLoaderData(); return (

{article.article.title}

{article.article.body}

    {article.article.tagList.map((tag) => (
  • {tag}
  • ))}

); } ``` สิ่งที่น่าสนใจกว่าคือ `ArticleMeta` และ `Comments` เพราะมันมีการเขียนข้อมูล (write operations) เช่น กดไลก์บทความ, คอมเมนต์ ฯลฯ เพื่อให้มันทำงานได้ เราต้อง implement ฝั่ง backend ก่อน สร้าง `action.ts` ใน `api` segment ของหน้า: pages/article-read/api/action.ts ``` import { redirect, type ActionFunctionArgs } from "@remix-run/node"; import { namedAction } from "remix-utils/named-action"; import { redirectBack } from "remix-utils/redirect-back"; import invariant from "tiny-invariant"; import { DELETE, POST, requireUser } from "shared/api"; export const action = async ({ request, params }: ActionFunctionArgs) => { const currentUser = await requireUser(request); const authorization = { Authorization: `Token ${currentUser.token}` }; const formData = await request.formData(); return namedAction(formData, { async delete() { invariant(params.slug, "Expected a slug parameter"); await DELETE("/articles/{slug}", { params: { path: { slug: params.slug } }, headers: authorization, }); return redirect("/"); }, async favorite() { invariant(params.slug, "Expected a slug parameter"); await POST("/articles/{slug}/favorite", { params: { path: { slug: params.slug } }, headers: authorization, }); return redirectBack(request, { fallback: "/" }); }, async unfavorite() { invariant(params.slug, "Expected a slug parameter"); await DELETE("/articles/{slug}/favorite", { params: { path: { slug: params.slug } }, headers: authorization, }); return redirectBack(request, { fallback: "/" }); }, async createComment() { invariant(params.slug, "Expected a slug parameter"); const comment = formData.get("comment"); invariant(typeof comment === "string", "Expected a comment parameter"); await POST("/articles/{slug}/comments", { params: { path: { slug: params.slug } }, headers: { ...authorization, "Content-Type": "application/json" }, body: { comment: { body: comment } }, }); return redirectBack(request, { fallback: "/" }); }, async deleteComment() { invariant(params.slug, "Expected a slug parameter"); const commentId = formData.get("id"); invariant(typeof commentId === "string", "Expected an id parameter"); const commentIdNumeric = parseInt(commentId, 10); invariant( !Number.isNaN(commentIdNumeric), "Expected a numeric id parameter", ); await DELETE("/articles/{slug}/comments/{id}", { params: { path: { slug: params.slug, id: commentIdNumeric } }, headers: authorization, }); return redirectBack(request, { fallback: "/" }); }, async followAuthor() { const authorUsername = formData.get("username"); invariant( typeof authorUsername === "string", "Expected a username parameter", ); await POST("/profiles/{username}/follow", { params: { path: { username: authorUsername } }, headers: authorization, }); return redirectBack(request, { fallback: "/" }); }, async unfollowAuthor() { const authorUsername = formData.get("username"); invariant( typeof authorUsername === "string", "Expected a username parameter", ); await DELETE("/profiles/{username}/follow", { params: { path: { username: authorUsername } }, headers: authorization, }); return redirectBack(request, { fallback: "/" }); }, }); }; ``` Export จาก slice แล้วก็ตามด้วย route และเชื่อมหน้าเว็บไปด้วยเลย: pages/article-read/index.ts ``` export { ArticleReadPage } from "./ui/ArticleReadPage"; export { loader } from "./api/loader"; export { action } from "./api/action"; ``` app/routes/article.$slug.tsx ``` import { ArticleReadPage } from "pages/article-read"; export { loader, action } from "pages/article-read"; export default ArticleReadPage; ``` ตอนนี้ถึงแม้เราจะยังไม่ได้ใส่ปุ่มไลก์ในหน้าอ่าน แต่ปุ่มไลก์ในหน้า feed จะเริ่มทำงานแล้ว! เพราะมันส่ง "like" requests มาที่ route นี้ ลองเล่นดูได้ `ArticleMeta` และ `Comments` ก็เป็นกลุ่มของ forms เหมือนกัน เราเคยทำมาแล้ว ก๊อปโค้ดไปใช้โลด: pages/article-read/ui/ArticleMeta.tsx ``` import { Form, Link, useLoaderData } from "@remix-run/react"; import { useContext } from "react"; import { CurrentUser } from "shared/api"; import type { loader } from "../api/loader"; export function ArticleMeta() { const currentUser = useContext(CurrentUser); const { article } = useLoaderData(); return (
{article.article.author.username} {article.article.createdAt}
{article.article.author.username == currentUser?.username ? ( <> Edit Article    ) : ( <>    )}
); } ``` pages/article-read/ui/Comments.tsx ``` import { useContext } from "react"; import { Form, Link, useLoaderData } from "@remix-run/react"; import { CurrentUser } from "shared/api"; import type { loader } from "../api/loader"; export function Comments() { const { comments } = useLoaderData(); const currentUser = useContext(CurrentUser); return (
{currentUser !== null ? (
) : (

Sign in   or   Sign up   to add comments on this article.

)} {comments.comments.map((comment) => (

{comment.body}

  {comment.author.username} {comment.createdAt} {comment.author.username === currentUser?.username && (
)}
))}
); } ``` และแล้วหน้าอ่านบทความก็เรียบร้อย! ปุ่ม follow ผู้เขียน, ไลก์โพสต์, และทิ้งคอมเมนต์ควรจะใช้ได้ตามคาด ![Article reader with functioning buttons to like and follow](/th/assets/images/realworld-article-reader-6a420e4f2afe139d2bdd54d62974f0b9.jpg) 
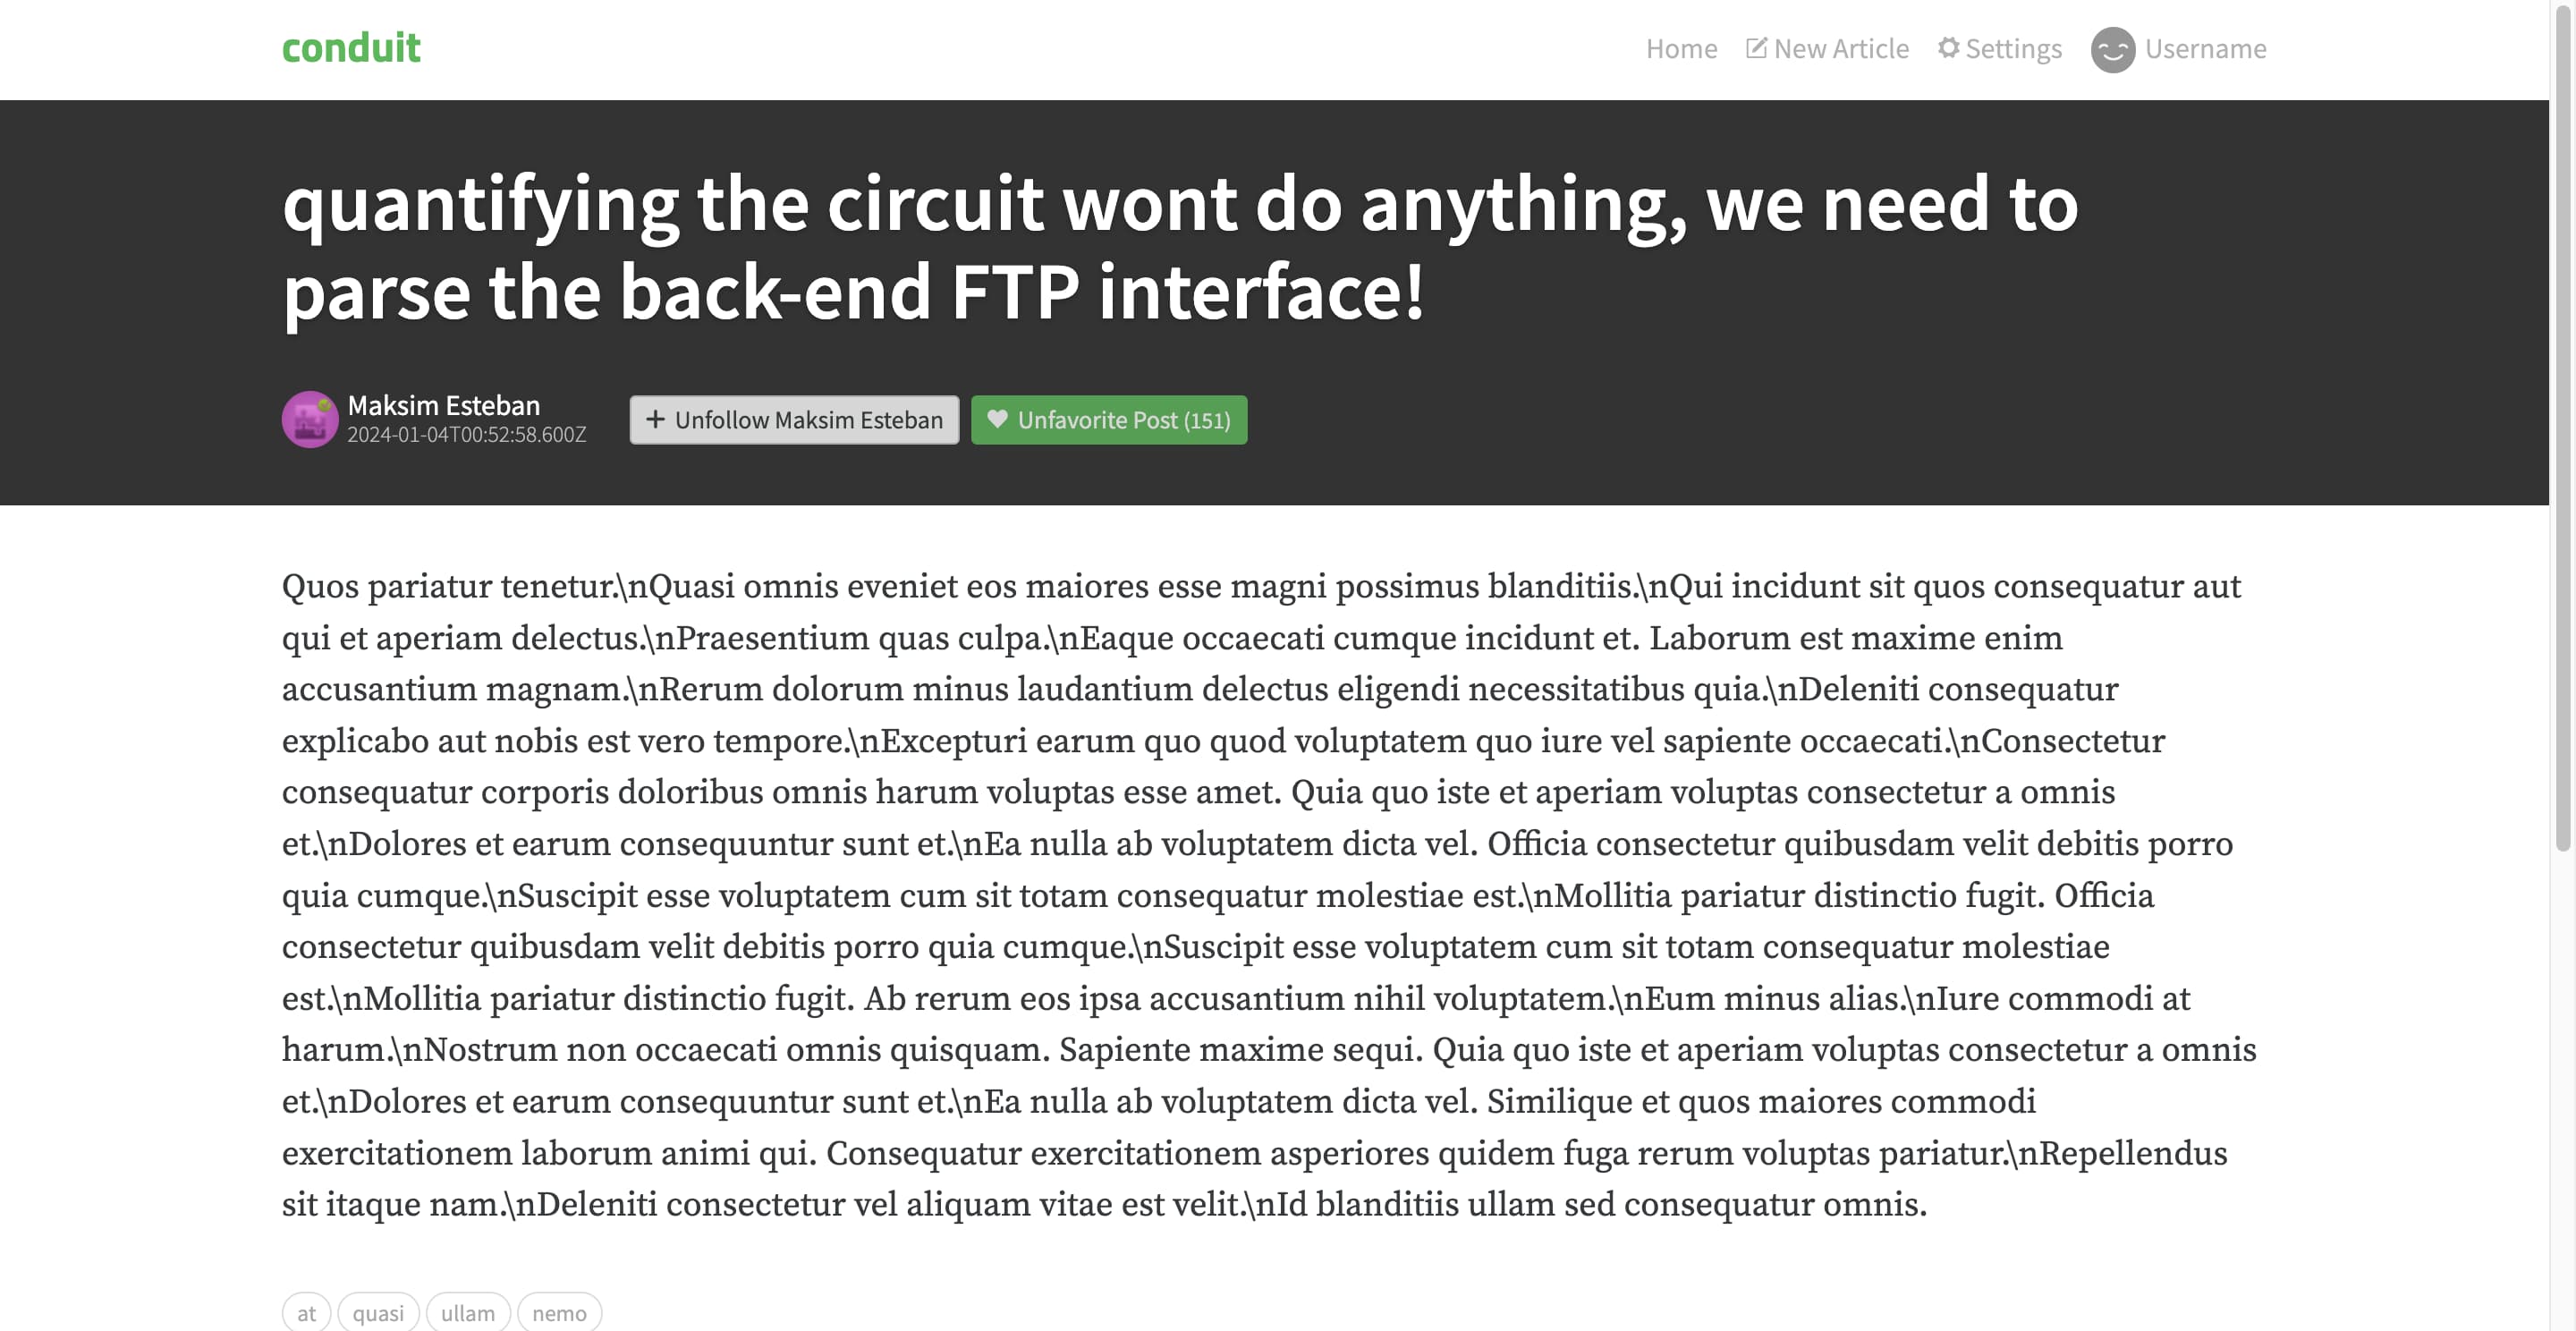
หน้าอ่านบทความพร้อมปุ่มไลก์และ follow ที่ใช้งานได้จริง ### Article editor (หน้าเขียนบทความ)[​](#article-editor-หน้าเขียนบทความ "ลิงก์ตรงไปยังหัวข้อ") นี่เป็นหน้าสุดท้ายที่เราจะทำในบทเรียนนี้ และส่วนที่น่าสนใจที่สุดคือเราจะ validate ข้อมูลในฟอร์มยังไง ตัวหน้าเว็บ `article-edit/ui/ArticleEditPage.tsx` จะค่อนข้างเรียบง่าย ความซับซ้อนส่วนเกินถูกซ่อนไว้ใน 2 components อื่น: pages/article-edit/ui/ArticleEditPage.tsx ``` import { Form, useLoaderData } from "@remix-run/react"; import type { loader } from "../api/loader"; import { TagsInput } from "./TagsInput"; import { FormErrors } from "./FormErrors"; export function ArticleEditPage() { const article = useLoaderData(); return (
); } ``` หน้านี้จะดึงบทความปัจจุบันมาแสดง (ถ้าไม่ได้เขียนใหม่) และเติมข้อมูลลงฟอร์ม เราเคยเห็นแบบนี้มาแล้ว ที่น่าสนใจคือ `FormErrors` เพราะมันจะรับผลการ validate และแสดงให้ user เห็น มาดูกัน: pages/article-edit/ui/FormErrors.tsx ``` import { useActionData } from "@remix-run/react"; import type { action } from "../api/action"; export function FormErrors() { const actionData = useActionData(); return actionData?.errors != null ? (
    {actionData.errors.map((error) => (
  • {error}
  • ))}
) : null; } ``` ตรงนี้เราสมมติว่า action ของเราจะ return field `errors` ซึ่งเป็น array ของข้อความ error ที่คนอ่านรู้เรื่อง เราจะไปดูส่วน action กันเร็วๆ นี้ อีก component คือ tags input เป็นแค่ input field ธรรมดาที่มี preview tags ให้ดูด้วย ไม่มีอะไรมาก: pages/article-edit/ui/TagsInput.tsx ``` import { useEffect, useRef, useState } from "react"; export function TagsInput({ name, defaultValue, }: { name: string; defaultValue?: Array; }) { const [tagListState, setTagListState] = useState(defaultValue ?? []); function removeTag(tag: string): void { const newTagList = tagListState.filter((t) => t !== tag); setTagListState(newTagList); } const tagsInput = useRef(null); useEffect(() => { tagsInput.current && (tagsInput.current.value = tagListState.join(",")); }, [tagListState]); return ( <> setTagListState(e.target.value.split(",").filter(Boolean)) } />
{tagListState.map((tag) => ( [" ", "Enter"].includes(e.key) && removeTag(tag) } onClick={() => removeTag(tag)} >{" "} {tag} ))}
); } ``` ทีนี้มาดูส่วน API ตัว loader ควรจะดู URL ถ้ามี article slug แปลว่าเรากำลังแก้บทความเดิม และข้อมูลควรถูกโหลดมา แต่ถ้าไม่มี ก็ไม่ต้อง return อะไร มาสร้าง loader กัน: pages/article-edit/api/loader.ts ``` import { json, type LoaderFunctionArgs } from "@remix-run/node"; import type { FetchResponse } from "openapi-fetch"; import { GET, requireUser } from "shared/api"; async function throwAnyErrors( responsePromise: Promise>, ) { const { data, error, response } = await responsePromise; if (error !== undefined) { throw json(error, { status: response.status }); } return data as NonNullable; } export const loader = async ({ params, request }: LoaderFunctionArgs) => { const currentUser = await requireUser(request); if (!params.slug) { return { article: null }; } return throwAnyErrors( GET("/articles/{slug}", { params: { path: { slug: params.slug } }, headers: { Authorization: `Token ${currentUser.token}` }, }), ); }; ``` ส่วน action จะรับค่าจาก fields ใหม่, เอาไปผ่าน data schema ของเรา และถ้าทุกอย่างถูกต้อง ก็ commit การเปลี่ยนแปลงไปที่ backend ไม่ว่าจะอัปเดตบทความเดิมหรือสร้างใหม่: pages/article-edit/api/action.ts ``` import { json, redirect, type ActionFunctionArgs } from "@remix-run/node"; import { POST, PUT, requireUser } from "shared/api"; import { parseAsArticle } from "../model/parseAsArticle"; export const action = async ({ request, params }: ActionFunctionArgs) => { try { const { body, description, title, tags } = parseAsArticle( await request.formData(), ); const tagList = tags?.split(",") ?? []; const currentUser = await requireUser(request); const payload = { body: { article: { title, description, body, tagList, }, }, headers: { Authorization: `Token ${currentUser.token}` }, }; const { data, error } = await (params.slug ? PUT("/articles/{slug}", { params: { path: { slug: params.slug } }, ...payload, }) : POST("/articles", payload)); if (error) { return json({ errors: error }, { status: 422 }); } return redirect(`/article/${data.article.slug ?? ""}`); } catch (errors) { return json({ errors }, { status: 400 }); } }; ``` ตัว schema ยังทำหน้าที่เป็น parsing function สำหรับ `FormData` ด้วย ซึ่งช่วยให้เราดึง fields ที่ clean แล้วออกมาได้ง่ายๆ หรือจะ throw errors ออกมาจัดการตอนท้ายก็ได้ parsing function หน้าตาประมาณนี้: pages/article-edit/model/parseAsArticle.ts ``` export function parseAsArticle(data: FormData) { const errors = []; const title = data.get("title"); if (typeof title !== "string" || title === "") { errors.push("Give this article a title"); } const description = data.get("description"); if (typeof description !== "string" || description === "") { errors.push("Describe what this article is about"); } const body = data.get("body"); if (typeof body !== "string" || body === "") { errors.push("Write the article itself"); } const tags = data.get("tags"); if (typeof tags !== "string") { errors.push("The tags must be a string"); } if (errors.length > 0) { throw errors; } return { title, description, body, tags: data.get("tags") ?? "" } as { title: string; description: string; body: string; tags: string; }; } ``` ยอมรับว่ามันดูยาวและซ้ำซ้อนหน่อย แต่ก็คุ้มแลกกับ errors ที่อ่านรู้เรื่อง อันนี้อาจจะใช้ Zod schema ก็ได้ แต่เราต้องมานั่ง render error messages ฝั่ง frontend อีก ซึ่งฟอร์มนี้มันไม่คุ้มที่จะทำซับซ้อนขนาดนั้น ขั้นตอนสุดท้าย — เชื่อมหน้าเว็บ, loader, และ action เข้ากับ routes เนื่องจากเรารองรับทั้งสร้างใหม่และแก้ไข เราเลย export สิ่งเดียวกันจาก `editor._index.tsx` และ `editor.$slug.tsx` ได้เลย: pages/article-edit/index.ts ``` export { ArticleEditPage } from "./ui/ArticleEditPage"; export { loader } from "./api/loader"; export { action } from "./api/action"; ``` app/routes/editor.\_index.tsx, app/routes/editor.$slug.tsx (same content) ``` import { ArticleEditPage } from "pages/article-edit"; export { loader, action } from "pages/article-edit"; export default ArticleEditPage; ``` เสร็จแล้ว! ลองล็อกอินแล้วสร้างบทความใหม่ดูนะ หรือจะแกล้งๆ "ลืม" เขียนบทความแล้วดูว่า validation ทำงานไหมก็ได้ 😉 ![The Conduit article editor, with the title field saying “New article” and the rest of the fields empty. Above the form there are two errors: “Describe what this article is about” and “Write the article itself”.](/th/assets/images/realworld-article-editor-bc3ee45c96ae905fdbb54d6463d12723.jpg) ตัวแก้ไขบทความ Conduit โดยช่อง title เขียนว่า “New article” และช่องอื่นว่างหมด ข้างบนฟอร์มมี 2 errors: **“Describe what this article is about”** และ **“Write the article itself”** ส่วนหน้า profile และ settings ก็คล้ายกับ article reader และ editor มาก ทิ้งไว้ให้เป็นแบบฝึกหัดสำหรับผู้อ่าน นั่นก็คือคุณไงล่ะ :) --- # การจัดการ API Requests ## Shared API Requests[​](#shared-api-requests "ลิงก์ตรงไปยังหัวข้อ") เริ่มด้วยการวาง Logic การเรียก API ที่ใช้ร่วมกันไว้ใน `shared/api` สิ่งนี้ช่วยให้คุณ Reuse คำสั่ง Request ได้ง่ายทั่วทั้งแอป และช่วยให้ Prototyping ได้เร็วขึ้น สำหรับหลายๆ โปรเจกต์ แค่นี้ก็เพียงพอแล้วสำหรับการเรียก API โครงสร้างไฟล์ทั่วไปจะเป็นดังนี้: * 📂 shared * 📂 api * 📄 client.ts * 📄 index.ts * 📂 endpoints * 📄 login.ts ไฟล์ `client.ts` รวมการตั้งค่า HTTP request ไว้ที่เดียว มันจะห่อหุ้ม Method ที่คุณเลือกใช้ (เช่น `fetch()` หรือ `axios` instance) และจัดการ Configuration ทั่วไป เช่น: * Backend base URL * Default headers (เช่น สำหรับ authentication) * Data serialization นี่คือตัวอย่างสำหรับ `axios` และ `fetch`: * Axios * Fetch shared/api/client.ts ``` // Example using axios import axios from 'axios'; export const client = axios.create({ baseURL: 'https://your-api-domain.com/api/', timeout: 5000, headers: { 'X-Custom-Header': 'my-custom-value' } }); ``` shared/api/client.ts ``` export const client = { async post(endpoint: string, body: any, options?: RequestInit) { const response = await fetch(`https://your-api-domain.com/api${endpoint}`, { method: 'POST', body: JSON.stringify(body), ...options, headers: { 'Content-Type': 'application/json', 'X-Custom-Header': 'my-custom-value', ...options?.headers, }, }); return response.json(); } // ... other methods like put, delete, etc. }; ``` จัดระเบียบฟังก์ชัน API request แต่ละตัวของคุณใน `shared/api/endpoints` โดยจัดกลุ่มตาม API endpoint note เพื่อให้ตัวอย่างกระชับ เราจะละเว้นเรื่องการโต้ตอบกับ Form และ Validation สำหรับรายละเอียดเกี่ยวกับ Libraries เช่น Zod หรือ Valibot ให้ดูที่บทความ [Type Validation and Schemas](/th/docs/guides/examples/types.md#type-validation-schemas-and-zod) shared/api/endpoints/login.ts ``` import { client } from '../client'; export interface LoginCredentials { email: string; password: string; } export function login(credentials: LoginCredentials) { return client.post('/login', credentials); } ``` ใช้ไฟล์ `index.ts` ใน `shared/api` เพื่อ Export request functions ของคุณออกไป shared/api/index.ts ``` export { client } from './client'; // ถ้าคุณต้องการ Export client เองด้วย export { login } from './endpoints/login'; export type { LoginCredentials } from './endpoints/login'; ``` ## Slice-Specific API Requests[​](#slice-specific-api-requests "ลิงก์ตรงไปยังหัวข้อ") ถ้า API request ถูกใช้โดย Slice ใด Slice หนึ่งเท่านั้น (เช่น หน้าเดียว หรือ Feature เดียว) และจะไม่ถูก Reuse ที่อื่น ให้วางมันไว้ใน api segment ของ Slice นั้นๆ วิธีนี้จะช่วยเก็บ Logic เฉพาะของ Slice ไว้ด้วยกันอย่างเป็นระเบียบ * 📂 pages * 📂 login * 📄 index.ts * 📂 api * 📄 login.ts * 📂 ui * 📄 LoginPage.tsx pages/login/api/login.ts ``` import { client } from 'shared/api'; interface LoginCredentials { email: string; password: string; } export function login(credentials: LoginCredentials) { return client.post('/login', credentials); } ``` คุณไม่จำเป็นต้อง Export ฟังก์ชัน `login()` ออกไปใน Public API ของ Page เพราะไม่น่าจะมีที่อื่นในแอปที่ต้องการ Request นี้ note หลีกเลี่ยงการวาง API calls และ Response types ไว้ใน Layer `entities` เร็วเกินไป การตอบกลับจาก Backend อาจแตกต่างจากที่ Frontend entities ของคุณต้องการ Logic API ใน `shared/api` หรือใน `api` segment ของ Slice ช่วยให้คุณแปลงข้อมูลได้อย่างเหมาะสม ทำให้ Entities โฟกัสไปที่เรื่องของ Frontend เท่านั้น ## การใช้ Client Generators[​](#client-generators "ลิงก์ตรงไปยังหัวข้อ") ถ้า Backend ของคุณมี OpenAPI specification เครื่องมืออย่าง [orval](https://orval.dev/) หรือ [openapi-typescript](https://openapi-ts.dev/) สามารถ Generate API types และ Request functions ให้คุณได้ วางโค้ดที่ Generate มาไว้ใน เช่น `shared/api/openapi` และอย่าลืมใส่ `README.md` เพื่ออธิบายว่า Types พวกนี้คืออะไร และจะ Generate มันยังไง ## การเชื่อมต่อกับ Server State Libraries[​](#server-state-libraries "ลิงก์ตรงไปยังหัวข้อ") เมื่อใช้ Server State Libraries เช่น [TanStack Query (React Query)](https://tanstack.com/query/latest) หรือ [Pinia Colada](https://pinia-colada.esm.dev/) คุณอาจต้องแชร์ Types หรือ Cache keys ระหว่าง Slices ให้ใช้ `shared` layer สำหรับสิ่งต่าง ๆ เช่น: * API data types * Cache keys * Common query/mutation options สำหรับรายละเอียดเพิ่มเติมเกี่ยวกับวิธีการทำงานกับ Server State Libraries ให้ดูที่ [React Query article](/th/docs/guides/tech/with-react-query.md) --- # การยืนยันตัวตน (Authentication) โดยทั่วไป การ Authentication ประกอบด้วยขั้นตอนต่อไปนี้: 1. รับ Credential จากผู้ใช้ (เช่น Username/Password) 2. ส่งไปให้ Backend 3. เก็บ Token เพื่อใช้ในการ Request แบบระบุตัวตน (Authenticated requests) ## รับ Credential จากผู้ใช้ยังไง[​](#รับ-credential-จากผู้ใช้ยังไง "ลิงก์ตรงไปยังหัวข้อ") เราถือว่าแอปของคุณมีหน้าที่รับ Credential ถ้าคุณใช้ Authentication ผ่าน OAuth คุณก็แค่สร้างหน้า Login ที่มีลิงก์ไปยังหน้า Login ของผู้ให้บริการ OAuth แล้วข้ามไป [ขั้นตอนที่ 3](#how-to-store-the-token-for-authenticated-requests) ได้เลย ### หน้า Login แบบแยกต่างหาก[​](#หน้า-login-แบบแยกต่างหาก "ลิงก์ตรงไปยังหัวข้อ") ปกติแล้ว เว็บไซต์มักจะมีหน้าสำหรับ Login แยกต่างหาก เพื่อให้กรอก Username และ Password หน้าพวกนี้มักจะเรียบง่าย ไม่ต้องการการ Decomposition อะไรมาก แบบฟอร์ม Login และ Registration มักจะหน้าตาคล้ายๆ กัน เลยอาจจะรวมอยู่ในหน้าเดียวกันได้ สร้าง Slice สำหรับหน้า Login/Registration ของคุณใน Pages layer: * 📂 pages * 📂 login * 📂 ui * 📄 LoginPage.tsx (หรือไฟล์ Component ตาม Framework ของคุณ) * 📄 RegisterPage.tsx * 📄 index.ts * หน้าอื่นๆ... ที่นี่เราสร้าง 2 Components และ Export ทั้งคู่ออกไปในไฟล์ index ของ Slice Components เหล่านี้จะมี Form ที่มีหน้าที่นำเสนอ Control ที่เข้าใจง่ายให้ผู้ใช้กรอก Credential ### Dialog สำหรับ Login[​](#dialog-สำหรับ-login "ลิงก์ตรงไปยังหัวข้อ") ถ้าแอปของคุณมี Dialog สำหรับ Login ที่ใช้ได้ในทุกหน้า ลองพิจารณาสร้าง Dialog นั้นเป็น Widget ดูสิ วิธีนี้ช่วยให้คุณไม่ต้อง Decompose มากเกินไป แต่ยังมีอิสระที่จะนำ Dialog นี้ไปใช้ซ้ำในหน้าไหนก็ได้ * 📂 widgets * 📂 login-dialog * 📂 ui * 📄 LoginDialog.tsx * 📄 index.ts * Widgets อื่นๆ... ส่วนที่เหลือของไกด์นี้เขียนสำหรับแนวทางแบบหน้าแยกต่างหาก แต่หลักการเดียวกันก็ใช้กับ Dialog widget ได้นะ ### Client-side validation[​](#client-side-validation "ลิงก์ตรงไปยังหัวข้อ") บางครั้ง โดยเฉพาะตอนสมัครสมาชิก (Registration) มันสมเหตุสมผลที่จะตรวจสอบข้อมูลฝั่ง Client เพื่อให้ผู้ใช้รู้ทันทีว่าทำอะไรผิด การ Validation สามารถทำได้ใน `model` segment ของหน้า Login ใช้ Library สำหรับ Schema validation เช่น [Zod](https://zod.dev) สำหรับ JS/TS และ Expose schema นั้นให้ `ui` segment ใช้: pages/login/model/registration-schema.ts ``` import { z } from "zod"; export const registrationData = z.object({ email: z.string().email(), password: z.string().min(6), confirmPassword: z.string(), }).refine((data) => data.password === data.confirmPassword, { message: "รหัสผ่านไม่ตรงกัน", path: ["confirmPassword"], }); ``` จากนั้น ใน `ui` segment คุณสามารถใช้ Schema นี้เพื่อ Validate ข้อมูลที่ผู้ใช้กรอก: pages/login/ui/RegisterPage.tsx ``` import { registrationData } from "../model/registration-schema"; function validate(formData: FormData) { const data = Object.fromEntries(formData.entries()); try { registrationData.parse(data); } catch (error) { // TODO: แสดง Error message ให้ผู้ใช้เห็น } } export function RegisterPage() { return (
validate(new FormData(e.target))}>
) } ``` ## ส่ง Credential ไป Backend ยังไง[​](#ส่ง-credential-ไป-backend-ยังไง "ลิงก์ตรงไปยังหัวข้อ") สร้างฟังก์ชันที่ส่ง Request ไปยัง Login endpoint ของ Backend ฟังก์ชันนี้อาจถูกเรียกโดยตรงใน Component code โดยใช้ Mutation library (เช่น TanStack Query) หรือเรียกเป็น Side effect ใน State manager ก็ได้ อย่างที่อธิบายไปใน [ไกด์สำหรับ API requests](/th/docs/guides/examples/api-requests.md) คุณสามารถวาง Request ของคุณไว้ใน `shared/api` หรือใน `api` segment ของหน้า Login ก็ได้ ### Two-factor authentication (2FA)[​](#two-factor-authentication-2fa "ลิงก์ตรงไปยังหัวข้อ") ถ้าแอปของคุณรองรับ 2FA คุณอาจต้อง Redirect ไปยังอีกหน้าเพื่อให้ผู้ใช้กรอก One-time password ปกติแล้ว `POST /login` request ของคุณจะคืนค่า User object พร้อม Flag ที่บอกว่าผู้ใช้เปิด 2FA ไว้หรือไม่ ถ้า Flag นี้ถูกเซ็ต ก็ Redirect ผู้ใช้ไปหน้า 2FA ซะ เนื่องจากหน้านี้เกี่ยวข้องกับการ Login มากๆ คุณสามารถเก็บมันไว้ใน Slice เดียวกัน คือ `login` ใน Pages layer ได้เลย คุณต้องมี Request function อีกอันที่คล้ายกับ `login()` ที่เราสร้างก่อนหน้านี้ วางไว้ด้วยกันเลย ไม่ว่าจะใน Shared หรือใน `api` segment ของหน้า `login` ## เก็บ Token สำหรับ Authenticated requests ยังไง[​](#how-to-store-the-token-for-authenticated-requests "ลิงก์ตรงไปยังหัวข้อ") ไม่ว่าคุณจะใช้แบบไหน จะ Login ง่ายๆ ด้วย Password, OAuth, หรือ 2FA สุดท้ายคุณก็จะได้ Token มา Token นี้ควรถูกเก็บไว้เพื่อให้ Request ต่อๆ ไปสามารถระบุตัวตนได้ ที่เก็บ Token ในอุดมคติสำหรับเว็บแอปคือ **Cookie** — ซึ่งไม่ต้องจัดการหรือเก็บ Token เองเลย ดังนั้น Cookie storage แทบไม่ต้องคำนึงถึงในฝั่งสถาปัตยกรรม Frontend ถ้า Frontend framework ของคุณมี Server side (เช่น [Remix](https://remix.run)) คุณควรเก็บ Server-side cookie infrastructure ไว้ใน `shared/api` มีตัวอย่างใน [ส่วน Authentication ของ Tutorial](/th/docs/get-started/tutorial.md#authentication) ว่าทำยังไงใน Remix อย่างไรก็ตาม บางครั้ง Cookie storage ก็ไม่ใช่ทางเลือก ในกรณีนี้ คุณต้องเก็บ Token เอง นอกจากการเก็บ Token แล้ว คุณอาจต้องจัดการ Logic สำหรับการ Refresh token เมื่อมันหมดอายุด้วย ใน FSD มีหลายที่ที่คุณสามารถเก็บ Token ได้ และหลายวิธีที่จะทำให้ส่วนอื่นๆ ของแอปเรียกใช้ได้ ### ใน Shared[​](#ใน-shared "ลิงก์ตรงไปยังหัวข้อ") วิธีนี้เข้ากันได้ดีกับ API client ที่นิยามไว้ใน `shared/api` เพราะ Token จะพร้อมใช้งานสำหรับ Request functions อื่นๆ ที่ต้องการ Authentication คุณสามารถทำให้ API client เก็บ State ได้ ไม่ว่าจะด้วย Reactive store หรือตัวแปรระดับ Module ง่ายๆ และอัปเดต State นั้นในฟังก์ชัน `login()`/`logout()` ของคุณ Automatic token refresh สามารถทำเป็น Middleware ใน API client — ซึ่งจะทำงานทุกครั้งที่คุณส่ง Request มันทำงานแบบนี้: * Authenticate และเก็บ Access token และ Refresh token * ส่ง Request ใดๆ ที่ต้องการ Authentication * ถ้า Request ล้มเหลวด้วย Status code ที่บอกว่า Token หมดอายุ และมี Token ใน Store ให้ส่ง Refresh request, เก็บ Token ใหม่, และลองส่ง Request เดิมอีกครั้ง ข้อเสียอย่างนึงของวิธีนี้คือ Logic การจัดการและ Refresh token ไม่มีที่อยู่เฉพาะเจาะจง อาจจะโอเคสำหรับบางแอปหรือบางทีม แต่ถ้า Logic การจัดการ Token ซับซ้อนขึ้น อาจจะดีกว่าถ้าแยกความรับผิดชอบของการส่ง Request และการจัดการ Token ออกจากกัน คุณทำได้โดยเก็บ Request และ API client ไว้ใน `shared/api` แต่เอา Token store และ Management logic ไปไว้ใน `shared/auth` ข้อเสียอีกอย่างคือ ถ้า Backend ส่ง Object ข้อมูลผู้ใช้ปัจจุบันมาพร้อมกับ Token คุณต้องหาที่เก็บมัน หรือไม่งั้นก็ต้องทิ้งข้อมูลนั้นไป แล้ว Request ใหม่จาก Endpoint เช่น `/me` หรือ `/users/current` ### ใน Entities[​](#ใน-entities "ลิงก์ตรงไปยังหัวข้อ") เป็นเรื่องปกติสำหรับโปรเจกต์ FSD ที่จะมี Entity สำหรับ User และ/หรือ Entity สำหรับ Current user มันอาจจะเป็น Entity เดียวกันเลยก็ได้ note **Current user** บางครั้งเรียกว่า "viewer" หรือ "me" เพื่อแยก User ที่ Login แล้วซึ่งมี Permission และข้อมูลส่วนตัว ออกจากรายชื่อ Users ทั้งหมดที่มีข้อมูลสาธารณะ ในการเก็บ Token ใน User entity ให้สร้าง Reactive store ใน `model` segment Store นั้นสามารถเก็บทั้ง Token และ User object เนื่องจากปกติ API client จะอยู่ใน `shared/api` หรือกระจายอยู่ใน Entities ความท้าทายหลักของวิธีนี้คือการทำให้ Token พร้อมใช้งานสำหรับ Request อื่นๆ ที่ต้องการมัน โดยไม่ละเมิด [กฎการ Import ของ Layers](/th/docs/reference/layers.md#import-rule-on-layers): > Module (ไฟล์) ใน Slice หนึ่ง สามารถ Import Slice อื่นๆ ได้เฉพาะเมื่อ Slice เหล่านั้นอยู่ใน Layer ที่ต่ำกว่าอย่างเคร่งครัด มีความท้าทายหลายอย่าง: 1. **ส่ง Token เองทุกครั้งที่ส่ง Request**
นี่เป็นวิธีที่ง่ายที่สุด แต่ก็จะเริ่มยุ่งยากและน่ารำคาญอย่างรวดเร็ว และถ้าคุณไม่มี Type safety ก็ลืมง่ายด้วย แถมยังไม่เข้ากับ Pattern ของ Middleware สำหรับ API client ใน Shared อีกต่างหาก 2. **Expose Token ให้ทั้งแอปผ่าน Context หรือ Global store เช่น `localStorage`**
Key สำหรับดึง Token จะถูกเก็บไว้ใน `shared/api` เพื่อให้ API client เข้าถึงได้ Reactive store ของ Token จะถูก Export จาก User entity และ Context provider (ถ้าจำเป็น) จะถูกตั้งค่าใน App layer วิธีนี้ให้อิสระในการออกแบบ API client มากกว่า แต่สร้าง Dependency แฝงไปยัง Layer ที่สูงกว่าเพื่อจัดเตรียม Context เมื่อใช้วิธีนี้ ควรเตรียม Error message ที่ช่วยบอกปัญหาถ้า Context หรือ `localStorage` ไม่ได้ถูกตั้งค่าอย่างถูกต้อง 3. **Inject Token เข้าไปใน API client ทุกครั้งที่มันเปลี่ยน**
ถ้า Store ของคุณ Reactive คุณสามารถสร้าง Subscription ที่จะอัปเดต Token store ของ API client ทุกครั้งที่ Store ใน Entity เปลี่ยน วิธีนี้คล้ายกับวิธีก่อนหน้าตรงที่สร้าง Dependency แฝงไปยัง Layer ที่สูงกว่า แต่วิธีนี้เป็นแบบ Imperative ("push") มากกว่า ในขณะที่วิธีก่อนหน้าเป็นแบบ Declarative ("pull") เมื่อคุณจัดการเรื่องการ Expose token ที่เก็บใน Entity's model ได้แล้ว คุณสามารถใส่ Business logic ที่ซับซ้อนขึ้นเกี่ยวกับการจัดการ Token ลงไปได้ เช่น `model` segment สามารถมี Logic เพื่อ Invalidate token หลังจากช่วงเวลาหนึ่ง หรือ Refresh token เมื่อมันหมดอายุ สำหรับการส่ง Request จริงๆ ไปยัง Backend ให้ใช้ `api` segment ของ User entity หรือ `shared/api` ### ใน Pages/Widgets (ไม่แนะนำ)[​](#ใน-pageswidgets-ไม่แนะนำ "ลิงก์ตรงไปยังหัวข้อ") ไม่แนะนำให้เก็บ App-wide state เช่น Access token ใน Pages หรือ Widgets หลีกเลี่ยงการวาง Token store ใน `model` segment ของหน้า Login ให้เลือกวิธีจากสองข้อแรกแทน คือ Shared หรือ Entities ## Logout และ Token invalidation[​](#logout-และ-token-invalidation "ลิงก์ตรงไปยังหัวข้อ") ปกติ แอปมักจะไม่มีหน้าสำหรับ Logout ทั้งหน้า แต่ฟังก์ชัน Logout ก็ยังสำคัญมาก มันประกอบด้วย Authenticated request ไปยัง Backend และการอัปเดต Token store ถ้าคุณเก็บ Requests ทั้งหมดไว้ใน `shared/api` ให้เก็บ Logout request function ไว้ที่นั่น ใกล้ๆ กับ Login function แต่ถ้าไม่ใช่ ให้พิจารณาเก็บ Logout request function ไว้ใกล้ๆ ปุ่มที่กด Logout เช่น ถ้าคุณมี Header widget ที่ปรากฏทุกหน้าและมีลิงก์ Logout ให้วาง Request นั้นใน `api` segment ของ Widget นั้น การอัปเดต Token store จะต้องถูกเรียกจากจุดที่มีปุ่ม Logout เช่น Header widget คุณสามารถรวม Request และ Store update ไว้ใน `model` segment ของ Widget นั้นได้ ### Automatic logout[​](#automatic-logout "ลิงก์ตรงไปยังหัวข้อ") อย่าลืมสร้างระบบกันเหนียว (Failsafes) สำหรับตอนที่ Request เพื่อ Logout ล้มเหลว หรือ Request เพื่อ Refresh token ล้มเหลว ในทั้งสองกรณีนี้ คุณควรเคลียร์ Token store ทิ้ง ถ้าคุณเก็บ Token ใน Entities โค้ดส่วนนี้วางใน `model` segment ได้เลยเพราะเป็น Pure business logic ถ้าคุณเก็บ Token ใน Shared การวาง Logic นี้ใน `shared/api` อาจทำให้ Segment บวมและผิดวัตถุประสงค์ ถ้าคุณเริ่มสังเกตว่า API segment ของคุณมีของสองอย่างที่ไม่เกี่ยวกันอยู่ด้วยกัน ลองแยก Logic การจัดการ Token ออกไปอีก Segment นึงดูสิ เช่น `shared/auth` --- # Autocomplete WIP บทความนี้อยู่ระหว่างการเขียน หากต้องการให้บทความนี้เสร็จเร็วขึ้น คุณสามารถ: * 📢 แบ่งปันความคิดเห็นของคุณ [ที่บทความ (คอมเมนต์/รีแอกชัน)](https://github.com/feature-sliced/documentation/issues/170) * 💬 รวบรวมเนื้อหา [ที่เกี่ยวข้องจากแชท](https://t.me/feature_sliced) * ⚒️ ร่วมสนับสนุน [ในรูปแบบอื่นๆ](https://github.com/feature-sliced/documentation/blob/master/CONTRIBUTING.md)
*🍰 Stay tuned!* > เกี่ยวกับการ Decomposition ตาม Layers ## ดูเพิ่มเติม[​](#ดูเพิ่มเติม "ลิงก์ตรงไปยังหัวข้อ") * [(Discussion) About the application of the methodology for the selection with loaded dictionaries](https://github.com/feature-sliced/documentation/discussions/65#discussioncomment-480807) --- # Browser API WIP บทความนี้อยู่ระหว่างการเขียน หากต้องการให้บทความนี้เสร็จเร็วขึ้น คุณสามารถ: * 📢 แบ่งปันความคิดเห็นของคุณ [ที่บทความ (คอมเมนต์/รีแอกชัน)](https://github.com/feature-sliced/documentation/issues/197) * 💬 รวบรวมเนื้อหา [ที่เกี่ยวข้องจากแชท](https://t.me/feature_sliced) * ⚒️ ร่วมสนับสนุน [ในรูปแบบอื่นๆ](https://github.com/feature-sliced/documentation/blob/master/CONTRIBUTING.md)
*🍰 Stay tuned!* > เกี่ยวกับการทำงานกับ Browser API: localStorage, audio Api, bluetooth API, ฯลฯ > > คุณสามารถถามเกี่ยวกับไอเดียในรายละเอียดเพิ่มเติมได้ที่ [@alex\_novi](https://t.me/alex_novich) --- # CMS WIP บทความนี้อยู่ระหว่างการเขียน หากต้องการให้บทความนี้เสร็จเร็วขึ้น คุณสามารถ: * 📢 แบ่งปันความคิดเห็นของคุณ [ที่บทความ (คอมเมนต์/รีแอกชัน)](https://github.com/feature-sliced/documentation/issues/172) * 💬 รวบรวมเนื้อหา [ที่เกี่ยวข้องจากแชท](https://t.me/feature_sliced) * ⚒️ ร่วมสนับสนุน [ในรูปแบบอื่นๆ](https://github.com/feature-sliced/documentation/blob/master/CONTRIBUTING.md)
*🍰 Stay tuned!* ## ฟีเจอร์อาจจะแตกต่างกัน[​](#ฟีเจอร์อาจจะแตกต่างกัน "ลิงก์ตรงไปยังหัวข้อ") ในบางโปรเจกต์ ฟังก์ชันการทำงานทั้งหมดรวมอยู่ที่ข้อมูลจาก Server > ## วิธีทำงานกับ CMS markup ให้ถูกต้องยิ่งขึ้น[​](#วิธีทำงานกับ-cms-markup-ให้ถูกต้องยิ่งขึ้น "ลิงก์ตรงไปยังหัวข้อ") > > --- # Feedback WIP บทความนี้อยู่ระหว่างการเขียน หากต้องการให้บทความนี้เสร็จเร็วขึ้น คุณสามารถ: * 📢 แบ่งปันความคิดเห็นของคุณ [ที่บทความ (คอมเมนต์/รีแอกชัน)](https://github.com/feature-sliced/documentation/issues/187) * 💬 รวบรวมเนื้อหา [ที่เกี่ยวข้องจากแชท](https://t.me/feature_sliced) * ⚒️ ร่วมสนับสนุน [ในรูปแบบอื่นๆ](https://github.com/feature-sliced/documentation/blob/master/CONTRIBUTING.md)
*🍰 Stay tuned!* > Errors, Alerts, Notifications, ... --- # i18n WIP บทความนี้อยู่ระหว่างการเขียน หากต้องการให้บทความนี้เสร็จเร็วขึ้น คุณสามารถ: * 📢 แบ่งปันความคิดเห็นของคุณ [ที่บทความ (คอมเมนต์/รีแอกชัน)](https://github.com/feature-sliced/documentation/issues/171) * 💬 รวบรวมเนื้อหา [ที่เกี่ยวข้องจากแชท](https://t.me/feature_sliced) * ⚒️ ร่วมสนับสนุน [ในรูปแบบอื่นๆ](https://github.com/feature-sliced/documentation/blob/master/CONTRIBUTING.md)
*🍰 Stay tuned!* ## วางไว้ที่ไหน? ทำงานกับมันยังไง?[​](#วางไว้ที่ไหน-ทำงานกับมันยังไง "ลิงก์ตรงไปยังหัวข้อ") * * * --- # Metric WIP บทความนี้อยู่ระหว่างการเขียน หากต้องการให้บทความนี้เสร็จเร็วขึ้น คุณสามารถ: * 📢 แบ่งปันความคิดเห็นของคุณ [ที่บทความ (คอมเมนต์/รีแอกชัน)](https://github.com/feature-sliced/documentation/issues/181) * 💬 รวบรวมเนื้อหา [ที่เกี่ยวข้องจากแชท](https://t.me/feature_sliced) * ⚒️ ร่วมสนับสนุน [ในรูปแบบอื่นๆ](https://github.com/feature-sliced/documentation/blob/master/CONTRIBUTING.md)
*🍰 Stay tuned!* > เกี่ยวกับวิธีการ Initialize metrics ในแอปพลิเคชัน --- # Monorepositories WIP บทความนี้อยู่ระหว่างการเขียน หากต้องการให้บทความนี้เสร็จเร็วขึ้น คุณสามารถ: * 📢 แบ่งปันความคิดเห็นของคุณ [ที่บทความ (คอมเมนต์/รีแอกชัน)](https://github.com/feature-sliced/documentation/issues/221) * 💬 รวบรวมเนื้อหา [ที่เกี่ยวข้องจากแชท](https://t.me/feature_sliced) * ⚒️ ร่วมสนับสนุน [ในรูปแบบอื่นๆ](https://github.com/feature-sliced/documentation/blob/master/CONTRIBUTING.md)
*🍰 Stay tuned!* > เกี่ยวกับการประยุกต์ใช้กับ Mono repositories, BFF, และ Microapps ## ดูเพิ่มเติม[​](#ดูเพิ่มเติม "ลิงก์ตรงไปยังหัวข้อ") * [(Discussion) About mono repositories and plug-ins-packages](https://github.com/feature-sliced/documentation/discussions/50) * [(Thread) About the application for a mono repository](https://t.me/feature_sliced/2412) --- # Page layouts (เลย์เอาต์ของหน้า) ไกด์นี้จะสำรวจเรื่อง Abstraction ของ *Page layout* — เมื่อหลายๆ หน้าใช้โครงสร้างรวมๆ เหมือนกัน และต่างกันแค่เนื้อหาหลัก info คำถามของคุณไม่อยู่ในไกด์นี้เหรอ? โพสต์คำถามของคุณโดยการให้ Feedback ในบทความนี้สิ (ปุ่มสีฟ้าทางขวา) แล้วเราจะพิจารณาขยายไกด์นี้ให้! ## Simple layout (เลย์เอาต์แบบง่าย)[​](#simple-layout-เลย์เอาต์แบบง่าย "ลิงก์ตรงไปยังหัวข้อ") เลย์เอาต์ที่ง่ายที่สุดก็คือหน้านี้ที่คุณกำลังดูอยู่ไง มันมี Header พร้อม Navigation, Sidebars สองข้าง, และ Footer พร้อม External links ไม่มี Business logic ซับซ้อน และส่วนที่ Dynamic มีแค่ Sidebars กับ Switchers ทางขวาของ Header เท่านั้น เลย์เอาต์แบบนี้วางไว้ใน `shared/ui` หรือ `app/layouts` ได้ทั้งก้อนเลย โดยรับ Props เพื่อเติม Content ให้ Sidebars: shared/ui/layout/Layout.tsx ``` import { Link, Outlet } from "react-router-dom"; import { useThemeSwitcher } from "./useThemeSwitcher"; export function Layout({ siblingPages, headings }) { const [theme, toggleTheme] = useThemeSwitcher(); return (
{/* นี่คือที่ที่เนื้อหาหลักจะถูกวาง */}
  • GitHub
  • Twitter
); } ``` shared/ui/layout/useThemeSwitcher.ts ``` export function useThemeSwitcher() { const [theme, setTheme] = useState("light"); function toggleTheme() { setTheme(theme === "light" ? "dark" : "light"); } useEffect(() => { document.body.classList.remove("light", "dark"); document.body.classList.add(theme); }, [theme]); return [theme, toggleTheme] as const; } ``` โค้ดของ Sidebars ขอละไว้ให้นักอ่านไปทำเป็นการบ้านนะ 😉 ## การใช้ Widgets ใน Layout[​](#การใช้-widgets-ใน-layout "ลิงก์ตรงไปยังหัวข้อ") บางครั้งคุณอาจอยากใส่ Business logic บางอย่างลงใน Layout โดยเฉพาะถ้าคุณใช้ Nested routes ซ้อนลึกๆ กับ Router เช่น [React Router](https://reactrouter.com/) ทีนี้คุณจะเก็บ Layout ไว้ใน Shared หรือ Widgets ไม่ได้แล้ว เพราะ [กฎการ Import ของ Layers](/th/docs/reference/layers.md#import-rule-on-layers): > Module ใน Slice หนึ่ง สามารถ Import Slice อื่นๆ ได้เฉพาะเมื่อ Slice เหล่านั้นอยู่ใน Layer ที่ต่ำกว่าอย่างเคร่งครัด ก่อนจะคุยเรื่องวิธีแก้ เราต้องคุยกันก่อนว่ามันเป็นปัญหาจริงๆ รึเปล่า คุณ *จำเป็นต้องใช้* Layout นั้นจริงๆ มั้ย และถ้าใช่ มัน *จำเป็นมั้ย* ที่จะต้องเป็น Widget? ถ้า Business logic ก้อนนั้นถูกใช้ซ้ำแค่ 2-3 หน้า และ Layout เป็นแค่ Wrapper เล็กๆ สำหรับ Widget นั้น ลองพิจารณา 1 ใน 2 ทางเลือกนี้ดู: 1. **เขียน Layout แบบ Inline ใน App layer ตรงที่คุณ Config routing เลย**
วิธีนี้เยี่ยมมากสำหรับ Router ที่รองรับ Nesting เพราะคุณสามารถจัดกลุ่ม Route และใส่ Layout ให้เฉพาะพวกมันได้ 2. **ก็แค่ Copy-paste มันซะ**
ความอยากที่จะ Abstract โค้ดมักจะถูกให้ค่าเกินจริง โดยเฉพาะกับ Layouts ที่แทบไม่ค่อยเปลี่ยน สักวันหนึ่งถ้าหน้าหนึ่งต้องเปลี่ยน คุณก็แค่แก้หน้านั้นโดยไม่ต้องกระทบหน้าอื่นให้วุ่นวาย ถ้ากลัวใครจะลืมอัปเดตหน้าอื่น ก็เขียน Comment ทิ้งไว้บอกความสัมพันธ์ระหว่างหน้าพวกนั้นได้ ถ้าข้างบนใช้ไม่ได้สักวิธี มี 2 solutions ที่จะใส่ Widget ลงใน Layout: 1. **ใช้ Render props หรือ Slots**
Framework ส่วนใหญ่ยอมให้คุณส่ง UI เข้ามาจากภายนอกได้ ใน React เรียกว่า [render props](https://www.patterns.dev/react/render-props-pattern/), ใน Vue เรียกว่า [slots](https://vuejs.org/guide/components/slots) 2. **ย้าย Layout ไปที่ App layer**
คุณยังสามารถเก็บ Layout ของคุณไว้ที่ App layer ได้ด้วย เช่นใน `app/layouts` แล้วคุณอยากจะ Compose widget ไหนเข้าไปก็ได้ตามใจชอบ ## อ่านเพิ่มเติม[​](#อ่านเพิ่มเติม "ลิงก์ตรงไปยังหัวข้อ") * มีตัวอย่างการสร้าง Layout พร้อม Authentication ด้วย React และ Remix (เทียบเท่า React Router) ใน [tutorial](/th/docs/get-started/tutorial.md) --- # Desktop/Touch platforms WIP บทความนี้อยู่ระหว่างการเขียน หากต้องการให้บทความนี้เสร็จเร็วขึ้น คุณสามารถ: * 📢 แบ่งปันความคิดเห็นของคุณ [ที่บทความ (คอมเมนต์/รีแอกชัน)](https://github.com/feature-sliced/documentation/issues/198) * 💬 รวบรวมเนื้อหา [ที่เกี่ยวข้องจากแชท](https://t.me/feature_sliced) * ⚒️ ร่วมสนับสนุน [ในรูปแบบอื่นๆ](https://github.com/feature-sliced/documentation/blob/master/CONTRIBUTING.md)
*🍰 Stay tuned!* > เกี่ยวกับการประยุกต์ใช้ Methodology สำหรับ Desktop/Touch --- # SSR (Server-Side Rendering) WIP บทความนี้อยู่ระหว่างการเขียน หากต้องการให้บทความนี้เสร็จเร็วขึ้น คุณสามารถ: * 📢 แบ่งปันความคิดเห็นของคุณ [ที่บทความ (คอมเมนต์/รีแอกชัน)](https://github.com/feature-sliced/documentation/issues/173) * 💬 รวบรวมเนื้อหา [ที่เกี่ยวข้องจากแชท](https://t.me/feature_sliced) * ⚒️ ร่วมสนับสนุน [ในรูปแบบอื่นๆ](https://github.com/feature-sliced/documentation/blob/master/CONTRIBUTING.md)
*🍰 Stay tuned!* > เกี่ยวกับการ Implement SSR โดยใช้ Methodology นี้ --- # Theme (ธีม) WIP บทความนี้อยู่ระหว่างการเขียน หากต้องการให้บทความนี้เสร็จเร็วขึ้น คุณสามารถ: * 📢 แบ่งปันความคิดเห็นของคุณ [ที่บทความ (คอมเมนต์/รีแอกชัน)](https://github.com/feature-sliced/documentation/issues/207) * 💬 รวบรวมเนื้อหา [ที่เกี่ยวข้องจากแชท](https://t.me/feature_sliced) * ⚒️ ร่วมสนับสนุน [ในรูปแบบอื่นๆ](https://github.com/feature-sliced/documentation/blob/master/CONTRIBUTING.md)
*🍰 Stay tuned!* ## ฉันควรวางโค้ดเกี่ยวกับธีมและ Palette ไว้ที่ไหน?[​](#ฉันควรวางโค้ดเกี่ยวกับธีมและ-palette-ไว้ที่ไหน "ลิงก์ตรงไปยังหัวข้อ") > ## การอภิปรายเกี่ยวกับตำแหน่งของ Theme และ Logic ของ i18n[​](#การอภิปรายเกี่ยวกับตำแหน่งของ-theme-และ-logic-ของ-i18n "ลิงก์ตรงไปยังหัวข้อ") > --- # Types (ชนิดข้อมูล) ไกด์นี้เกี่ยวข้องกับ Data types จากภาษาที่มี Type อย่าง TypeScript และอธิบายว่ามันอยู่ตรงไหนใน FSD info คำถามของคุณไม่อยู่ในไกด์นี้เหรอ? โพสต์คำถามของคุณโดยการให้ Feedback ในบทความนี้สิ (ปุ่มสีฟ้าทางขวา) แล้วเราจะพิจารณาขยายไกด์นี้ให้! ## Utility types[​](#utility-types "ลิงก์ตรงไปยังหัวข้อ") Utility types คือ Types ที่ไม่ได้มีความหมายในตัวมันเองและมักจะถูกใช้ร่วมกับ Types อื่นๆ ตัวอย่างเช่น: ``` type ArrayValues = T[number]; ``` Source: เพื่อให้ Utility types ใช้ได้ทั่วทั้งโปรเจกต์ของคุณ ให้ติดตั้ง Library อย่าง [`type-fest`](https://github.com/sindresorhus/type-fest) หรือสร้าง Library ของคุณเองใน `shared/lib` อย่าลืมระบุให้ชัดเจนว่า Types ใหม่แบบไหน *ควร* ถูกเพิ่มเข้ามาใน Library นี้ และ Types แบบไหน *ไม่ควร* ตัวอย่างเช่น ตั้งชื่อว่า `shared/lib/utility-types` และเพิ่ม README ไว้ข้างในที่อธิบายว่าอะไรคือ Utility type ในทีมของคุณ อย่าประเมินความสามารถในการ Reuse ของ Utility type สูงเกินไป แค่เพราะมัน *สามารถ* Reuse ได้ ไม่ได้แปลว่ามัน *จะ* ถูก Reuse และด้วยเหตุนี้ ไม่ใช่ทุก Utility type จำเป็นต้องอยู่ใน Shared บาง Utility types อยู่ติดกับที่ที่มันถูกใช้ก็โอเคแล้ว: * 📂 pages * 📂 home * 📂 api * 📄 ArrayValues.ts (utility type) * 📄 getMemoryUsageMetrics.ts (โค้ดที่ใช้ utility type) warning ต้านทานความอยากที่จะสร้างโฟลเดอร์ `shared/types` หรือเพิ่ม `types` segment ใน Slices ของคุณ หมวดหมู่ "types" ก็เหมือนหมวดหมู่ "components" หรือ "hooks" ตรงที่มันอธิบายว่า *ข้างในคืออะไร* ไม่ใช่ *มีไว้ทำไม* Segments ควรอธิบายจุดประสงค์ของโค้ด ไม่ใช่แก่นแท้ของมัน ## Business entities และการอ้างอิงข้ามกัน[​](#business-entities-และการอ้างอิงข้ามกัน "ลิงก์ตรงไปยังหัวข้อ") หนึ่งใน Types ที่สำคัญที่สุดในแอปคือ Types ของ Business entities หรือสิ่งของในโลกจริงที่แอปของคุณทำงานด้วย เช่น ในแอป Music streaming คุณอาจมี Business entities *Song*, *Album*, ฯลฯ Business entities มักจะมาจาก Backend ขั้นตอนแรกคือการ Type ข้อมูลตอบกลับจาก Backend มันสะดวกที่จะมีฟังก์ชันสำหรับ Request ไปยังทุก Endpoint และ Type ผลลัพธ์ของฟังก์ชันนี้ เพื่อความปลอดภัยของ Type เป็นพิเศษ คุณอาจต้องการรัน Response ผ่าน Schema validation library อย่าง [Zod](https://zod.dev) ตัวอย่างเช่น ถ้าคุณเก็บ Requests ทั้งหมดไว้ใน Shared คุณอาจจะทำแบบนี้: shared/api/songs.ts ``` import type { Artist } from "./artists"; interface Song { id: number; title: string; artists: Array; } export function listSongs() { return fetch('/api/songs').then((res) => res.json() as Promise>); } ``` คุณอาจสังเกตเห็นว่า `Song` type อ้างอิง Entity อื่นคือ `Artist` นี่เป็นข้อดีของการเก็บ Requests ไว้ใน Shared — Types ในโลกจริงมักจะเกี่ยวพันกัน ถ้าเราเก็บฟังก์ชันนี้ไว้ใน `entities/song/api` เราจะไม่สามารถ Import `Artist` จาก `entities/artist` มาดื้อๆ ได้ เพราะ FSD จำกัดการ Cross-import ระหว่าง Slices ด้วย [กฎการ Import ของ Layers](/th/docs/reference/layers.md#import-rule-on-layers): > Module ใน Slice หนึ่ง สามารถ Import Slice อื่นๆ ได้เฉพาะเมื่อ Slice เหล่านั้นอยู่ใน Layer ที่ต่ำกว่าอย่างเคร่งครัด มีสองวิธีในการจัดการปัญหานี้: 1. **Parametrize Types ของคุณ**
คุณสามารถทำให้ Types ของคุณรับ Type arguments เป็นช่องว่าง (Slots) สำหรับเชื่อมต่อกับ Entities อื่น และยังกำหนดข้อจำกัด (Constraints) บน Slots เหล่านั้นได้ด้วย ตัวอย่างเช่น: entities/song/model/song.ts ``` interface Song { id: number; title: string; artists: Array; } ``` วิธีนี้เวิร์คกับบาง Types ดีกว่าบาง Types อย่าง `Cart = { items: Array }` ที่เรียบง่าย สามารถทำให้ทำงานกับ Product type ไหนก็ได้ง่ายๆ แต่ Types ที่เชื่อมโยงกันมากกว่านี้ เช่น `Country` และ `City` อาจจะไม่แยกออกจากกันง่ายขนาดนั้น 2. **Cross-import (แต่ทำให้ถูกวิธี)**
ในการทำ Cross-imports ระหว่าง Entities ใน FSD คุณสามารถใช้ Public API พิเศษเฉพาะสำหรับแต่ละ Slice ที่จะทำการ Cross-import ตัวอย่างเช่น ถ้าเรามี Entities `song`, `artist`, และ `playlist` และสองอันหลังต้องอ้างอิง `song` เราสามารถสร้าง Public APIs พิเศษสองอันสำหรับทั้งคู่ใน `song` entity ด้วยเครื่องหมาย `@x`: * 📂 entities * 📂 song * 📂 @x * 📄 artist.ts (Public API สำหรับ `artist` entity เพื่อ Import) * 📄 playlist.ts (Public API สำหรับ `playlist` entity เพื่อ Import) * 📄 index.ts (Public API ปกติ) เนื้อหาของไฟล์ `📄 entities/song/@x/artist.ts` จะคล้ายกับ `📄 entities/song/index.ts`: entities/song/@x/artist.ts ``` export type { Song } from "../model/song.ts"; ``` จากนั้น `📄 entities/artist/model/artist.ts` สามารถ Import `Song` ได้แบบนี้: entities/artist/model/artist.ts ``` import type { Song } from "entities/song/@x/artist"; export interface Artist { name: string; songs: Array; } ``` โดยการสร้างการเชื่อมต่อที่ชัดเจนระหว่าง Entities เราจะควบคุม Inter-dependencies ได้ และยังคงรักษาระดับของการแยก Domain ได้ดีพอสมควร ## Data transfer objects และ Mappers[​](#data-transfer-objects-and-mappers "ลิงก์ตรงไปยังหัวข้อ") Data transfer objects หรือ DTOs เป็นคำที่อธิบายรูปร่างของข้อมูลที่มาจาก Backend บางครั้ง DTO ก็ใช้ได้เลย แต่บางครั้งมันก็ไม่สะดวกสำหรับ Frontend นั่นคือที่มาของ Mappers — พวกมันแปลง DTO ให้เป็นรูปร่างที่สะดวกขึ้น ### วาง DTOs ไว้ที่ไหน[​](#วาง-dtos-ไว้ที่ไหน "ลิงก์ตรงไปยังหัวข้อ") ถ้าคุณมี Backend types ใน Package แยกต่างหาก (เช่น ถ้าคุณแชร์โค้ดระหว่าง Frontend และ Backend) ก็แค่ Import DTOs จากที่นั่นก็จบ! ถ้าคุณไม่แชร์โค้ดระหว่าง Backend และ Frontend คุณต้องเก็บ DTOs ไว้สักที่ใน Frontend codebase และเราจะสำรวจกรณีนี้กันด้านล่าง ถ้าคุณมี Request functions ใน `shared/api` นั่นคือที่ที่ DTOs ควรอยู่ ติดกับฟังก์ชันที่ใช้มันเลย: shared/api/songs.ts ``` import type { ArtistDTO } from "./artists"; interface SongDTO { id: number; title: string; artist_ids: Array; } export function listSongs() { return fetch('/api/songs').then((res) => res.json() as Promise>); } ``` ตามที่กล่าวในส่วนที่แล้ว การเก็บ Requests และ DTOs ใน Shared มีข้อดีคือสามารถอ้างอิง DTOs อื่นๆ ได้ ### วาง Mappers ไว้ที่ไหน[​](#วาง-mappers-ไว้ที่ไหน "ลิงก์ตรงไปยังหัวข้อ") Mappers คือฟังก์ชันที่รับ DTO ไปแปลงร่าง และด้วยเหตุนี้ มันควรจะอยู่ใกล้กับนิยามของ DTO ในทางปฏิบัติหมายความว่าถ้า Requests และ DTOs ของคุณนิยามใน `shared/api` Mappers ก็ควรอยู่ที่นั่นด้วย: shared/api/songs.ts ``` import type { ArtistDTO } from "./artists"; interface SongDTO { id: number; title: string; disc_no: number; artist_ids: Array; } interface Song { id: string; title: string; /** ชื่อเต็มของเพลง รวมเลขแผ่นด้วย */ fullTitle: string; artistIds: Array; } function adaptSongDTO(dto: SongDTO): Song { return { id: String(dto.id), title: dto.title, fullTitle: `${dto.disc_no} / ${dto.title}`, artistIds: dto.artist_ids.map(String), }; } export function listSongs() { return fetch('/api/songs').then(async (res) => (await res.json()).map(adaptSongDTO)); } ``` ถ้า Requests และ Stores ของคุณนิยามใน Entity slices โค้ดพวกนี้ก็จะไปอยู่ที่นั่น โดยต้องคำนึงถึงข้อจำกัดของการ Cross-imports ระหว่าง Slices: entities/song/api/dto.ts ``` import type { ArtistDTO } from "entities/artist/@x/song"; export interface SongDTO { id: number; title: string; disc_no: number; artist_ids: Array; } ``` entities/song/api/mapper.ts ``` import type { SongDTO } from "./dto"; export interface Song { id: string; title: string; /** ชื่อเต็มของเพลง รวมเลขแผ่นด้วย */ fullTitle: string; artistIds: Array; } export function adaptSongDTO(dto: SongDTO): Song { return { id: String(dto.id), title: dto.title, fullTitle: `${dto.disc_no} / ${dto.title}`, artistIds: dto.artist_ids.map(String), }; } ``` entities/song/api/listSongs.ts ``` import { adaptSongDTO } from "./mapper"; export function listSongs() { return fetch('/api/songs').then(async (res) => (await res.json()).map(adaptSongDTO)); } ``` entities/song/model/songs.ts ``` import { createSlice, createEntityAdapter } from "@reduxjs/toolkit"; import { listSongs } from "../api/listSongs"; export const fetchSongs = createAsyncThunk('songs/fetchSongs', listSongs); const songAdapter = createEntityAdapter(); const songsSlice = createSlice({ name: "songs", initialState: songAdapter.getInitialState(), reducers: {}, extraReducers: (builder) => { builder.addCase(fetchSongs.fulfilled, (state, action) => { songAdapter.upsertMany(state, action.payload); }) }, }); ``` ### จัดการ Nested DTOs ยังไงดี[​](#จัดการ-nested-dtos-ยังไงดี "ลิงก์ตรงไปยังหัวข้อ") ส่วนที่มีปัญหาที่สุดคือเมื่อ Response จาก Backend มี Entities หลายตัว ตัวอย่างเช่น ถ้า Song ไม่ได้มีแค่ ID ของ Authors แต่มี Object ของ Author ทั้งก้อนเลย ในกรณีนี้ เป็นไปไม่ได้เลยที่ Entities จะไม่รู้จักกัน (เว้นแต่เราจะทิ้งข้อมูลหรือไปคุยกับทีม Backend อย่างจริงจัง) แทนที่จะหาวิธีเชื่อมต่อ Slices แบบอ้อมๆ (เช่น Middleware กลางที่จะ Dispatch actions ไปยัง Slices อื่น) ให้เลือกใช้ Explicit cross-imports ด้วยเครื่องหมาย `@x` ดีกว่า นี่คือวิธี Implement ด้วย Redux Toolkit: entities/song/model/songs.ts ``` import { createSlice, createEntityAdapter, createAsyncThunk, createSelector, } from '@reduxjs/toolkit' import { normalize, schema } from 'normalizr' import { getSong } from "../api/getSong"; // Define normalizr entity schemas export const artistEntity = new schema.Entity('artists') export const songEntity = new schema.Entity('songs', { artists: [artistEntity], }) const songAdapter = createEntityAdapter() export const fetchSong = createAsyncThunk( 'songs/fetchSong', async (id: string) => { const data = await getSong(id) // Normalize ข้อมูลเพื่อให้ Reducers สามารถ Load payload ที่คาดเดาได้ เช่น: // `action.payload = { songs: {}, artists: {} }` const normalized = normalize(data, songEntity) return normalized.entities } ) export const slice = createSlice({ name: 'songs', initialState: songAdapter.getInitialState(), reducers: {}, extraReducers: (builder) => { builder.addCase(fetchSong.fulfilled, (state, action) => { songAdapter.upsertMany(state, action.payload.songs) }) }, }) const reducer = slice.reducer export default reducer ``` entities/song/@x/artist.ts ``` export { fetchSong } from "../model/songs"; ``` entities/artist/model/artists.ts ``` import { createSlice, createEntityAdapter } from '@reduxjs/toolkit' import { fetchSong } from 'entities/song/@x/artist' const artistAdapter = createEntityAdapter() export const slice = createSlice({ name: 'users', initialState: artistAdapter.getInitialState(), reducers: {}, extraReducers: (builder) => { builder.addCase(fetchSong.fulfilled, (state, action) => { // และจัดการผลการ Fetch เดียวกันโดยใส่ Artists ที่นี่ artistAdapter.upsertMany(state, action.payload.artists) }) }, }) const reducer = slice.reducer export default reducer ``` วิธีนี้ลดประโยชน์ของ Slice isolation ลงเล็กน้อย แต่มันสะท้อนความเชื่อมโยงระหว่างสอง Entities นี้ที่เราควบคุมไม่ได้อย่างถูกต้อง ถ้า Entities พวกนี้ต้องถูก Refactor มันก็ต้องถูก Refactor ไปพร้อมๆ กัน ## Global types และ Redux[​](#global-types-และ-redux "ลิงก์ตรงไปยังหัวข้อ") Global types คือ Types ที่จะถูกใช้ทั่วทั้งแอปพลิเคชัน มี 2 แบบ โดยแบ่งตามสิ่งที่มันต้องรู้: 1. Generic types ที่ไม่มีรายละเอียดเฉพาะเจาะจงของแอปพลิเคชัน 2. Types ที่ต้องรู้เกี่ยวกับแอปพลิเคชันทั้งหมด กรณีแรกแก้ง่าย — วาง Types ของคุณใน Shared ใน Segment ที่เหมาะสม ตัวอย่างเช่น ถ้าคุณมี Interface สำหรับตัวแปร Global สำหรับ Analytics คุณสามารถวางไว้ที่ `shared/analytics` warning หลีกเลี่ยงการสร้างโฟลเดอร์ `shared/types` มันรวมสิ่งที่ไม่เกี่ยวข้องกันโดยอิงแค่คุณสมบัติของการ "เป็น Type" ซึ่งคุณสมบัตินั้นมักจะไม่มีประโยชน์เวลาค้นหาโค้ดในโปรเจกต์ กรณีที่สองพบบ่อยในโปรเจกต์ที่ใช้ Redux แบบไม่ใช้ RTK Store type สุดท้ายของคุณจะพร้อมก็ต่อเมื่อเอา Reducers ทั้งหมดมารวมกัน แต่ Store type นี้ต้องพร้อมใช้งานสำหรับ Selectors ที่คุณใช้ทั่วทั้งแอป ตัวอย่างเช่น นี่คือนิยาม Store ทั่วไปของคุณ: app/store/index.ts ``` import { combineReducers, rootReducer } from "redux"; import { songReducer } from "entities/song"; import { artistReducer } from "entities/artist"; const rootReducer = combineReducers(songReducer, artistReducer); const store = createStore(rootReducer); type RootState = ReturnType; type AppDispatch = typeof store.dispatch; ``` มันคงจะดีถ้ามี Redux hooks `useAppDispatch` และ `useAppSelector` ที่มี Type กำกับ อยู่ใน `shared/store` แต่พวกมันไม่สามารถ Import `RootState` และ `AppDispatch` จาก App layer ได้เนื่องจาก [กฎการ Import ของ Layers](/th/docs/reference/layers.md#import-rule-on-layers): > Module ใน Slice หนึ่ง สามารถ Import Slice อื่นๆ ได้เฉพาะเมื่อ Slice เหล่านั้นอยู่ใน Layer ที่ต่ำกว่าอย่างเคร่งครัด วิธีที่แนะนำในกรณีนี้คือสร้าง Explicit dependency ระหว่าง Layer Shared และ App สอง Types นี้ `RootState` และ `AppDispatch` ไม่น่าจะเปลี่ยนบ่อย และ Redux developers จะคุ้นเคยกับมัน ดังนั้นเราไม่ต้องกังวลกับมันมากนัก ใน TypeScript คุณทำได้โดยประกาศ Types เป็น Global แบบนี้: app/store/index.ts ``` /* same content as in the code block before… */ declare type RootState = ReturnType; declare type AppDispatch = typeof store.dispatch; ``` shared/store/index.ts ``` import { useDispatch, useSelector, type TypedUseSelectorHook } from "react-redux"; export const useAppDispatch = useDispatch.withTypes() export const useAppSelector: TypedUseSelectorHook = useSelector; ``` ## Enums[​](#enums "ลิงก์ตรงไปยังหัวข้อ") กฎทั่วไปของ Enums คือควรนิยาม **ใกล้กับตำแหน่งที่ใช้งานให้มากที่สุด** เมื่อ Enum แทนค่าที่เฉพาะเจาะจงกับ Feature เดียว มันควรถูกนิยามใน Feature นั้น การเลือก Segment ควรกำหนดโดยตำแหน่งที่ใช้งานเช่นกัน ถ้า Enum ของคุณเก็บ เช่น ตำแหน่งของ Toast บนหน้าจอ มันควรอยู่ใน `ui` segment ถ้ามันแทนสถานะการโหลดของ Backend operation มันควรอยู่ใน `api` segment บาง Enums เป็น Common จริงๆ ทั่วทั้งโปรเจกต์ เช่น General backend response statuses หรือ Design system tokens ในกรณีนี้ คุณสามารถวางพวกมันไว้ใน Shared และเลือก Segment ตามสิ่งที่ Enum นั้นเป็นตัวแทน (`api` สำหรับ Response statuses, `ui` สำหรับ Design tokens, ฯลฯ) ## Type validation schemas และ Zod[​](#type-validation-schemas-และ-zod "ลิงก์ตรงไปยังหัวข้อ") ถ้าคุณต้องการ Validate ว่าข้อมูลของคุณตรงตามรูปแบบหรือข้อจำกัดบางอย่าง คุณสามารถนิยาม Validation schema ใน TypeScript Library ยอดนิยมสำหรับงานนี้คือ [Zod](https://zod.dev) Validation schemas ก็ควรอยู่ร่วมกับโค้ดที่ใช้พวกมันให้มากที่สุดเท่าที่จะทำได้ Validation schemas คล้ายกับ Mappers (ตามที่คุยไปในหัวข้อ [Data transfer objects และ Mappers](#data-transfer-objects-and-mappers)) ในแง่ที่ว่ามันรับ Data transfer object และ Parse มัน ถ้า Parse ไม่ผ่านก็ Error หนึ่งในกรณีที่พบบ่อยที่สุดของการ Validation คือข้อมูลที่มาจาก Backend โดยทั่วไปคุณต้องการให้ Request ล้มเหลวถ้าข้อมูลไม่ตรงกับ Schema ดังนั้นจึงสมเหตุสมผลที่จะวาง Schema ไว้ที่เดียวกับ Request function ซึ่งปกติคือ `api` segment ถ้าข้อมูลของคุณมาจาก User input เช่น Form การ Validation ควรเกิดขึ้นตอนที่ข้อมูลกำลังถูกป้อน คุณสามารถวาง Schema ของคุณใน `ui` segment ติดกับ Form component หรือใน `model` segment ถ้า `ui` segment เริ่มรกเกินไป ## Typings ของ Component props และ Context[​](#typings-ของ-component-props-และ-context "ลิงก์ตรงไปยังหัวข้อ") โดยทั่วไป ดีที่สุดคือเก็บ Interface ของ Props หรือ Context ไว้ในไฟล์เดียวกับ Component หรือ Context ที่ใช้พวกมัน ถ้าคุณใช้ Framework ที่มี Single-file components เช่น Vue หรือ Svelte และคุณนิยาม Props interface ในไฟล์เดียวกันไม่ได้ หรือคุณต้องการแชร์ Interface นั้นระหว่างหลาย Components ให้สร้างไฟล์แยกในโฟลเดอร์เดียวกัน ปกติคือ `ui` segment นี่คือตัวอย่างกับ JSX (React หรือ Solid): pages/home/ui/RecentActions.tsx ``` interface RecentActionsProps { actions: Array<{ id: string; text: string }>; } export function RecentActions({ actions }: RecentActionsProps) { /* … */ } ``` และนี่คือตัวอย่างที่ Interface เก็บในไฟล์แยกสำหรับ Vue: pages/home/ui/RecentActionsProps.ts ``` export interface RecentActionsProps { actions: Array<{ id: string; text: string }>; } ``` pages/home/ui/RecentActions.vue ``` ``` ## Ambient declaration files (`*.d.ts`)[​](#ambient-declaration-files-dts "ลิงก์ตรงไปยังหัวข้อ") บาง Packages เช่น [Vite](https://vitejs.dev) หรือ [ts-reset](https://www.totaltypescript.com/ts-reset) ต้องการ Ambient declaration files เพื่อให้ทำงานได้ทั่วทั้งแอป ปกติแล้วไฟล์พวกนี้ไม่ได้ใหญ่หรือซับซ้อน ดังนั้นมักจะไม่ต้องการการวางโครงสร้างอะไรมาก โยนไว้ใน `src/` ก็ได้ เพื่อให้ `src` เป็นระเบียบขึ้น คุณสามารถเก็บพวกมันไว้ที่ App layer ใน `app/ambient/` Packages อื่นๆ แค่ไม่มี Typings และคุณอาจต้องการประกาศให้มันเป็น Untyped หรือเขียน Typings ให้มันเอง ที่ที่ดีสำหรับ Typings พวกนั้นคือ `shared/lib` ในโฟลเดอร์เช่น `shared/lib/untyped-packages` สร้างไฟล์ `%LIBRARY_NAME%.d.ts` ที่นั่นและประกาศ Types ที่คุณต้องการ: shared/lib/untyped-packages/use-react-screenshot.d.ts ``` // Library นี้ไม่มี Typings และเราขี้เกียจเขียนเอง declare module "use-react-screenshot"; ``` ## การ Generate Types อัตโนมัติ[​](#การ-generate-types-อัตโนมัติ "ลิงก์ตรงไปยังหัวข้อ") เป็นเรื่องปกติที่จะ Generate types จากแหล่งภายนอก เช่น Generate backend types จาก OpenAPI schema ในกรณีนี้ ให้สร้างที่เฉพาะใน Codebase ของคุณสำหรับ Types เหล่านี้ เช่น `shared/api/openapi` ในอุดมคติ คุณควรใส่ README ในโฟลเดอร์นั้นด้วยเพื่ออธิบายว่าไฟล์พวกนี้คืออะไร วิธี Regenerate ยังไง ฯลฯ --- # White Labels WIP บทความนี้อยู่ระหว่างการเขียน หากต้องการให้บทความนี้เสร็จเร็วขึ้น คุณสามารถ: * 📢 แบ่งปันความคิดเห็นของคุณ [ที่บทความ (คอมเมนต์/รีแอกชัน)](https://github.com/feature-sliced/documentation/issues/215) * 💬 รวบรวมเนื้อหา [ที่เกี่ยวข้องจากแชท](https://t.me/feature_sliced) * ⚒️ ร่วมสนับสนุน [ในรูปแบบอื่นๆ](https://github.com/feature-sliced/documentation/blob/master/CONTRIBUTING.md)
*🍰 Stay tuned!* > Figma, brand uikit, templates, ความสามารถในการปรับตัวกับแบรนด์ต่างๆ ## ดูเพิ่มเติม[​](#ดูเพิ่มเติม "ลิงก์ตรงไปยังหัวข้อ") * [(Thread) About the application for white-labels (branded) projects](https://t.me/feature_sliced/1543) * [(Presentation) About white-labels apps and design](http://yadi.sk/i/5IdhzsWrpO3v4Q) --- # Cross-import **Cross-import** คือการ import **ระหว่าง slices ที่แตกต่างกันแต่อยู่ใน layer เดียวกัน** ตัวอย่างเช่น: * การ import `features/product` จาก `features/cart` * การ import `widgets/sidebar` จาก `widgets/header` Cross-imports ถือเป็น "Code Smell" หรือสัญญาณเตือนว่า slices ต่างๆ เริ่มมีความผูกพันกัน (Couple) มากเกินไป ในบางสถานการณ์อาจเลี่ยงไม่ได้จริงๆ แต่เราควรทำด้วยความตั้งใจและมีการพูดคุยหรือทำเอกสารแจ้งทีมให้รับรู้เสมอนะ note Layer `shared` และ `app` ไม่มี concept ของ slice ดังนั้นการ import *ภายใน* layer เหล่านี้ **ไม่นับ** ว่าเป็น cross-imports นะ ## ทำไมถึงเป็น Code Smell?[​](#ทำไมถึงเป็น-code-smell "ลิงก์ตรงไปยังหัวข้อ") Cross-imports ไม่ใช่แค่เรื่องของสไตล์การเขียนโค้ด แต่ถูกมองว่าเป็น **Code Smell** เพราะมันทำให้เส้นแบ่งระหว่าง Domain ไม่ชัดเจนและก่อให้เกิด dependencies แฝง ลองนึกภาพว่า slice `cart` ต้องพึ่งพา Business Logic ของ `product` โดยตรงดูสิ ตอนแรกมันอาจจะดูสะดวกดี แต่จริงๆ แล้วมันสร้างปัญหาตามมาเพียบเลย: 1. **ความเป็นเจ้าของและความรับผิดชอบไม่ชัดเจน (Unclear ownership):** พอ `cart` ไป import `product` ก็เริ่มงงแล้วว่า Logic นี้ใครเป็น "เจ้าของ" กันแน่? ถ้าทีม `product` เปลี่ยน Logic ภายใน ก็อาจจะไปทำ `cart` พังโดยไม่รู้ตัว ความคลุมเครือนี้ทำให้ไล่โค้ดยากและหาคนรับผิดชอบบั๊กหรือฟีเจอร์ลำบากขึ้น 2. **ขาดความเป็นอิสระและทดสอบยาก (Reduced isolation):** ข้อดีหลักๆ ของ Architecture แบบ Sliced คือแต่ละ Slice ควรพัฒนา ทดสอบ และ Deploy ได้อย่างอิสระ แต่ Cross-imports เข้ามาทำลายสิ่งนี้ — จะเทส `cart` ทีก็ต้อง setup `product` ด้วย แถมแก้ไฟล์นึงอาจทำเทสของอีกไฟล์พังได้ง่ายๆ 3. **ภาระทางความคิดเพิ่มขึ้น (Increased cognitive load):** จะแก้ `cart` ที ต้องมานั่งพะวงว่า `product` ทำงานยังไง โครงสร้างเป็นแบบไหน ยิ่ง Cross-imports เยอะ ยิ่งต้องไล่โค้ดข้าม Slice ไปมาจนปวดหัว แค่แก้จุดเล็กๆ อาจต้องรู้ Context ทั้งระบบเลยก็ได้ 4. **ทางสู่ Circular Dependencies:** Cross-imports มักเริ่มจาก dependencies ทางเดียว แต่เผลอแป๊บเดียวอาจกลายเป็นสองทาง (A import B, แล้ว B ก็ import A) ทำให้ Slices ล็อกติดกันแน่น แกะออกยาก และ Refactor ลำบากขึ้นเรื่อยๆ จุดประสงค์ของการแบ่งขอบเขต Domain คือเพื่อให้แต่ละ Slice โฟกัสหน้าที่ของตัวเองและปรับเปลี่ยนได้ง่าย ยิ่ง Dependencies หลวมเท่าไหร่ เรายิ่งคาดเดาผลกระทบได้ง่ายขึ้นเท่านั้น แต่ Cross-imports เข้ามาทำลายกำแพงนี้ ทำให้ผลกระทบวงกว้างขึ้นและ Refactor ยากขึ้น — นี่แหละเหตุผลที่เรามองว่ามันเป็น Code Smell ที่ควรแก้ ในหัวข้อถัดไป เราจะมาดูว่าปัญหานี้มักโผล่มาแบบไหนในโปรเจกต์จริง และมีกลยุทธ์อะไรให้เลือกใช้บ้าง ## Cross-imports ใน layer Entities[​](#cross-imports-ใน-layer-entities "ลิงก์ตรงไปยังหัวข้อ") Cross-imports ใน `entities` มักเกิดจากการแบ่ง Entity ละเอียดเกินไป ก่อนจะหันไปพึ่ง `@x` ลองพิจารณาดูซิว่า **ควรรวมขอบเขต (Boundaries) เข้าด้วยกันไหม?** บางทีมใช้ `@x` เป็นพื้นที่สำหรับ Cross-import ของ `entities` โดยเฉพาะ แต่ขอบอกเลยว่าควรใช้เป็น **ทางเลือกสุดท้าย (Last Resort)** — เป็น **สิ่งที่ต้องยอมแลกอย่างจำใจ** ไม่ใช่วิธีที่แนะนำนะ ให้มองว่า `@x` เป็นเหมือนประตูปริศนาสำหรับการอ้างอิง Domain ที่เลี่ยงไม่ได้จริงๆ — ไม่ใช่เครื่องมือสำหรับใช้ซ้ำทั่วไป การใช้มันพร่ำเพรื่อจะทำให้ขอบเขตของ Entity ผูกติดกันแน่นและ Refactor ยากในอนาคต สำหรับรายละเอียดเกี่ยวกับ `@x` ลองดูที่ [เอกสาร Public API](/th/docs/reference/public-api.md) ถ้าอยากดูตัวอย่างจริงๆ ของการอ้างอิงข้าม Business Entities ดูได้ที่: * [Types guide — Business entities and their cross-references](/th/docs/guides/examples/types.md#business-entities-and-their-cross-references) * [Layers reference — Entities](/th/docs/reference/layers.md#entities) ## Features และ Widgets: หลากหลายกลยุทธ์[​](#features-และ-widgets-หลากหลายกลยุทธ์ "ลิงก์ตรงไปยังหัวข้อ") ใน layer `features` และ `widgets` การจะบอกว่า Cross-imports **ห้ามเด็ดขาด** อาจจะดูตึงเกินไปหน่อย ในความเป็นจริงเรามี **หลายกลยุทธ์** ให้เลือกใช้ ส่วนนี้เราจะไม่เน้นโค้ดมากนัก แต่จะเน้น **Patterns** ที่คุณเลือกใช้ได้ตามความเหมาะสมของทีมและบริบทโปรเจกต์ ### Strategy A: Slice merge (รวม Slice)[​](#strategy-a-slice-merge-รวม-slice "ลิงก์ตรงไปยังหัวข้อ") ถ้า Slice สองตัวมันไม่ค่อยจะอิสระจากกันเท่าไหร่ แถมยังต้องแก้พร้อมกันตลอด ก็จับมันมารวมเป็น Slice เดียวกันซะเลยสิ้นเรื่อง ตัวอย่าง (ก่อนรวม): * `features/profile` * `features/profileSettings` ถ้าสองตัวนี้ Cross-import กันไปมาและต้องไปด้วยกันตลอด ก็แปลว่าจริงๆ แล้วมันคือ Feature เดียวกันนั่นแหละ การรวมมันเข้าไปอยู่ใน `features/profile` มักจะเป็นทางเลือกที่ง่ายและคลีนกว่าเยอะ ### Strategy B: ดัน Shared Domain Flows ลงไปที่ `entities` (Domain-only)[​](#strategy-b-ดัน-shared-domain-flows-ลงไปที่-entities-domain-only "ลิงก์ตรงไปยังหัวข้อ") ถ้าหลาย Feature ต้องใช้ Flow ระดับ Domain ร่วมกัน ให้ย้าย Flow นั้นลงไปอยู่ใน Domain Slice ใน `entities` ซะ (เช่น `entities/session`) หลักการสำคัญ: * `entities` เก็บ **Domain Types และ Domain Logic เท่านั้น** * UI เก็บไว้ที่ `features` / `widgets` * Features ทำการ import และเรียกใช้ Domain Logic จาก `entities` ตัวอย่างเช่น ถ้าทั้ง `features/auth` และ `features/profile` ต้องการตรวจสอบ Session ทั้งคู่ ก็ให้เอาฟังก์ชันตรวจสอบ Session ไปไว้ที่ `entities/session` แล้วให้ทั้งสอง Feature เรียกใช้จากที่นั่นแทน ดูแนวทางเพิ่มเติมได้ที่ [Layers reference — Entities](/th/docs/reference/layers.md#entities) ### Strategy C: ประกอบร่างจาก Layer ด้านบน (Pages / App)[​](#strategy-c-ประกอบร่างจาก-layer-ด้านบน-pages--app "ลิงก์ตรงไปยังหัวข้อ") แทนที่จะให้ Slices ใน Layer เดียวกันเชื่อมต่อกันเองผ่าน Cross-imports ให้เราไปประกอบพวกมันที่ระดับสูงกว่า (`pages` / `app`) แทน วิธีนี้ใช้ Pattern ที่เรียกว่า **Inversion of Control (IoC)** — แทนที่ Slices จะต้องรู้จักกันเอง ให้ Layer ด้านบนเป็นคนจับพวกมันมาเจอกัน เทคนิค IoC ทั่วไปได้แก่: * **Render props (React):** ส่ง Component หรือฟังก์ชัน render เข้าไปเป็น Props * **Slots (Vue):** ใช้ Named slots เพื่อแทรก Content จาก Parent * **Dependency Injections:** ส่ง Dependencies ผ่าน Props หรือ Context #### ตัวอย่าง Basic composition (React):[​](#ตัวอย่าง-basic-composition-react "ลิงก์ตรงไปยังหัวข้อ") features/userProfile/index.ts ``` export { UserProfilePanel } from './ui/UserProfilePanel'; ``` features/activityFeed/index.ts ``` export { ActivityFeed } from './ui/ActivityFeed'; ``` pages/UserDashboardPage.tsx ``` import React from 'react'; import { UserProfilePanel } from '@/features/userProfile'; import { ActivityFeed } from '@/features/activityFeed'; export function UserDashboardPage() { return (
); } ``` ด้วยโครงสร้างนี้ `features/userProfile` และ `features/activityFeed` จะไม่รู้จักกันเลย `pages/UserDashboardPage` จะทำหน้าที่เอาพวกมันมาประกอบเป็นหน้าจอที่สมบูรณ์เอง #### ตัวอย่าง Render props (React):[​](#ตัวอย่าง-render-props-react "ลิงก์ตรงไปยังหัวข้อ") เมื่อ Feature นึงต้องการ Render content ของอีก Feature นึง ให้ใช้ Render props เพื่อกลับด้าน Dependency (Invert dependency): features/commentList/ui/CommentList.tsx ``` interface CommentListProps { comments: Comment[]; renderUserAvatar?: (userId: string) => React.ReactNode; } export function CommentList({ comments, renderUserAvatar }: CommentListProps) { return (
    {comments.map(comment => (
  • {renderUserAvatar?.(comment.userId)} {comment.text}
  • ))}
); } ``` pages/PostPage.tsx ``` import { CommentList } from '@/features/commentList'; import { UserAvatar } from '@/features/userProfile'; export function PostPage() { return ( } /> ); } ``` ตอนนี้ `CommentList` ก็ไม่ต้อง import จาก `userProfile` แล้ว — หน้า Page จะเป็นคนฉีด (Inject) Avatar Component เข้ามาให้เอง #### ตัวอย่าง Slots (Vue):[​](#ตัวอย่าง-slots-vue "ลิงก์ตรงไปยังหัวข้อ") ระบบ Slot ของ Vue เป็นวิธีที่เป็นธรรมชาติมากๆ ในการประกอบ Features เข้าด้วยกันโดยไม่ต้อง Cross-import: features/commentList/ui/CommentList.vue ``` ``` pages/PostPage.vue ``` ``` Feature `CommentList` ยังคงเป็นอิสระจาก `userProfile` อย่างสมบูรณ์ หน้า Page ใช้ Slots เพื่อประกอบพวกมันเข้าด้วยกัน ### Strategy D: Reuse ข้าม Feature ผ่าน Public API เท่านั้น[​](#strategy-d-reuse-ข้าม-feature-ผ่าน-public-api-เท่านั้น "ลิงก์ตรงไปยังหัวข้อ") ถ้ากลยุทธ์ข้างบนยังไม่ตอบโจทย์และจำเป็นต้อง Reuse ข้าม Feature จริงๆ ให้ทำผ่าน **Public API** ที่ประกาศไว้อย่างชัดเจนเท่านั้น (เช่น exported hooks หรือ UI components) หลีกเลี่ยงการเข้าถึง `store`/`model` หรือ Implementation ภายในของ Slice อื่นโดยตรง ต่างจาก Strategy A-C ที่พยายามกำจัด Cross-imports วิธีนี้คือ "ยอมรับมัน" แต่ลดความเสี่ยงด้วยการกำหนดขอบเขตที่เข้มงวด #### ตัวอย่างโค้ด:[​](#ตัวอย่างโค้ด "ลิงก์ตรงไปยังหัวข้อ") features/auth/index.ts ``` export { useAuth } from './model/useAuth'; export { AuthButton } from './ui/AuthButton'; ``` features/profile/ui/ProfileMenu.tsx ``` import React from 'react'; import { useAuth, AuthButton } from '@/features/auth'; export function ProfileMenu() { const { user } = useAuth(); if (!user) { return ; } return
{user.name}
; } ``` ตัวอย่างเช่น ห้าม `features/profile` ไป import จาก path อย่าง `features/auth/model/internal/*` เด็ดขาด ให้ใช้แค่สิ่งที่ `features/auth` ยอมเปิดเผยผ่าน Public API เท่านั้นพอ ## เมื่อไหร่ที่ Cross-imports กลายเป็นปัญหา?[​](#เมื่อไหร่ที่-cross-imports-กลายเป็นปัญหา "ลิงก์ตรงไปยังหัวข้อ") หลังจากดูกลยุทธ์ต่างๆ แล้ว คำถามที่ตามมาคือ: > เมื่อไหร่ที่ Cross-import ยอมรับได้ และเมื่อไหร่ที่ควรมองว่าเป็น Code Smell แล้วต้อง Refactor? สัญญาณเตือนที่พบบ่อย: * มีการพึ่งพา store/model/business logic ของ Slice อื่นโดยตรง * มีการ Import ลึกเข้าไปในไฟล์ภายในของ Slice อื่น * **Bidirectional dependencies** (A import B และ B ก็ import A) * แก้ Slice นึงแล้วทำอีก Slice พังบ่อยๆ * Flow ที่ควรจะไปประกอบกันที่ `pages` / `app` ถูกยัดเยียดให้ Cross-import กันเองใน Layer เดียวกัน ถ้าเจอสัญญาณพวกนี้เมื่อไหร่ ให้มองว่าเป็น **Code Smell** ไว้ก่อนเลย และลองพิจารณาใช้กลยุทธ์ที่แนะนำไปข้างต้นดูนะ ## ความเข้มงวดขึ้นอยู่กับการตัดสินใจของทีม/โปรเจกต์[​](#ความเข้มงวดขึ้นอยู่กับการตัดสินใจของทีมโปรเจกต์ "ลิงก์ตรงไปยังหัวข้อ") จะเข้มงวดกับกฎพวกนี้แค่ไหน ขึ้นอยู่กับทีมและบริบทของโปรเจกต์คุณเลย ตัวอย่างเช่น: * ใน **โปรเจกต์ระยะเริ่มต้น (Early-stage)** ที่มีการทดลองเยอะๆ การยอมให้มี Cross-imports บ้างอาจช่วยให้ไปได้เร็วขึ้น (Speed trade-off) * ใน **ระบบระยะยาวหรือระบบที่มีกฎเกณฑ์เข้มงวด** (เช่น Fintech หรือบริการขนาดใหญ่) การแบ่งขอบเขตที่ชัดเจนมักคุ้มค่ากว่าในแง่ของการดูแลรักษาและความเสถียร Cross-imports ไม่ใช่ข้อห้ามตายตัว มันคือ Dependencies ที่ **โดยทั่วไปควรหลีกเลี่ยง** แต่บางครั้งก็ถูกนำมาใช้อย่างตั้งใจ ถ้าคุณตัดสินใจจะมี Cross-import: * ให้มองว่ามันคือทางเลือกทางสถาปัตยกรรมที่ตั้งใจเลือกแล้ว * เขียนเอกสารหรือเหตุผลกำกับไว้ด้วย * หมั่นกลับมาทบทวนเป็นระยะเมื่อระบบโตขึ้น ทีมควรตกลงกันเรื่อง: * ระดับความเข้มงวดที่ต้องการ * จะสะท้อนเรื่องนี้ผ่าน Lint rules, Code review และ Documentation อย่างไร * เมื่อไหร่และอย่างไรที่จะกลับมาประเมิน Cross-imports ที่มีอยู่ใหม่อีกครั้ง ## อ้างอิง (References)[​](#อ้างอิง-references "ลิงก์ตรงไปยังหัวข้อ") * [(Thread) About the supposed inevitability of cross-ports](https://t.me/feature_sliced/4515) * [(Thread) About resolving cross-ports in entities](https://t.me/feature_sliced/3678) * [(Thread) About cross-imports and responsibility](https://t.me/feature_sliced/3287) * [(Thread) About imports between segments](https://t.me/feature_sliced/4021) * [(Thread) About cross-imports inside shared](https://t.me/feature_sliced/3618) --- # Desegmentation Desegmentation (หรือที่รู้จักว่า Horizontal Slicing หรือ Packaging by Layer) คือรูปแบบการจัดระเบียบโค้ดที่ไฟล์ถูกจัดกลุ่มตามบทบาททางเทคนิค (Technical Roles) แทนที่จะเป็น Business Domains ที่มันรับผิดชอบ นี่หมายความว่าโค้ดที่มีฟังก์ชันทางเทคนิคคล้ายกันจะถูกเก็บไว้ที่เดียวกัน ไม่ว่ามันจะจัดการ Business logic อะไรก็ตาม แนวทางนี้เป็นที่นิยมใน Meta-frameworks อย่าง Next และ Nuxt เนื่องจากความเรียบง่าย เพราะเริ่มได้ง่ายและเปิดให้ใช้ฟีเจอร์อย่าง Auto-imports และ File-based routing: * 📂 app * 📂 components * 📄 DeliveryCard.jsx * 📄 DeliveryChoice.jsx * 📄 RegionSelect.jsx * 📄 UserAvatar.jsx * 📂 actions * 📄 delivery.js * 📄 region.js * 📄 user.js * 📂 composables * 📄 delivery.js * 📄 region.js * 📄 user.js * 📂 constants * 📄 delivery.js * 📄 region.js * 📄 user.js * 📂 utils * 📄 delivery.js * 📄 region.js * 📄 user.js * 📂 stores * 📂 delivery * 📄 getters.js * 📄 actions.js Pattern นี้เกิดขึ้นใน FSD codebases ด้วย ในรูปแบบของ Generic folders: * 📂 features * 📂 delivery * 📂 ui * 📂 components ⚠️ * 📂 entities * 📂 recommendations * 📂 utils ⚠️ ไฟล์ต่างๆ ก็เป็นแหล่งของ Desegmentation ได้เหมือนกัน ไฟล์อย่าง `types.ts` สามารถรวมหลาย Domains ไว้ด้วยกัน ทำให้การค้นหาและการ Refactor ในอนาคตยุ่งยาก โดยเฉพาะใน Layers อย่าง `pages` หรือ `widgets`: * 📂 pages * 📂 delivery * 📄 index.ts * 📂 ui * 📄 DeliveryCard.tsx * 📄 DeliveryChoice.tsx * 📄 UserAvatar.tsx * 📂 model * 📄 types.ts ⚠️ * 📄 utils.ts ⚠️ * 📂 api * 📄 endpoints.ts ⚠️ - types.ts - utils.ts - endpoints.ts pages/delivery/model/types.ts ``` // ❌ ไม่ดี: ผสม Business domains ใน Generic file export interface DeliveryOption { id: string; name: string; price: number; } export interface UserInfo { id: string; name: string; avatar: string; } ``` pages/delivery/model/utils.ts ``` // ❌ ไม่ดี: ผสม Business domains ใน Generic file export function formatDeliveryPrice(price: number) { return `$${price.toFixed(2)}`; } export function getUserInitials(name: string) { return name.split(' ').map(n => n[0]).join(''); } ``` pages/delivery/api/endpoints.ts ``` // ❌ ไม่ดี: ผสม Business domains ใน Generic file export async function fetchDeliveryOptions() { /* ... */ } export async function fetchUserInfo() { /* ... */ } ``` ## ปัญหา[​](#ปัญหา "ลิงก์ตรงไปยังหัวข้อ") แม้โครงสร้างนี้จะเริ่มต้นง่าย แต่มันนำไปสู่ปัญหาการขยายตัว (Scalability) ในโปรเจกต์ขนาดใหญ่: * **Low Cohesion (ความเกาะเกี่ยวต่ำ):** การแก้ไข Feature เดียวมักต้องแก้ไฟล์ในหลายโฟลเดอร์ใหญ่ๆ เช่น `pages`, `components`, และ `stores` * **Tight Coupling (ความเกี่ยวพันสูง):** Components อาจมี Dependencies ที่ไม่คาดคิด นำไปสู่ Dependency chains ที่ซับซ้อนและพันกันยุ่งเหยิง * **Difficult Refactoring (Refactor ยาก):** ต้องใช้ความพยายามเพิ่มขึ้นในการดึงโค้ดที่เกี่ยวข้องกับ Domain เฉพาะออกมาด้วยมือ ## ทางแก้[​](#ทางแก้ "ลิงก์ตรงไปยังหัวข้อ") รวมโค้ดทั้งหมดที่เกี่ยวข้องกับ Domain เฉพาะไว้ในที่เดียวกัน หลีกเลี่ยงชื่อโฟลเดอร์ Generic เช่น `types`, `components`, `utils` รวมถึงชื่อไฟล์ Generic เช่น `types.ts`, `utils.ts`, หรือ `helpers.ts` ให้ใช้ชื่อที่สะท้อนถึง Domain ที่มันเป็นตัวแทนโดยตรงแทน หลีกเลี่ยงชื่อไฟล์ Generic เช่น `types.ts` ถ้าเป็นไปได้ โดยเฉพาะใน Slices ที่มีหลาย Domains: * 📂 pages * 📂 delivery * 📄 index.tsx * 📂 ui * 📄 DeliveryPage.tsx * 📄 DeliveryCard.tsx * 📄 DeliveryChoice.tsx * 📄 UserInfo.tsx * 📂 model * 📄 delivery.ts * 📄 user.ts ## ดูเพิ่มเติม[​](#ดูเพิ่มเติม "ลิงก์ตรงไปยังหัวข้อ") * [(Article) About Low Coupling and High Cohesion clearly](https://enterprisecraftsmanship.com/posts/cohesion-coupling-difference/) * [(Article) Low Coupling and High Cohesion. The Law of Demeter](https://medium.com/german-gorelkin/low-coupling-high-cohesion-d36369fb1be9) --- # Excessive Entities Layer `entities` ใน Feature-Sliced Design เป็นหนึ่งใน Layer ล่างๆ ที่มีไว้สำหรับ Business logic เป็นหลัก นั่นทำให้มันเข้าถึงได้ง่าย — ทุก Layers ยกเว้น `shared` สามารถเข้าถึงมันได้ อย่างไรก็ตาม ความเป็น Global ของมันหมายความว่าการเปลี่ยนแปลงใน `entities` อาจส่งผลกระทบวงกว้าง ต้องใช้การ Design อย่างระมัดระวังเพื่อหลีกเลี่ยงการ Refactor ที่ราคาแพง Entities ที่มากเกินไปอาจนำไปสู่ความกำกวม (โค้ดไหนควรอยู่ Layer นี้), Coupling, และปัญหา Import ตลอดเวลา (โค้ดกระจัดกระจายไปตาม Slices พี่น้อง) ## วิธีรักษา `entities` layer ให้สะอาด[​](#วิธีรักษา-entities-layer-ให้สะอาด "ลิงก์ตรงไปยังหัวข้อ") ### 0. พิจารณาการไม่มี `entities` layer เลย[​](#0-พิจารณาการไม่มี-entities-layer-เลย "ลิงก์ตรงไปยังหัวข้อ") คุณอาจคิดว่าแอปของคุณจะไม่เป็น Feature-Sliced ถ้าไม่มี Layer นี้ แต่มันโอเคมากๆ ที่แอปจะไม่มี `entities` layer เลย มันไม่ได้ทำลาย FSD แต่อย่างใด ในทางตรงกันข้าม มันช่วยให้ Architecture เรียบง่ายและเก็บ `entities` layer ไว้สำหรับการ Scale ในอนาคต ตัวอย่างเช่น ถ้าแอปของคุณทำหน้าที่เป็น Thin client เป็นไปได้มากว่ามันไม่ต้องการ `entities` layer Thick และ Thin clients คืออะไร? การแยก *Thick* vs. *Thin client* อ้างถึงวิธีการที่แอปประมวลผลข้อมูล: * *Thin* clients พึ่งพา Backend สำหรับการประมวลผลข้อมูลส่วนใหญ่ Client-side business logic มีน้อยมากและเกี่ยวข้องแค่การแลกเปลี่ยนข้อมูลกับ Backend * *Thick* clients จัดการ Client-side business logic จำนวนมาก ทำให้พวกมันเป็นผู้สมัครที่เหมาะสมสำหรับ `entities` layer จำไว้ว่าการแบ่งประเภทนี้ไม่ได้เป็นขาว-ดำอย่างเคร่งครัด และส่วนต่างๆ ของแอปเดียวกันอาจทำตัวเป็น "Thick" หรือ "Thin" client ก็ได้ ### 1. หลีกเลี่ยงการ Preemptive slicing (แบ่ง Slice ล่วงหน้า)[​](#1-หลีกเลี่ยงการ-preemptive-slicing-แบ่ง-slice-ล่วงหน้า "ลิงก์ตรงไปยังหัวข้อ") ตรงข้ามกับเวอร์ชันก่อนๆ FSD 2.1 สนับสนุน Deferred decomposition ของ Slices แทนที่จะเป็น Preemptive และแนวทางนี้ก็ใช้กับ `entities` layer ด้วย ตอนแรก คุณสามารถวางโค้ดทั้งหมดของคุณใน `model` segment ของหน้า (Widget, Feature) แล้วค่อยพิจารณา Refactor ทีหลัง เมื่อ Business requirements นิ่งแล้ว จำไว้ว่า: ยิ่งคุณย้ายโค้ดไป `entities` layer ช้าเท่าไหร่ การ Refactor ที่อาจเกิดขึ้นก็จะอันตรายน้อยลงเท่านั้น — โค้ดใน Entities อาจกระทบฟังก์ชันของ Slice ใดๆ ใน Layers ที่สูงกว่า ### 2. หลีกเลี่ยง Entities ที่ไม่จำเป็น[​](#2-หลีกเลี่ยง-entities-ที่ไม่จำเป็น "ลิงก์ตรงไปยังหัวข้อ") อย่าสร้าง Entity สำหรับ Business logic ทุกชิ้น ให้ใช้ Types จาก `shared/api` และวาง Logic ใน `model` segment ของ Slice ปัจจุบันแทน สำหรับ Business logic ที่ Reuse ได้ ให้ใช้ `model` segment ภายใน Entity slice โดยเก็บ Data definitions ไว้ใน `shared/api`: ``` 📂 entities 📂 order 📄 index.ts 📂 model 📄 apply-discount.ts // Business logic ที่ใช้ OrderDto จาก shared/api 📂 shared 📂 api 📄 index.ts 📂 endpoints 📄 order.ts ``` ### 3. แยก CRUD Operations ออกจาก Entities[​](#3-แยก-crud-operations-ออกจาก-entities "ลิงก์ตรงไปยังหัวข้อ") CRUD operations ถึงจะจำเป็น แต่มักเต็มไปด้วย Boilerplate code ที่ไม่มี Business logic สำคัญ การรวมพวกมันไว้ใน `entities` layer อาจทำให้รกและบดบังโค้ดที่มีความหมายจริงๆ ให้วาง CRUD operations ใน `shared/api` แทน: ``` 📂 shared 📂 api 📄 client.ts 📄 index.ts 📂 endpoints 📄 order.ts // รวม CRUD operations ที่เกี่ยวกับ Order ทั้งหมด 📄 products.ts 📄 cart.ts ``` สำหรับ CRUD operations ที่ซับซ้อน (เช่น Atomic updates, Rollbacks, หรือ Transactions) ให้ประเมินว่า `entities` layer เหมาะสมหรือไม่ แต่ใช้ด้วยความระมัดระวัง ### 4. เก็บ Authentication Data ใน `shared`[​](#4-เก็บ-authentication-data-ใน-shared "ลิงก์ตรงไปยังหัวข้อ") ให้เลือก `shared` layer แทนที่จะสร้าง `user` entity สำหรับ Authentication data เช่น Tokens หรือ User DTOs ที่ได้จาก Backend ข้อมูลพวกนี้เป็น Context-specific และไม่น่าจะถูก Reuse นอกขอบเขตของ Authentication: * Authentication responses (เช่น Tokens หรือ DTOs) มักขาด Fields ที่จำเป็นสำหรับการ Reuse ที่กว้างขึ้น หรือแปรเปลี่ยนตามบริบท (เช่น Private vs. Public user profiles) * การใช้ Entities สำหรับ Auth data อาจนำไปสู่ Cross-layer imports (เช่น `entities` เข้าไปใน `shared`) หรือการใช้ `@x` notation ซึ่งทำให้ Architecture ซับซ้อน ให้เก็บ Authentication-related data ใน `shared/auth` หรือ `shared/api` แทน: ``` 📂 shared 📂 auth 📄 use-auth.ts // authenticated user info หรือ token 📄 index.ts 📂 api 📄 client.ts 📄 index.ts 📂 endpoints 📄 order.ts ``` สำหรับรายละเอียดเพิ่มเติมเกี่ยวกับการ Implement authentication ดูที่ [Authentication guide](/th/docs/guides/examples/auth.md) ### 5. ลด Cross-Imports ให้น้อยที่สุด[​](#5-ลด-cross-imports-ให้น้อยที่สุด "ลิงก์ตรงไปยังหัวข้อ") FSD อนุญาตให้มี Cross-imports ผ่าน `@x` notation แต่มันอาจนำมาซึ้งปัญหาทางเทคนิคเช่น Circular dependencies เพื่อหลีกเลี่ยงสิ่งนี้ ให้ออกแบบ Entities ภายใน Business contexts ที่แยกจากกัน (Isolated) เพื่อกำจัดความจำเป็นในการ Cross-imports: Non-Isolated Business Context (หลีกเลี่ยง): ``` 📂 entities 📂 order 📂 @x 📂 model 📂 order-item 📂 @x 📂 model 📂 order-customer-info 📂 @x 📂 model ``` Isolated Business Context (แนะนำ): ``` 📂 entities 📂 order-info 📄 index.ts 📂 model 📄 order-info.ts ``` Isolated context ห่อหุ้ม Logic ที่เกี่ยวข้องทั้งหมด (เช่น Order items และ Customer info) ภายใน Module เดียว ลดความซับซ้อนและป้องกันการแก้ไขจากภายนอกต่อ Logic ที่ผูกกันแน่น --- # Routing WIP บทความนี้อยู่ระหว่างการเขียน หากต้องการให้บทความนี้เสร็จเร็วขึ้น คุณสามารถ: * 📢 แบ่งปันความคิดเห็นของคุณ [ที่บทความ (คอมเมนต์/รีแอกชัน)](https://github.com/feature-sliced/documentation/issues/169) * 💬 รวบรวมเนื้อหา [ที่เกี่ยวข้องจากแชท](https://t.me/feature_sliced) * ⚒️ ร่วมสนับสนุน [ในรูปแบบอื่นๆ](https://github.com/feature-sliced/documentation/blob/master/CONTRIBUTING.md)
*🍰 Stay tuned!* ## สถานการณ์[​](#สถานการณ์ "ลิงก์ตรงไปยังหัวข้อ") URL ของหน้าต่างๆ ถูก Hardcode ไว้ใน Layers ที่ต่ำกว่า Pages entities/post/card ``` ... ``` ## ปัญหา[​](#ปัญหา "ลิงก์ตรงไปยังหัวข้อ") URL ไม่ได้รวมศูนย์อยู่ใน Page layer ซึ่งเป็นที่ที่มันควรอยู่ตามขอบเขตความรับผิดชอบ ## ถ้าคุณเพิกเฉย[​](#ถ้าคุณเพิกเฉย "ลิงก์ตรงไปยังหัวข้อ") เมื่อต้องเปลี่ยน URL คุณจะต้องคอยจำว่า URL เหล่านี้ (และ Logic ของ URLs/Redirects) อาจจะอยู่ในทุก Layers ยกเว้น Pages และมันยังหมายความว่าตอนนี้แม้แต่ Product card ธรรมดาๆ ก็รับภาระส่วนหนึ่งมาจาก Pages ซึ่งทำให้ Logic ของโปรเจกต์กระจัดกระจาย ## ทางแก้[​](#ทางแก้ "ลิงก์ตรงไปยังหัวข้อ") กำหนดวิธีการทำงานกับ URLs/Redirects จากระดับ Page ขึ้นไป ส่งต่อไปยัง Layers ข้างล่างผ่าน Composition/Props/Factories ## ดูเพิ่มเติม[​](#ดูเพิ่มเติม "ลิงก์ตรงไปยังหัวข้อ") * [(Thread) What if I "sew up" routing in entities/features/widgets](https://t.me/feature_sliced/4389) * [(Thread) Why does it smear the logic of routes only in pages](https://t.me/feature_sliced/3756) --- # การย้ายจากสถาปัตยกรรมที่ทำเอง (Custom Architecture) ไกด์นี้อธิบายแนวทางที่อาจเป็นประโยชน์เมื่อย้ายจาก Custom self-made architecture มาเป็น Feature-Sliced Design นี่คือโครงสร้างโฟลเดอร์ของ Custom architecture ทั่วไป เราจะใช้เป็นตัวอย่างในไกด์นี้ คลิกที่ลูกศรสีฟ้าเพื่อเปิดโฟลเดอร์ 📁 src * 📁 actions * 📁 product * 📁 order * 📁 api * 📁 components * 📁 containers * 📁 constants * 📁 i18n * 📁 modules * 📁 helpers * 📁 routes * 📁 products.jsx * 📄 products.\[id].jsx * 📁 utils * 📁 reducers * 📁 selectors * 📁 styles * 📄 App.jsx * 📄 index.js ## ก่อนที่คุณจะเริ่ม[​](#before-you-start "ลิงก์ตรงไปยังหัวข้อ") คำถามสำคัญที่สุดที่ต้องถามทีมของคุณเมื่อพิจารณาจะเปลี่ยนมาใช้ Feature-Sliced Design คือ — *คุณต้องการมันจริงๆ หรือเปล่า?* เรารัก Feature-Sliced Design แต่แม้แต่เราก็ยอมรับว่าบางโปรเจกต์ก็อยู่ได้สบายๆ โดยไม่ต้องมีมัน นี่คือเหตุผลบางข้อที่ควรพิจารณาเปลี่ยน: 1. สมาชิกทีมใหม่บ่นว่ามันยากที่จะเรียนรู้จนทำงานได้จริง (Productive Level) 2. การแก้ไขโค้ดส่วนหนึ่งมักทำให้ส่วนอื่นที่ไม่เกี่ยวข้องกันพัง **บ่อยๆ** 3. การเพิ่มฟังก์ชันใหม่ทำได้ยากเนื่องจากจำนวนสิ่งที่ต้องคำนึงถึงมีมากเกินไป **หลีกเลี่ยงการเปลี่ยนไปใช้ FSD โดยขัดความต้องการของเพื่อนร่วมทีม** แม้ว่าคุณจะเป็น Lead ก็ตาม ก่อนอื่น โน้มน้าวเพื่อนร่วมทีมของคุณว่าประโยชน์ที่ได้คุ้มค่ากับต้นทุนการย้ายและต้นทุนการเรียนรู้ Architecture ใหม่แทนอันเดิมที่ใช้อยู่ และจำไว้ว่าการเปลี่ยนแปลงทางสถาปัตยกรรมใดๆ ไม่ได้เห็นผลทันทีในสายตาผู้บริหาร ตรวจสอบให้แน่ใจว่าพวกเขาเห็นด้วยกับการเปลี่ยนก่อนเริ่ม และอธิบายให้พวกเขาฟังว่ามันจะเป็นประโยชน์ต่อโปรเจกต์อย่างไร tip ถ้าคุณต้องการตัวช่วยในการโน้มน้าว Project manager ว่า FSD มีประโยชน์ ลองพิจารณาประเด็นเหล่านี้: 1. การย้ายไป FSD สามารถทำแบบค่อยเป็นค่อยไปได้ ดังนั้นมันจะไม่หยุดการพัฒนาฟีเจอร์ใหม่ 2. Architecture ที่ดีสามารถลดเวลาที่ Developer ใหม่ต้องใช้ในการเริ่มทำงานจริงได้อย่างมาก 3. FSD เป็น Architecture ที่มีเอกสารรองรับ ดังนั้นทีมไม่ต้องเสียเวลาเขียนดูแลเอกสารของตัวเองตลอดเวลา *** ถ้าคุณตัดสินใจที่จะเริ่มย้ายแล้ว สิ่งแรกที่คุณควรทำคือตั้ง Alias สำหรับ `📁 src` มันจะมีประโยชน์ในภายหลังในการอ้างถึง Top-level folders เราจะใช้ `@` เป็น Alias สำหรับ `./src` ในส่วนที่เหลือของไกด์นี้ ## Step 1. แบ่งโค้ดตาม Pages[​](#divide-code-by-pages "ลิงก์ตรงไปยังหัวข้อ") Custom architectures ส่วนใหญ่มีการแบ่งตามหน้าอยู่แล้ว ไม่ว่า Logic จะเล็กหรือใหญ่ ถ้าคุณมี `📁 pages` อยู่แล้ว คุณข้ามขั้นตอนนี้ได้เลย ถ้าคุณมีแค่ `📁 routes` ให้สร้าง `📁 pages` และพยายามย้าย Component code จาก `📁 routes` มาให้มากที่สุดเท่าที่จะทำได้ ในอุดมคติ คุณควรจะมี Route ที่เล็กและ Page ที่ใหญ่ ขณะที่คุณย้ายโค้ด ให้สร้างโฟลเดอร์สำหรับแต่ละหน้าและเพิ่มไฟล์ Index: note ตอนนี้ ไม่เป็นไรถ้า Pages ของคุณอ้างอิงถึงกันและกัน คุณค่อยจัดการทีหลัง แต่ตอนนี้ให้โฟกัสที่การสร้างการแบ่งแยกตามหน้าที่ชัดเจน Route file: src/routes/products.\[id].js ``` export { ProductPage as default } from "@/pages/product" ``` Page index file: src/pages/product/index.js ``` export { ProductPage } from "./ProductPage.jsx" ``` Page component file: src/pages/product/ProductPage.jsx ``` export function ProductPage(props) { return
; } ``` ## Step 2. แยกทุกอย่างอื่นออกจาก Pages[​](#separate-everything-else-from-pages "ลิงก์ตรงไปยังหัวข้อ") สร้างโฟลเดอร์ `📁 src/shared` และย้ายทุกอย่างที่ไม่ได้ Import จาก `📁 pages` หรือ `📁 routes` ไปที่นั่น สร้างโฟลเดอร์ `📁 src/app` และย้ายทุกอย่างที่ Import pages หรือ Routes ไปที่นั่น รวมถึง Routes เองด้วย จำไว้ว่า Shared layer ไม่มี Slices ดังนั้นไม่เป็นไรถ้า Segments จะ Import กันเอง คุณควรจะได้โครงสร้างไฟล์แบบนี้: 📁 src * 📁 app * 📁 routes * 📄 products.jsx * 📄 products.\[id].jsx * 📄 App.jsx * 📄 index.js * 📁 pages * 📁 product * 📁 ui * 📄 ProductPage.jsx * 📄 index.js * 📁 catalog * 📁 shared * 📁 actions * 📁 api * 📁 components * 📁 containers * 📁 constants * 📁 i18n * 📁 modules * 📁 helpers * 📁 utils * 📁 reducers * 📁 selectors * 📁 styles ## Step 3. จัดการ Cross-imports ระหว่าง Pages[​](#tackle-cross-imports-between-pages "ลิงก์ตรงไปยังหัวข้อ") ค้นหาทุกจุดที่หน้าหนึ่งกำลัง Import จากอีกหน้าหนึ่ง และทำหนึ่งในสองสิ่งนี้: 1. Copy-paste โค้ดที่ถูก Import ไปยังหน้าที่เรียกใช้เพื่อลบ Dependency 2. ย้ายโค้ดไปไว้ใน Segment ที่เหมาะสมใน Shared: * ถ้าเป็นส่วนของ UI kit ให้ย้ายไป `📁 shared/ui` * ถ้าเป็น Configuration constant ให้ย้ายไป `📁 shared/config` * ถ้าเป็น Backend interaction ให้ย้ายไป `📁 shared/api` note **การ Copy-paste ไม่ใช่เรื่องผิดทางสถาปัตยกรรม** อันที่จริง บางครั้งมันถูกต้องกว่าที่จะ Duplicate แทนที่จะ Abstract เป็น Reusable module ใหม่ เหตุผลคือบางครั้งส่วนที่แชร์กันของ Pages เริ่มที่จะแตกต่างกัน และคุณคงไม่อยากให้ Dependencies มาขัดขวางในกรณีเหล่านี้ อย่างไรก็ตาม หลักการ DRY ("Don't Repeat Yourself") ก็ยังสมเหตุสมผล ดังนั้นต้องแน่ใจว่าคุณไม่ได้ Copy-pasting business logic ไม่งั้นคุณจะต้องจำไปแก้ Bugs ในหลายที่พร้อมกัน ## Step 4. รื้อ Shared Layer[​](#unpack-shared-layer "ลิงก์ตรงไปยังหัวข้อ") คุณอาจจะมีของเยอะมากใน Shared layer ในขั้นตอนนี้ และโดยทั่วไปคุณควรหลีกเลี่ยงสิ่งนั้น เหตุผลคือ Shared layer อาจเป็น Dependency ของ Layer อื่นๆ ใน Codebase ของคุณ ดังนั้นการเปลี่ยนแปลงโค้ดตรงนั้นย่อมเสี่ยงต่อผลกระทบที่ไม่ได้ตั้งใจมากกว่า ค้นหา Objects ทั้งหมดที่ใช้แค่ในหน้าเดียวและย้ายไปที่ Slice ของหน้านั้น และใช่ *นั่นรวมถึง Actions, Reducers, และ Selectors ด้วย* ไม่มีประโยชน์ที่จะรวม Actions ทั้งหมดเข้าด้วยกัน แต่มีประโยชน์ที่จะวาง Actions ที่เกี่ยวข้องไว้ใกล้กับที่ที่มันถูกใช้ คุณควรจะได้โครงสร้างไฟล์แบบนี้: 📁 src * 📁 app (เหมือนเดิม) * 📁 pages * 📁 product * 📁 actions * 📁 reducers * 📁 selectors * 📁 ui * 📄 Component.jsx * 📄 Container.jsx * 📄 ProductPage.jsx * 📄 index.js * 📁 catalog * 📁 shared (เฉพาะของที่ Reuse) * 📁 actions * 📁 api * 📁 components * 📁 containers * 📁 constants * 📁 i18n * 📁 modules * 📁 helpers * 📁 utils * 📁 reducers * 📁 selectors * 📁 styles ## Step 5. จัดระเบียบโค้ดตาม Technical purpose[​](#organize-by-technical-purpose "ลิงก์ตรงไปยังหัวข้อ") ใน FSD การแบ่งตาม Technical purpose ทำด้วย *Segments* มีบางอันที่พบบ่อย: * `ui` — ทุกอย่างที่เกี่ยวกับการแสดงผล UI: UI components, Date formatters, Styles, ฯลฯ * `api` — Backend interactions: Request functions, Data types, Mappers, ฯลฯ * `model` — Data model: Schemas, Interfaces, Stores, และ Business logic * `lib` — Library code ที่ Modules อื่นใน Slice นี้ต้องการ * `config` — Configuration files และ Feature flags คุณสามารถสร้าง Segments ของคุณเองได้ด้วยถ้าต้องการ แต่อย่าสร้าง Segments ที่รวมโค้ดตามสิ่งที่มันเป็น เช่น `components`, `actions`, `types`, `utils` แต่ให้รวมโค้ดตามสิ่งที่มันทำ จัดระเบียบ Pages ของคุณใหม่เพื่อแยกโค้ดตาม Segments คุณน่าจะมี `ui` segment อยู่แล้ว ตอนนี้ได้เวลาสร้าง Segments อื่นๆ เช่น `model` สำหรับ Actions, Reducers, และ Selectors หรือ `api` สำหรับ Thunks และ Mutations และจัดระเบียบ Shared layer เพื่อลบโฟลเดอร์เหล่านี้: * `📁 components`, `📁 containers` — ส่วนใหญ่ควรกลายเป็น `📁 shared/ui` * `📁 helpers`, `📁 utils` — ถ้ามี Reused helpers เหลืออยู่ ให้รวมกลุ่มตามฟังก์ชัน เช่น Dates หรือ Type conversions และย้ายกลุ่มพวกนี้ไป `📁 shared/lib` * `📁 constants` — เช่นกัน รวมกลุ่มตามฟังก์ชันและย้ายไป `📁 shared/config` ## ขั้นตอนทางเลือก (Optional steps)[​](#optional-steps "ลิงก์ตรงไปยังหัวข้อ") ### Step 6. สร้าง Entities/Features จาก Redux slices ที่ใช้ในหลายหน้า[​](#form-entities-features-from-redux "ลิงก์ตรงไปยังหัวข้อ") โดยปกติ Redux slices ที่ถูก Reuse จะอธิบายสิ่งที่เกี่ยวข้องกับ Business เช่น Products หรือ Users ดังนั้นพวกนี้สามารถย้ายไป Entities layer, หนึ่ง Entity ต่อหนึ่งโฟลเดอร์ ถ้า Redux slice เกี่ยวข้องกับ Action ที่ Users ต้องการทำในแอป เช่น Comments ก็สามารถย้ายไป Features layer Entities และ Features ควรเป็นอิสระต่อกัน ถ้า Business domain ของคุณมีการเชื่อมต่อกันโดยธรรมชาติระหว่าง Entities ให้อ้างอิงถึง [Guide เกี่ยวกับ Business entities](/th/docs/guides/examples/types.md#business-entities-and-their-cross-references) สำหรับคำแนะนำในการจัดระเบียบการเชื่อมต่อเหล่านี้ API functions ที่เกี่ยวกับ Slices เหล่านี้สามารถอยู่ที่ `📁 shared/api` ได้ ### Step 7. Refactor Modules ของคุณ[​](#refactor-your-modules "ลิงก์ตรงไปยังหัวข้อ") โฟลเดอร์ `📁 modules` มักใช้สำหรับ Business logic ดังนั้นมันจึงค่อนข้างคล้ายกับ Features layer ของ FSD โดยธรรมชาติ บาง Modules อาจอธิบาย UI ก้อนใหญ่ๆ เช่น App header ในกรณีนั้น คุณควรย้ายพวกมันไปที่ Widgets layer ### Step 8. สร้างรากฐาน UI ที่สะอาดใน `shared/ui`[​](#form-clean-ui-foundation "ลิงก์ตรงไปยังหัวข้อ") `📁 shared/ui` ในอุดมคติควรประกอบด้วยชุดของ UI elements ที่ไม่มี Business logic ฝังอยู่ และควรจะ Reusable สูง Refactor UI components ที่เคยอยู่ใน `📁 components` และ `📁 containers` เพื่อแยก Business logic ออกมา ย้าย Business logic นั้นไปยัง Layers ที่สูงกว่า ถ้ามันไม่ได้ถูกใช้ในหลายที่เกินไป คุณอาจพิจารณา Copy-paste ก็ได้ ## ดูเพิ่มเติม[​](#see-also "ลิงก์ตรงไปยังหัวข้อ") * [(Talk in Russian) Ilya Klimov — Крысиные бега бесконечного рефакторинга: как не дать техническому долгу убить мотивацию и продукт](https://youtu.be/aOiJ3k2UvO4) --- # การย้ายจาก v1 ไป v2 ## ทำไมถึงต้อง v2?[​](#ทำไมถึงต้อง-v2 "ลิงก์ตรงไปยังหัวข้อ") แนวคิดดั้งเดิมของ **Feature-Slices** [ถูกประกาศ](https://t.me/feature_slices) ในปี 2018 ตั้งแต่นั้นมา มีการเปลี่ยนแปลงหลายอย่างใน Methodology แต่ในขณะเดียวกัน **[หลักการพื้นฐานยังคงเดิม](https://feature-sliced.github.io/featureslices.dev/v1.0.html)**: * การใช้โครงสร้าง Frontend project ที่ *เป็นมาตรฐาน* * การแบ่งแอปพลิเคชันโดยยึด *Business logic* เป็นหลัก * การใช้ *Isolated Features* เพื่อป้องกัน Implicit side effects และ Cyclic dependencies * การใช้ *Public API* พร้อมกับข้อห้ามในการปีน "เข้าไปข้างใน" ของ Module ในขณะเดียวกัน ในเวอร์ชันก่อนหน้าของ Methodology ก็ยังมี **จุดอ่อน** ที่: * บางครั้งนำไปสู่ Boilerplate code * บางครั้งนำไปสู่ความซับซ้อนเกินจำเป็นของฐานโค้ดและกฎที่ไม่ชัดเจนระหว่าง Abstractions * บางครั้งนำไปสู่ Implicit architectural solutions ซึ่งขัดขวางการปรับปรุงโปรเจกต์และการ Onboarding คนใหม่ เวอร์ชันใหม่ของ Methodology ([v2](https://github.com/feature-sliced/documentation)) ถูกออกแบบมา **เพื่อกำจัดข้อบกพร่องเหล่านี้ ในขณะที่ยังคงข้อดีที่มีอยู่** ของแนวทางนี้ไว้ ตั้งแต่ปี 2018 [ยังมีการพัฒนา](https://github.com/kof/feature-driven-architecture/issues) อีก Methodology ที่คล้ายกัน - [**feature-driven**](https://github.com/feature-sliced/documentation/tree/rc/feature-driven) ซึ่งถูกประกาศครั้งแรกโดย [Oleg Isonen](https://github.com/kof) หลังจากรวมสองแนวทางเข้าด้วยกัน เราได้ **ปรับปรุงและขัดเกลาแนวทางปฏิบัติที่มีอยู่** - เพื่อความยืดหยุ่น ความชัดเจน และประสิทธิภาพในการใช้งานที่มากขึ้น > ผลลัพธ์คือ สิ่งนี้ส่งผลกระทบแม้กระทั่งชื่อของ Methodology - *"feature-slice**d**"* ## ทำไมถึงสมเหตุสมผลที่จะย้ายโปรเจกต์ไป v2?[​](#ทำไมถึงสมเหตุสมผลที่จะย้ายโปรเจกต์ไป-v2 "ลิงก์ตรงไปยังหัวข้อ") > `WIP:` เวอร์ชันปัจจุบันของ Methodology อยู่ระหว่างการพัฒนาและรายละเอียดบางอย่าง *อาจเปลี่ยนแปลงได้* #### 🔍 Architecture ที่โปร่งใสและเรียบง่ายขึ้น[​](#-architecture-ที่โปร่งใสและเรียบง่ายขึ้น "ลิงก์ตรงไปยังหัวข้อ") Methodology (v2) นำเสนอ **Abstractions ที่เข้าใจง่ายและเป็นสากลมากขึ้น รวมถึงวิธีแยก Logic ในหมู่นักพัฒนา** ทั้งหมดนี้ส่งผลดีอย่างมากต่อการดึงคนใหม่ๆ เข้ามาร่วมทีม รวมถึงการศึกษาโปรเจกต์ปัจจุบัน และการกระจาย Business logic ของแอปพลิเคชัน #### 📦 Modularity ที่ยืดหยุ่นและจริงใจมากขึ้น[​](#-modularity-ที่ยืดหยุ่นและจริงใจมากขึ้น "ลิงก์ตรงไปยังหัวข้อ") Methodology (v2) อนุญาตให้ **กระจาย Logic ในวิธีที่ยืดหยุ่นมากขึ้น:** * ด้วยความสามารถในการ Refactor ส่วนที่แยกจากกันได้ตั้งแต่ต้น * ด้วยความสามารถในการพึ่งพา Abstractions เดียวกัน โดยไม่ต้องมี Dependencies ที่พันกันยุ่งเหยิงโดยไม่จำเป็น * ด้วยข้อกำหนดที่ง่ายขึ้นสำหรับตำแหน่งของ Module ใหม่ *(layer => slice => segment)* #### 🚀 Specifications, Plans, Community ที่มากขึ้น[​](#-specifications-plans-community-ที่มากขึ้น "ลิงก์ตรงไปยังหัวข้อ") ในขณะนี้ `core-team` กำลังทำงานอย่างแข็งขันในเวอร์ชันล่าสุด (v2) ของ Methodology ดังนั้นสำหรับเวอร์ชันนี้: * จะมี Cases / Problems ที่ถูกอธิบายมากขึ้น * จะมี Guides ในการประยุกต์ใช้มากขึ้น * จะมีตัวอย่างจริงมากขึ้น * โดยรวมแล้ว จะมี Documentation มากขึ้นสำหรับการ Onboarding คนใหม่และการศึกษาแนวคิดของ Methodology * Toolkit จะถูกพัฒนาในอนาคตเพื่อให้สอดคล้องกับแนวคิดและข้อตกลงทาง Architecture > แน่นอนว่าจะมีการ Support ผู้ใช้สำหรับเวอร์ชันแรกด้วย - แต่เวอร์ชันล่าสุดยังคงเป็น Priority สำหรับเรา > > ในอนาคต ด้วยการอัปเดตใหญ่ครั้งต่อไป คุณจะยังคงเข้าถึงเวอร์ชันปัจจุบัน (v2) ของ Methodology ได้ **โดยไม่มีความเสี่ยงต่อทีมและโปรเจกต์ของคุณ** ## Changelog[​](#changelog "ลิงก์ตรงไปยังหัวข้อ") ### `BREAKING` Layers[​](#breaking-layers "ลิงก์ตรงไปยังหัวข้อ") ตอนนี้ Methodology กำหนดให้มีการจัดสรร Layers อย่างชัดเจนที่ Top level * `/app` > `/processes` > **`/pages`** > **`/features`** > `/entities` > `/shared` * *นั่นคือ ไม่ใช่ทุกอย่างจะถูกปฏิบัติเหมือน Features/Pages อีกต่อไป* * แนวทางนี้ช่วยให้คุณ [กำหนดกฎสำหรับ Layers ได้อย่างชัดเจน](https://t.me/atomicdesign/18708): * **ยิ่ง Layer อยู่สูง** เท่าไหร่ Module ก็ยิ่งมี **Context** มากขึ้นเท่านั้น *(พูดง่ายๆ คือแต่ละ Module ของ Layer - สามารถ Import ได้เฉพาะ Modules ของ Layers ที่อยู่ต่ำกว่า แต่ห้าม Import จาก Layer ที่สูงกว่า)* * **ยิ่ง Layer อยู่ต่ำ** เท่าไหร่ ก็ยิ่ง **อันตรายและรับผิดชอบสูง** ในการเปลี่ยนแปลงมัน *(เพราะมักจะเป็น Layers ล่างๆ ที่ถูกใช้งานซ้ำมากที่สุด)* ### `BREAKING` Shared[​](#breaking-shared "ลิงก์ตรงไปยังหัวข้อ") Infrastructure abstractions `/ui`, `/lib`, `/api` ที่เคยอยู่ที่ src root ของโปรเจกต์ ตอนนี้ถูกแยกออกมาเป็น directory แยกต่างหาก `/src/shared` * `shared/ui` - ยังคงเป็น UI Kit ทั่วไปของแอปพลิเคชันเช่นเดิม (Optional) * *ในขณะเดียวกัน ก็ไม่มีใครห้ามใช้ `Atomic Design` ที่นี่เหมือนเมื่อก่อน* * `shared/lib` - ชุดของ Auxiliary libraries สำหรับ Implement logic * *ยังคงเหมือนเดิม - ไม่ใช่ที่ทิ้ง Helpers มั่วซั่ว* * `shared/api` - จุดเข้าถึงร่วมสำหรับ API * *สามารถ Register แบบ Local ในแต่ละ Feature / Page ได้ด้วย - แต่ไม่แนะนำ* * เหมือนเดิม - ไม่ควรมีการผูกมัดอย่างชัดเจนกับ Business logic ใน `shared` * *ถ้าจำเป็น คุณต้องย้ายความสัมพันธ์นี้ไปที่ระดับ `entities` หรือสูงกว่า* ### `NEW` Entities, Processes[​](#new-entities-processes "ลิงก์ตรงไปยังหัวข้อ") ใน v2 **, มี Abstractions ใหม่** เพิ่มเข้ามาเพื่อกำจัดปัญหาความซับซ้อนของ Logic และ High coupling * `/entities` - Layer **Business entities** ที่ประกอบด้วย Slices ที่เกี่ยวข้องโดยตรงกับ Business models หรือ Synthetic entities ที่ต้องใช้แค่ใน Frontend * *ตัวอย่าง: `user`, `i18n`, `order`, `blog`* * `/processes` - Layer **Business processes** ที่แทรกซึมทั่วทั้ง App * **Layer นี้เป็น Optional** มักจะแนะนำให้ใช้เมื่อ *Logic เติบโตขึ้นและเริ่มกระจายไปในหลายๆ หน้า* * *ตัวอย่าง: `payment`, `auth`, `quick-tour`* ### `BREAKING` Abstractions & Naming[​](#breaking-abstractions--naming "ลิงก์ตรงไปยังหัวข้อ") ตอนนี้ Abstractions เฉพาะและ [คำแนะนำที่ชัดเจนสำหรับการตั้งชื่อ](/th/docs/about/understanding/naming.md) ถูกกำหนดขึ้นแล้ว #### Layers[​](#layers "ลิงก์ตรงไปยังหัวข้อ") * `/app` — **Application initialization layer** * *เวอร์ชันก่อนหน้า: `app`, `core`,`init`, `src/index` (ก็มีเหมือนกัน)* * `/processes` — [**Business process layer**](https://github.com/feature-sliced/documentation/discussions/20) * *เวอร์ชันก่อนหน้า: `processes`, `flows`, `workflows`* * `/pages` — **Application page layer** * *เวอร์ชันก่อนหน้า: `pages`, `screens`, `views`, `layouts`, `components`, `containers`* * `/features` — [**Functionality parts layer**](https://github.com/feature-sliced/documentation/discussions/23) * *เวอร์ชันก่อนหน้า: `features`, `components`, `containers`* * `/entities` — [**Business entity layer**](https://github.com/feature-sliced/documentation/discussions/18#discussioncomment-422649) * *เวอร์ชันก่อนหน้า: `entities`, `models`, `shared`* * `/shared` — [**Layer of reused infrastructure code**](https://github.com/feature-sliced/documentation/discussions/31#discussioncomment-453020) 🔥 * *เวอร์ชันก่อนหน้า: `shared`, `common`, `lib`* #### Segments[​](#segments "ลิงก์ตรงไปยังหัวข้อ") * `/ui` — [**UI segment**](https://github.com/feature-sliced/documentation/discussions/31#discussioncomment-453132) 🔥 * *เวอร์ชันก่อนหน้า: `ui`, `components`, `view`* * `/model` — [**BL-segment**](https://github.com/feature-sliced/documentation/discussions/31#discussioncomment-472645) 🔥 * *เวอร์ชันก่อนหน้า: `model`, `store`, `state`, `services`, `controller`* * `/lib` — Segment **of auxiliary code** * *เวอร์ชันก่อนหน้า: `lib`, `libs`, `utils`, `helpers`* * `/api` — [**API segment**](https://github.com/feature-sliced/documentation/discussions/66) * *เวอร์ชันก่อนหน้า: `api`, `service`, `requests`, `queries`* * `/config` — **Application configuration segment** * *เวอร์ชันก่อนหน้า: `config`, `env`, `get-env`* ### `REFINED` Low coupling[​](#refined-low-coupling "ลิงก์ตรงไปยังหัวข้อ") ตอนนี้มันง่ายขึ้นมากที่จะ [ปฏิบัติตามหลักการ Low coupling](/th/docs/reference/slices-segments.md#zero-coupling-high-cohesion) ระหว่าง Modules ต้องขอบคุณ Layers ใหม่ *ในขณะเดียวกัน ก็ยังแนะนำให้หลีกเลี่ยงกรณีที่ยากต่อการ "Uncouple" Modules ให้มากที่สุดเท่าที่จะเป็นไปได้* ## ดูเพิ่มเติม[​](#ดูเพิ่มเติม "ลิงก์ตรงไปยังหัวข้อ") * [Notes from the report "React SPB Meetup #1"](https://t.me/feature_slices) * [React Berlin Talk - Oleg Isonen "Feature Driven Architecture"](https://www.youtube.com/watch?v=BWAeYuWFHhs) * [Comparison with v1 (community-chat)](https://t.me/feature_sliced/493) * [New ideas v2 with explanations (atomicdesign-chat)](https://t.me/atomicdesign/18708) * [Discussion of abstractions and naming for the new version of the methodology (v2)](https://github.com/feature-sliced/documentation/discussions/31) --- # การย้ายจาก v2.0 ไป v2.1 การเปลี่ยนแปลงหลักใน v2.1 คือ Mental model ใหม่สำหรับการแยกส่วน Interface (Decomposition) — โดยเริ่มจาก Pages ใน v2.0, FSD แนะนำให้ระบุ Entities และ Features ใน Interface ของคุณ โดยพิจารณาแม้กระทั่งชิ้นส่วนเล็กๆ ของการแสดงผล Entity และ Interactivity สำหรับการ Decomposition จากนั้นคุณจะสร้าง Widgets และ Pages จาก Entities และ Features ในโมเดลการ Decomposition นี้ Logic ส่วนใหญ่อยู่ใน Entities และ Features และ Pages เป็นเพียง Compositional layers ที่ไม่ได้มีความสำคัญอะไรในตัวเอง ใน v2.1, เราแนะนำให้เริ่มจาก Pages และอาจจะหยุดแค่นั้นเลยก็ได้ คนส่วนใหญ่รู้วิธีแยกแอปเป็นหน้าๆ อยู่แล้ว และ Pages ก็เป็นจุดเริ่มต้นทั่วไปเมื่อพยายามหา Component ใน Codebase ในโมเดลการ Decomposition ใหม่นี้ คุณเก็บ UI และ Logic ส่วนใหญ่ไว้ในแต่ละหน้า โดยรักษา Foundation ที่ Reusable ไว้ใน Shared ถ้ามีความจำเป็นต้อง Reuse Business logic ข้ามหลายๆ หน้า คุณค่อยย้ายมันลงไป Layer ข้างล่าง อีกส่วนเพิ่มเติมของ Feature-Sliced Design คือการทำให้ Cross-imports ระหว่าง Entities เป็นมาตรฐานด้วย `@x`-notation ## วิธีการย้าย (How to migrate)[​](#how-to-migrate "ลิงก์ตรงไปยังหัวข้อ") ไม่มี Breaking changes ใน v2.1 ซึ่งหมายความว่าโปรเจกต์ที่เขียนด้วย FSD v2.0 ก็ยังเป็นโปรเจกต์ที่ถูกต้องใน FSD v2.1 อย่างไรก็ตาม เราเชื่อว่า Mental model ใหม่มีประโยชน์ต่อทีมและโดยเฉพาะการ Onboarding developer ใหม่มากกว่า ดังนั้นเราแนะนำให้ปรับ Decomposition ของคุณเล็กน้อย ### Merge slices[​](#merge-slices "ลิงก์ตรงไปยังหัวข้อ") วิธีง่ายๆ ในการเริ่มคือรัน Linter ของเรา [Steiger](https://github.com/feature-sliced/steiger) บนโปรเจกต์ Steiger ถูกสร้างด้วย Mental model ใหม่ และกฎที่มีประโยชน์ที่สุดจะเป็น: * [`insignificant-slice`](https://github.com/feature-sliced/steiger/tree/master/packages/steiger-plugin-fsd/src/insignificant-slice) — ถ้า Entity หรือ Feature ถูกใช้ในหน้าเดียว กฎนี้จะแนะนำให้ Merge entity หรือ Feature นั้นเข้าไปในหน้านั้นทั้งก้อน * [`excessive-slicing`](https://github.com/feature-sliced/steiger/tree/master/packages/steiger-plugin-fsd/src/excessive-slicing) — ถ้า Layer มี Slices มากเกินไป มักจะเป็นสัญญาณว่า Decomposition ละเอียดเกินไป (Too fine-grained) กฎนี้จะแนะนำให้ Merge หรือจัดกลุ่มบาง Slices เพื่อช่วยการนำทางในโปรเจกต์ ``` npx steiger src ``` สิ่งนี้จะช่วยคุณระบุว่า Slices ไหนถูกใช้แค่ครั้งเดียว เพื่อที่คุณจะได้พิจารณาใหม่ว่ามันจำเป็นจริงๆ หรือเปล่า ในการพิจารณา ให้จำไว้ว่า Layer สร้าง Global namespace บางอย่างสำหรับ Slices ทั้งหมดข้างใน เหมือนที่คุณจะไม่ทำให้ Global namespace สกปรกด้วยตัวแปรที่ใช้แค่ครั้งเดียว คุณควรปฏิบัติกับพื้นที่ใน Namespace ของ Layer อย่างมีค่า และใช้อย่างประหยัด ### ทำให้ Cross-imports เป็นมาตรฐาน[​](#ทำให้-cross-imports-เป็นมาตรฐาน "ลิงก์ตรงไปยังหัวข้อ") ถ้าคุณมี Cross-imports ในโปรเจกต์ของคุณมาก่อน (เราไม่ตัดสินกัน!), ตอนนี้คุณสามารถใช้ประโยชน์จาก Notation ใหม่สำหรับการ Cross-importing ใน Feature-Sliced Design — `@x`-notation มันหน้าตาแบบนี้: entities/B/some/file.ts ``` import type { EntityA } from "entities/A/@x/B"; ``` สำหรับรายละเอียดเพิ่มเติม ตรวจสอบส่วน [Public API for cross-imports](/th/docs/reference/public-api.md#public-api-for-cross-imports) ใน Reference --- # การใช้ร่วมกับ Electron แอปพลิเคชัน Electron มีสถาปัตยกรรมพิเศษที่ประกอบด้วยหลาย Processes ซึ่งมีความรับผิดชอบต่างกัน การใช้ FSD ในบริบทนี้ต้องมีการปรับโครงสร้างให้เข้ากับธรรมชาติของ Electron ``` └── src ├── app # Common app layer │ ├── main # Main process │ │ └── index.ts # Main process entry point │ ├── preload # Preload script และ Context Bridge │ │ └── index.ts # Preload entry point │ └── renderer # Renderer process │ └── index.html # Renderer process entry point ├── main │ ├── features │ │ └── user │ │ └── ipc │ │ ├── get-user.ts │ │ └── send-user.ts │ ├── entities │ └── shared ├── renderer │ ├── pages │ │ ├── settings │ │ │ ├── ipc │ │ │ │ ├── get-user.ts │ │ │ │ └── save-user.ts │ │ │ ├── ui │ │ │ │ └── user.tsx │ │ │ └── index.ts │ │ └── home │ │ ├── ui │ │ │ └── home.tsx │ │ └── index.ts │ ├── widgets │ ├── features │ ├── entities │ └── shared └── shared # Common code ระหว่าง Main และ Renderer └── ipc # IPC description (event names, contracts) ``` ## กฎ Public API[​](#กฎ-public-api "ลิงก์ตรงไปยังหัวข้อ") แต่ละ Process ต้องมี Public API ของตัวเอง ตัวอย่างเช่น คุณไม่สามารถ Import modules จาก `main` ไป `renderer` ได้ มีแค่โฟลเดอร์ `src/shared` เท่านั้นที่เป็น Public สำหรับทั้งสอง Processes และยังจำเป็นสำหรับการอธิบาย Contracts สำหรับการปฏิสัมพันธ์ระหว่าง Process ## การเปลี่ยนแปลงเพิ่มเติมจากโครงสร้างมาตรฐาน[​](#การเปลี่ยนแปลงเพิ่มเติมจากโครงสร้างมาตรฐาน "ลิงก์ตรงไปยังหัวข้อ") แนะนำให้ใช้ Segment ใหม่ `ipc` ซึ่งเป็นที่ที่การปฏิสัมพันธ์ระหว่าง Processes เกิดขึ้น Layers `pages` และ `widgets` ตามชื่อแล้ว ไม่ควรอยู่ใน `src/main` คุณสามารถใช้ `features`, `entities` และ `shared` ได้ Layer `app` ใน `src` ประกอบด้วย Entry points สำหรับ `main` และ `renderer` รวมถึง IPC ด้วย ไม่ควรให้ Segments ใน `app` layer มีจุดตัดกัน (Intersection points) ## ตัวอย่างการปฏิสัมพันธ์ (Interaction example)[​](#ตัวอย่างการปฏิสัมพันธ์-interaction-example "ลิงก์ตรงไปยังหัวข้อ") src/shared/ipc/channels.ts ``` export const CHANNELS = { GET_USER_DATA: 'GET_USER_DATA', SAVE_USER: 'SAVE_USER', } as const; export type TChannelKeys = keyof typeof CHANNELS; ``` src/shared/ipc/events.ts ``` import { CHANNELS } from './channels'; export interface IEvents { [CHANNELS.GET_USER_DATA]: { args: void, response?: { name: string; email: string; }; }; [CHANNELS.SAVE_USER]: { args: { name: string; }; response: void; }; } ``` src/shared/ipc/preload.ts ``` import { CHANNELS } from './channels'; import type { IEvents } from './events'; type TOptionalArgs = T extends void ? [] : [args: T]; export type TElectronAPI = { [K in keyof typeof CHANNELS]: (...args: TOptionalArgs) => IEvents[typeof CHANNELS[K]]['response']; }; ``` src/app/preload/index.ts ``` import { contextBridge, ipcRenderer } from 'electron'; import { CHANNELS, type TElectronAPI } from 'shared/ipc'; const API: TElectronAPI = { [CHANNELS.GET_USER_DATA]: () => ipcRenderer.sendSync(CHANNELS.GET_USER_DATA), [CHANNELS.SAVE_USER]: args => ipcRenderer.invoke(CHANNELS.SAVE_USER, args), } as const; contextBridge.exposeInMainWorld('electron', API); ``` src/main/features/user/ipc/send-user.ts ``` import { ipcMain } from 'electron'; import { CHANNELS } from 'shared/ipc'; export const sendUser = () => { ipcMain.on(CHANNELS.GET_USER_DATA, ev => { ev.returnValue = { name: 'John Doe', email: 'john.doe@example.com', }; }); }; ``` src/renderer/pages/user-settings/ipc/get-user.ts ``` import { CHANNELS } from 'shared/ipc'; export const getUser = () => { const user = window.electron[CHANNELS.GET_USER_DATA](); return user ?? { name: 'John Donte', email: 'john.donte@example.com' }; }; ``` ## ดูเพิ่มเติม[​](#ดูเพิ่มเติม "ลิงก์ตรงไปยังหัวข้อ") * [Process Model Documentation](https://www.electronjs.org/docs/latest/tutorial/process-model) * [Context Isolation Documentation](https://www.electronjs.org/docs/latest/tutorial/context-isolation) * [Inter-Process Communication Documentation](https://www.electronjs.org/docs/latest/tutorial/ipc) * [Example](https://github.com/feature-sliced/examples/tree/master/examples/electron) --- # การใช้ร่วมกับ Next.js FSD สามารถใช้ร่วมกับ Next.js ได้ทั้งเวอร์ชัน App Router และ Pages Router หากคุณแก้ปัญหาความขัดแย้งหลักได้ — นั่นคือเรื่องโฟลเดอร์ `app` และ `pages` ## App Router[​](#app-router "ลิงก์ตรงไปยังหัวข้อ") ### ความขัดแย้งระหว่าง FSD และ Next.js ใน `app` layer[​](#conflict-between-fsd-and-nextjs-in-the-app-layer "ลิงก์ตรงไปยังหัวข้อ") Next.js แนะนำให้ใช้โฟลเดอร์ `app` เพื่อกำหนด Application routes มันคาดหวังให้ไฟล์ในโฟลเดอร์ `app` ตรงกับ Pathnames กลไกการ Routing นี้ **ไม่ตรงกัน** กับแนวคิดของ FSD เนื่องจากมันทำให้ไม่สามารถรักษาโครงสร้าง Slice แบบแบนราบ (Flat slice structure) ได้ ทางแก้คือย้ายโฟลเดอร์ `app` ของ Next.js ไปไว้ที่ Project root และ Import FSD pages จาก `src` (ซึ่งเป็นที่อยู่ของ FSD layers) เข้าไปในโฟลเดอร์ `app` ของ Next.js คุณจะต้องเพิ่มโฟลเดอร์ `pages` ไว้ที่ Project root ด้วย ไม่อย่างนั้น Next.js จะพยายามใช้ `src/pages` เป็น Pages Router แม้ว่าคุณจะใช้ App Router ก็ตาม ซึ่งจะทำให้ Build พัง และเป็นความคิดที่ดีที่จะใส่ไฟล์ `README.md` ไว้ใน Root `pages` folder นี้เพื่ออธิบายว่าทำไมมันถึงจำเป็นต้องมี แม้ว่าข้างในจะว่างเปล่าก็ตาม ``` ├── app # App folder (Next.js) │ ├── api │ │ └── get-example │ │ └── route.ts │ └── example │ └── page.tsx ├── pages # Empty pages folder (Next.js) │ └── README.md └── src ├── app │ └── api-routes # API routes ├── pages │ └── example │ ├── index.ts │ └── ui │ └── example.tsx ├── widgets ├── features ├── entities └── shared ``` ตัวอย่างการ Re-export page จาก `src/pages` ใน `app` ของ Next.js: app/example/page.tsx ``` export { ExamplePage as default, metadata } from '@/pages/example'; ``` ### Middleware[​](#middleware "ลิงก์ตรงไปยังหัวข้อ") ถ้าคุณใช้ Middleware ในโปรเจกต์ของคุณ มันต้องวางอยู่ที่ Project root ข้างๆ โฟลเดอร์ `app` และ `pages` ของ Next.js ### Instrumentation[​](#instrumentation "ลิงก์ตรงไปยังหัวข้อ") ไฟล์ `instrumentation.js` ช่วยให้คุณ Monitor ประสิทธิภาพและพฤติกรรมของ Application ถ้าคุณใช้มัน มันต้องวางอยู่ที่ Project root เหมือนกับ `middleware.js` ## Pages Router[​](#pages-router "ลิงก์ตรงไปยังหัวข้อ") ### ความขัดแย้งระหว่าง FSD และ Next.js ใน `pages` layer[​](#conflict-between-fsd-and-nextjs-in-the-pages-layer "ลิงก์ตรงไปยังหัวข้อ") Routes ควรวางอยู่ในโฟลเดอร์ `pages` ใน Root ของโปรเจกต์ คล้ายกับโฟลเดอร์ `app` สำหรับ App Router โครงสร้างภายใน `src` ที่เป็นที่ตั้งของ Layer folders จะยังคงเหมือนเดิม ``` ├── pages # Pages folder (Next.js) │ ├── _app.tsx │ ├── api │ │ └── example.ts # API route re-export │ └── example │ └── index.tsx └── src ├── app │ ├── custom-app │ │ └── custom-app.tsx # Custom App component │ └── api-routes │ └── get-example-data.ts # API route ├── pages │ └── example │ ├── index.ts │ └── ui │ └── example.tsx ├── widgets ├── features ├── entities └── shared ``` ตัวอย่างการ Re-export page จาก `src/pages` ใน `pages` ของ Next.js: pages/example/index.tsx ``` export { Example as default } from '@/pages/example'; ``` ### Custom `_app` component[​](#custom-_app-component "ลิงก์ตรงไปยังหัวข้อ") คุณสามารถวาง Custom App component ใน `src/app/_app` หรือ `src/app/custom-app`: src/app/custom-app/custom-app.tsx ``` import type { AppProps } from 'next/app'; export const MyApp = ({ Component, pageProps }: AppProps) => { return ( <>

My Custom App component

); }; ``` pages/\_app.tsx ``` export { App as default } from '@/app/custom-app'; ``` ## Route Handlers (API routes)[​](#route-handlers-api-routes "ลิงก์ตรงไปยังหัวข้อ") ใช้ `api-routes` segment ใน `app` layer เพื่อทำงานกับ Route Handlers ระวังเมื่อเขียน Backend code ในโครงสร้าง FSD — FSD มีเป้าหมายหลักสำหรับ Frontend ซึ่งหมายความว่าเป็นสิ่งที่คนจะคาดหวังว่าจะเจอ ถ้าคุณมี Endpoints เยอะ พิจารณาแยกพวกมันออกเป็น Package ต่างหากใน Monorepo * App Router * Pages Router src/app/api-routes/get-example-data.ts ``` import { getExamplesList } from '@/shared/db'; export const getExampleData = () => { try { const examplesList = getExamplesList(); return Response.json({ examplesList }); } catch { return Response.json(null, { status: 500, statusText: 'Ouch, something went wrong', }); } }; ``` app/api/example/route.ts ``` export { getExampleData as GET } from '@/app/api-routes'; ``` src/app/api-routes/get-example-data.ts ``` import type { NextApiRequest, NextApiResponse } from 'next'; const config = { api: { bodyParser: { sizeLimit: '1mb', }, }, maxDuration: 5, }; const handler = (req: NextApiRequest, res: NextApiResponse) => { res.status(200).json({ message: 'Hello from FSD' }); }; export const getExampleData = { config, handler } as const; ``` src/app/api-routes/index.ts ``` export { getExampleData } from './get-example-data'; ``` app/api/example.ts ``` import { getExampleData } from '@/app/api-routes'; export const config = getExampleData.config; export default getExampleData.handler; ``` ## คำแนะนำเพิ่มเติม[​](#additional-recommendations "ลิงก์ตรงไปยังหัวข้อ") * ใช้ `db` segment ใน `shared` layer เพื่ออธิบาย Database queries และการใช้งานต่อใน Layers ที่สูงกว่า * Logic การทำ Caching และ Revalidating queries ควรเก็บไว้ที่เดียวกับ Queries เอง ## ดูเพิ่มเติม[​](#see-also "ลิงก์ตรงไปยังหัวข้อ") * [Next.js Project Structure](https://nextjs.org/docs/app/getting-started/project-structure) * [Next.js Page Layouts](https://nextjs.org/docs/app/getting-started/layouts-and-pages) --- # การใช้ร่วมกับ NuxtJS เป็นไปได้ที่จะใช้ FSD ในโปรเจกต์ NuxtJS แต่จะเกิดความขัดแย้งเนื่องจากความแตกต่างระหว่างข้อกำหนดโครงสร้างโปรเจกต์ของ NuxtJS และหลักการของ FSD: * โดยปกติ NuxtJS เสนอโครงสร้างไฟล์แบบไม่มีโฟลเดอร์ `src` คืออยู่ที่ Root ของโปรเจกต์เลย * File routing อยู่ในโฟลเดอร์ `pages` ในขณะที่ใน FSD โฟลเดอร์นี้ถูกจองไว้สำหรับโครงสร้าง Slice แบบแบนราบ (Flat slice structure) ## การเพิ่ม Alias สำหรับไดเรกทอรี `src`[​](#การเพิ่ม-alias-สำหรับไดเรกทอรี-src "ลิงก์ตรงไปยังหัวข้อ") เพิ่ม `alias` object ใน Config ของคุณ: nuxt.config.ts ``` export default defineNuxtConfig({ devtools: { enabled: true }, // ไม่เกี่ยวกับ FSD, เปิดใช้งานตอนเริ่มโปรเจกต์ alias: { "@": '../src' }, }) ``` ## เลือกวิธีกำหนดค่า Router[​](#เลือกวิธีกำหนดค่า-router "ลิงก์ตรงไปยังหัวข้อ") ใน NuxtJS มีสองวิธีในการปรับแต่ง Routing - ใช้ Config และใช้โครงสร้างไฟล์ ในกรณีของ File-based routing คุณจะสร้างไฟล์ index.vue ในโฟลเดอร์ภายในไดเรกทอรี app/routes และในกรณีของ Config คุณจะกำหนดค่า Routers ในไฟล์ `router.options.ts` ### Routing โดยใช้ Config[​](#routing-โดยใช้-config "ลิงก์ตรงไปยังหัวข้อ") ใน `app` layer สร้างไฟล์ `router.options.ts` และ Export config object จากมัน: app/router.options.ts ``` import type { RouterConfig } from '@nuxt/schema'; export default { routes: (_routes) => [], }; ``` ในการเพิ่มหน้า `Home` ในโปรเจกต์ คุณต้องทำตามขั้นตอนเหล่านี้: * เพิ่ม Page slice ภายใน `pages` layer * เพิ่ม Route ที่เหมาะสมใน `app/router.config.ts` config ในการสร้าง Page slice ลองใช้ [CLI](https://github.com/feature-sliced/cli): ``` fsd pages home ``` สร้างไฟล์ `home-page.vue` ภายใน UI segment, เข้าถึงมันผ่าน Public API src/pages/home/index.ts ``` export { default as HomePage } from './ui/home-page'; ``` ดังนั้น โครงสร้างไฟล์จะเป็นดังนี้: ``` |── src │ ├── app │ │ ├── router.config.ts │ ├── pages │ │ ├── home │ │ │ ├── ui │ │ │ │ ├── home-page.vue │ │ │ ├── index.ts ``` สุดท้าย มาเพิ่ม Route ใน Config: app/router.config.ts ``` import type { RouterConfig } from '@nuxt/schema' export default { routes: (_routes) => [ { name: 'home', path: '/', component: () => import('@/pages/home.vue').then(r => r.default || r) } ], } ``` ### File Routing[​](#file-routing "ลิงก์ตรงไปยังหัวข้อ") ก่อนอื่น สร้างไดเรกทอรี `src` ใน Root ของโปรเจกต์ และสร้าง App และ Pages layers ภายในไดเรกทอรีนี้ และโฟลเดอร์ Routes ภายใน App layer ดังนั้น โครงสร้างไฟล์ของคุณควรจะเป็นดังนี้: ``` ├── src │ ├── app │ │ ├── routes │ ├── pages # Pages folder, เกี่ยวข้องกับ FSD ``` เพื่อให้ NuxtJS ใช้โฟลเดอร์ Routes ภายใน `app` layer สำหรับ File routing คุณต้องแก้ไข `nuxt.config.ts` ดังนี้: nuxt.config.ts ``` export default defineNuxtConfig({ devtools: { enabled: true }, // ไม่เกี่ยวกับ FSD, เปิดใช้งานตอนเริ่มโปรเจกต์ alias: { "@": '../src' }, dir: { pages: './src/app/routes' } }) ``` ตอนนี้ คุณสามารถสร้าง Routes สำหรับ Pages ภายใน `app` และเชื่อมต่อ Pages จาก `pages` เข้ากับพวกมัน ตัวอย่างเช่น ในการเพิ่มหน้า `Home` ในโปรเจกต์ คุณต้องทำตามขั้นตอนเหล่านี้: * เพิ่ม Page slice ภายใน `pages` layer * เพิ่ม Route ที่สอดคล้องกันภายใน `app` layer * เชื่อมต่อ Page จาก Slice เข้ากับ Route ในการสร้าง Page slice ลองใช้ [CLI](https://github.com/feature-sliced/cli): ``` fsd pages home ``` สร้างไฟล์ `home-page.vue` ภายใน UI segment, เข้าถึงมันโดยใช้ Public API src/pages/home/index.ts ``` export { default as HomePage } from './ui/home-page'; ``` สร้าง Route สำหรับหน้านี้ภายใน `app` layer: ``` ├── src │ ├── app │ │ ├── routes │ │ │ ├── index.vue │ ├── pages │ │ ├── home │ │ │ ├── ui │ │ │ │ ├── home-page.vue │ │ │ ├── index.ts ``` เพิ่ม Page component ของคุณภายในไฟล์ `index.vue`: src/app/routes/index.vue ``` ``` ## ทำอย่างไรกับ `layouts`?[​](#ทำอย่างไรกับ-layouts "ลิงก์ตรงไปยังหัวข้อ") คุณสามารถวาง Layouts ภายใน `app` layer ได้ ในการทำเช่นนี้คุณต้องแก้ไข Config ดังนี้: nuxt.config.ts ``` export default defineNuxtConfig({ devtools: { enabled: true }, // ไม่เกี่ยวกับ FSD, เปิดใช้งานตอนเริ่มโปรเจกต์ alias: { "@": '../src' }, dir: { pages: './src/app/routes', layouts: './src/app/layouts' } }) ``` ## ดูเพิ่มเติม[​](#ดูเพิ่มเติม "ลิงก์ตรงไปยังหัวข้อ") * [Documentation on changing directory config in NuxtJS](https://nuxt.com/docs/api/nuxt-config#dir) * [Documentation on changing router config in NuxtJS](https://nuxt.com/docs/guide/recipes/custom-routing#router-config) * [Documentation on changing aliases in NuxtJS](https://nuxt.com/docs/api/nuxt-config#alias) --- # การใช้ร่วมกับ React Query ## ปัญหาเรื่อง "จะวาง Keys ไว้ที่ไหน"[​](#ปัญหาเรื่อง-จะวาง-keys-ไว้ที่ไหน "ลิงก์ตรงไปยังหัวข้อ") ### วิธีแก้ — แบ่งตาม Entities[​](#วิธีแก้--แบ่งตาม-entities "ลิงก์ตรงไปยังหัวข้อ") ถ้าโปรเจกต์มีการแบ่งเป็น Entities อยู่แล้ว และแต่ละ Request ตรงกับ Entity เดียว การแบ่งที่สะอาดที่สุดคือแบ่งตาม Entity ในกรณีนี้ เราแนะนำให้ใช้โครงสร้างดังนี้: ``` └── src/ # ├── app/ # | ... # ├── pages/ # | ... # ├── entities/ # | ├── {entity}/ # | ... └── api/ # | ├── `{entity}.query` # Query-factory ที่เก็บ Keys และ Functions | ├── `get-{entity}` # Entity getter function | ├── `create-{entity}` # Entity creation function | ├── `update-{entity}` # Entity update function | ├── `delete-{entity}` # Entity delete function | ... # | # ├── features/ # | ... # ├── widgets/ # | ... # └── shared/ # ... # ``` ถ้ามีการเชื่อมต่อกันระหว่าง Entities (เช่น Entity `Country` มี field-list ของ `City` entities), คุณสามารถใช้ [Public API for cross-imports](/th/docs/reference/public-api.md#public-api-for-cross-imports) หรือพิจารณาทางเลือกอื่นข้างล่าง ### ทางเลือกอื่น — เก็บไว้ใน Shared[​](#ทางเลือกอื่น--เก็บไว้ใน-shared "ลิงก์ตรงไปยังหัวข้อ") ในกรณีที่การแยก Entity ไม่เหมาะสม สามารถพิจารณาโครงสร้างต่อไปนี้: ``` └── src/ # ... # └── shared/ # ├── api/ # ... ├── `queries` # Query-factories | ├── `document.ts` # | ├── `background-jobs.ts` # | ... # └── index.ts # ``` จากนั้นใน `@/shared/api/index.ts`: @/shared/api/index.ts ``` export { documentQueries } from "./queries/document"; ``` ## ปัญหาเรื่อง "จะแทรก Mutations ตรงไหน?"[​](#ปัญหาเรื่อง-จะแทรก-mutations-ตรงไหน "ลิงก์ตรงไปยังหัวข้อ") ไม่แนะนำให้ผสม Mutations กับ Queries มีสองทางเลือก: ### 1. Define custom hook ใน `api` segment ใกล้ๆ กับที่ใช้งาน[​](#1-define-custom-hook-ใน-api-segment-ใกล้ๆ-กับที่ใช้งาน "ลิงก์ตรงไปยังหัวข้อ") @/features/update-post/api/use-update-title.ts ``` export const useUpdateTitle = () => { const queryClient = useQueryClient(); return useMutation({ mutationFn: ({ id, newTitle }) => apiClient .patch(`/posts/${id}`, { title: newTitle }) .then((data) => console.log(data)), onSuccess: (newPost) => { queryClient.setQueryData(postsQueries.ids(id), newPost); }, }); }; ``` ### 2. Define mutation function ที่อื่น (Shared หรือ Entities) และใช้ `useMutation` โดยตรงใน Component[​](#2-define-mutation-function-ที่อื่น-shared-หรือ-entities-และใช้-usemutation-โดยตรงใน-component "ลิงก์ตรงไปยังหัวข้อ") ``` const { mutateAsync, isPending } = useMutation({ mutationFn: postApi.createPost, }); ``` @/pages/post-create/ui/post-create-page.tsx ``` export const CreatePost = () => { const { classes } = useStyles(); const [title, setTitle] = useState(""); const { mutate, isPending } = useMutation({ mutationFn: postApi.createPost, }); const handleChange = (e: ChangeEvent) => setTitle(e.target.value); const handleSubmit = (e: FormEvent) => { e.preventDefault(); mutate({ title, userId: DEFAULT_USER_ID }); }; return (
Create ); }; ``` ## การจัดการ Requests[​](#การจัดการ-requests "ลิงก์ตรงไปยังหัวข้อ") ### Query Factory[​](#query-factory "ลิงก์ตรงไปยังหัวข้อ") Query factory คือ Object ที่ค่าของ Key คือฟังก์ชันที่ Return รายการของ Query keys นี่คือวิธีใช้: ``` const keyFactory = { all: () => ["entity"], lists: () => [...postQueries.all(), "list"], }; ``` info `queryOptions` เป็น Built-in utility ใน react-query\@v5 (Optional) ``` queryOptions({ queryKey, ...options, }); ``` เพื่อความ Type safety ที่มากขึ้น, การเข้ากันได้กับ React-query เวอร์ชันในอนาคต, และการเข้าถึง Functions และ Query keys ที่ง่ายขึ้น คุณสามารถใช้ฟังก์ชัน `queryOptions` ที่มากับ “@tanstack/react-query” ได้ [(รายละเอียดเพิ่มเติมที่นี่)](https://tkdodo.eu/blog/the-query-options-api#queryoptions) ### 1. การสร้าง Query Factory[​](#1-การสร้าง-query-factory "ลิงก์ตรงไปยังหัวข้อ") @/entities/post/api/post.queries.ts ``` import { keepPreviousData, queryOptions } from "@tanstack/react-query"; import { getPosts } from "./get-posts"; import { getDetailPost } from "./get-detail-post"; import { PostDetailQuery } from "./query/post.query"; export const postQueries = { all: () => ["posts"], lists: () => [...postQueries.all(), "list"], list: (page: number, limit: number) => queryOptions({ queryKey: [...postQueries.lists(), page, limit], queryFn: () => getPosts(page, limit), placeholderData: keepPreviousData, }), details: () => [...postQueries.all(), "detail"], detail: (query?: PostDetailQuery) => queryOptions({ queryKey: [...postQueries.details(), query?.id], queryFn: () => getDetailPost({ id: query?.id }), staleTime: 5000, }), }; ``` ### 2. การใช้ Query Factory ใน Application Code[​](#2-การใช้-query-factory-ใน-application-code "ลิงก์ตรงไปยังหัวข้อ") ``` import { useParams } from "react-router-dom"; import { postApi } from "@/entities/post"; import { useQuery } from "@tanstack/react-query"; type Params = { postId: string; }; export const PostPage = () => { const { postId } = useParams(); const id = parseInt(postId || ""); const { data: post, error, isLoading, isError, } = useQuery(postApi.postQueries.detail({ id })); if (isLoading) { return
Loading...
; } if (isError || !post) { return <>{error?.message}; } return (

Post id: {post.id}

{post.title}

{post.body}

Owner: {post.userId}
); }; ``` ### ประโยชน์ของการใช้ Query Factory[​](#ประโยชน์ของการใช้-query-factory "ลิงก์ตรงไปยังหัวข้อ") * **จัดระเบียบ Request:** Factory ช่วยให้คุณจัดการ API requests ทั้งหมดไว้ที่เดียว ทำให้โค้ดอ่านง่ายและดูแลรักษาง่าย * **เข้าถึง Queries และ Keys ได้สะดวก:** Factory มี Methods ที่สะดวกสำหรับเข้าถึง Queries ประเภทต่างๆ และ Keys ของมัน * **ความสามารถในการ Refetch Query:** Factory ช่วยให้ Refetch ได้ง่ายโดยไม่ต้องเปลี่ยน Query keys ในส่วนต่างๆ ของ Application ## Pagination[​](#pagination "ลิงก์ตรงไปยังหัวข้อ") ในส่วนนี้ เราจะดูตัวอย่างฟังก์ชัน `getPosts` ซึ่งทำการ API Request เพื่อดึง Post entities โดยใช้ Pagination ### 1. สร้างฟังก์ชัน `getPosts`[​](#1-สร้างฟังก์ชัน-getposts "ลิงก์ตรงไปยังหัวข้อ") ฟังก์ชัน getPosts อยู่ในไฟล์ `get-posts.ts` ซึ่งอยู่ใน `api` segment @/pages/post-feed/api/get-posts.ts ``` import { apiClient } from "@/shared/api/base"; import { PostWithPaginationDto } from "./dto/post-with-pagination.dto"; import { PostQuery } from "./query/post.query"; import { mapPost } from "./mapper/map-post"; import { PostWithPagination } from "../model/post-with-pagination"; const calculatePostPage = (totalCount: number, limit: number) => Math.floor(totalCount / limit); export const getPosts = async ( page: number, limit: number, ): Promise => { const skip = page * limit; const query: PostQuery = { skip, limit }; const result = await apiClient.get("/posts", query); return { posts: result.posts.map((post) => mapPost(post)), limit: result.limit, skip: result.skip, total: result.total, totalPages: calculatePostPage(result.total, limit), }; }; ``` ### 2. Query factory สำหรับ Pagination[​](#2-query-factory-สำหรับ-pagination "ลิงก์ตรงไปยังหัวข้อ") `postQueries` query factory กำหนด Query options ต่างๆ สำหรับทำงานกับ Posts รวมถึงการ Request รายการ Posts แบบระบุ Page และ Limit ``` import { keepPreviousData, queryOptions } from "@tanstack/react-query"; import { getPosts } from "./get-posts"; export const postQueries = { all: () => ["posts"], lists: () => [...postQueries.all(), "list"], list: (page: number, limit: number) => queryOptions({ queryKey: [...postQueries.lists(), page, limit], queryFn: () => getPosts(page, limit), placeholderData: keepPreviousData, }), }; ``` ### 3. ใช้ใน Application Code[​](#3-ใช้ใน-application-code "ลิงก์ตรงไปยังหัวข้อ") @/pages/home/ui/index.tsx ``` export const HomePage = () => { const itemsOnScreen = DEFAULT_ITEMS_ON_SCREEN; const [page, setPage] = usePageParam(DEFAULT_PAGE); const { data, isFetching, isLoading } = useQuery( postApi.postQueries.list(page, itemsOnScreen), ); return ( <> setPage(page)} page={page} count={data?.totalPages} variant="outlined" color="primary" /> ); }; ``` note ตัวอย่างถูกทำให้ง่ายขึ้น เวอร์ชันเต็มดูได้ที่ [GitHub](https://github.com/ruslan4432013/fsd-react-query-example) ## `QueryProvider` สำหรับจัดการ Queries[​](#queryprovider-สำหรับจัดการ-queries "ลิงก์ตรงไปยังหัวข้อ") ในไกด์นี้ เราจะดูวิธีการจัดระเบียบ `QueryProvider` ### 1. สร้าง `QueryProvider`[​](#1-สร้าง-queryprovider "ลิงก์ตรงไปยังหัวข้อ") ไฟล์ `query-provider.tsx` อยู่ที่ path `@/app/providers/query-provider.tsx` @/app/providers/query-provider.tsx ``` import { QueryClient, QueryClientProvider } from "@tanstack/react-query"; import { ReactQueryDevtools } from "@tanstack/react-query-devtools"; import { ReactNode } from "react"; type Props = { children: ReactNode; client: QueryClient; }; export const QueryProvider = ({ client, children }: Props) => { return ( {children} ); }; ``` ### 2. สร้าง `QueryClient`[​](#2-สร้าง-queryclient "ลิงก์ตรงไปยังหัวข้อ") `QueryClient` คือ Instance ที่ใช้จัดการ API requests ไฟล์ `query-client.ts` อยู่ที่ `@/shared/api/query-client.ts` `QueryClient` ถูกสร้างด้วย Settings บางอย่างสำหรับ Query caching @/shared/api/query-client.ts ``` import { QueryClient } from "@tanstack/react-query"; export const queryClient = new QueryClient({ defaultOptions: { queries: { staleTime: 5 * 60 * 1000, gcTime: 5 * 60 * 1000, }, }, }); ``` ## Code generation[​](#code-generation "ลิงก์ตรงไปยังหัวข้อ") มีเครื่องมือที่สามารถ Generate API code ให้คุณได้ แต่มันยืดหยุ่นน้อยกว่าวิธี Manual ที่อธิบายข้างต้น ถ้า Swagger file ของคุณมีโครงสร้างที่ดี และคุณใช้หนึ่งในเครื่องมือเหล่านี้ มันอาจสมเหตุสมผลที่จะ Generate โค้ดทั้งหมดในไดเรกทอรี `@/shared/api` ## คำแนะนำเพิ่มเติมสำหรับจัดระเบียบ RQ[​](#คำแนะนำเพิ่มเติมสำหรับจัดระเบียบ-rq "ลิงก์ตรงไปยังหัวข้อ") ### API Client[​](#api-client "ลิงก์ตรงไปยังหัวข้อ") การใช้ Custom API client class ใน Shared layer, คุณสามารถทำให้ Configuration และการทำงานกับ API ในโปรเจกต์เป็นมาตรฐานเดียวกันได้ สิ่งนี้ช่วนให้คุณจัดการ Logging, Headers และ Data exchange format (เช่น JSON หรือ XML) ได้จากที่เดียว วิธีนี้ทำให้ดูแลรักษาและพัฒนาโปรเจกต์ง่ายขึ้นเพราะมันทำให้การเปลี่ยนและอัปเดตการปฏิสัมพันธ์กับ API ง่ายขึ้น @/shared/api/api-client.ts ``` import { API_URL } from "@/shared/config"; export class ApiClient { private baseUrl: string; constructor(url: string) { this.baseUrl = url; } async handleResponse(response: Response): Promise { if (!response.ok) { throw new Error(`HTTP error! Status: ${response.status}`); } try { return await response.json(); } catch (error) { throw new Error("Error parsing JSON response"); } } public async get( endpoint: string, queryParams?: Record, ): Promise { const url = new URL(endpoint, this.baseUrl); if (queryParams) { Object.entries(queryParams).forEach(([key, value]) => { url.searchParams.append(key, value.toString()); }); } const response = await fetch(url.toString(), { method: "GET", headers: { "Content-Type": "application/json", }, }); return this.handleResponse(response); } public async post>( endpoint: string, body: TData, ): Promise { const response = await fetch(`${this.baseUrl}${endpoint}`, { method: "POST", headers: { "Content-Type": "application/json", }, body: JSON.stringify(body), }); return this.handleResponse(response); } } export const apiClient = new ApiClient(API_URL); ``` ## ดูเพิ่มเติม[​](#see-also "ลิงก์ตรงไปยังหัวข้อ") * [(GitHub) Sample Project](https://github.com/ruslan4432013/fsd-react-query-example) * [(CodeSandbox) Sample Project](https://codesandbox.io/p/github/ruslan4432013/fsd-react-query-example/main) * [About the query factory](https://tkdodo.eu/blog/the-query-options-api) --- # การใช้ร่วมกับ SvelteKit เป็นไปได้ที่จะใช้ FSD ในโปรเจกต์ SvelteKit แต่จะเกิดความขัดแย้งเนื่องจากความแตกต่างระหว่างข้อกำหนดโครงสร้างของโปรเจกต์ SvelteKit และหลักการของ FSD: * โดยปกติ SvelteKit เสนอโครงสร้างไฟล์ภายในโฟลเดอร์ `src/routes` ในขณะที่ใน FSD การ Routing ต้องเป็นส่วนหนึ่งของ `app` layer * SvelteKit แนะนำให้วางทุกอย่างที่ไม่เกี่ยวกับ Routing ไว้ในโฟลเดอร์ `src/lib` ## มาตั้งค่า Config กัน[​](#มาตั้งค่า-config-กัน "ลิงก์ตรงไปยังหัวข้อ") svelte.config.ts ``` import adapter from '@sveltejs/adapter-auto'; import { vitePreprocess } from '@sveltejs/vite-plugin-svelte'; /** @type {import('@sveltejs/kit').Config}*/ const config = { preprocess: [vitePreprocess()], kit: { adapter: adapter(), files: { routes: 'src/app/routes', // ย้าย Routing ไปไว้ใน App layer lib: 'src', appTemplate: 'src/app/index.html', // ย้าย App entry point ไปไว้ใน App layer assets: 'public' }, alias: { '@/*': 'src/*' // สร้าง Alias สำหรับ Src directory } } }; export default config; ``` ## ย้าย File Routing ไปที่ `src/app`[​](#ย้าย-file-routing-ไปที่-srcapp "ลิงก์ตรงไปยังหัวข้อ") มาสร้าง App layer, ย้าย `index.html` ซึ่งเป็น Entry point ของแอปเข้าไปข้างในนั้น และสร้างโฟลเดอร์ Routes ดังนั้น โครงสร้างไฟล์ของคุณควรจะเป็นดังนี้: ``` ├── src │ ├── app │ │ ├── index.html │ │ ├── routes │ ├── pages # FSD Pages folder ``` ตอนนี้ คุณสามารถสร้าง Routes สำหรับ Pages ภายใน `app` และเชื่อมต่อ Pages จาก `pages` เข้ากับพวกมัน ตัวอย่างเช่น ในการเพิ่ม Home page ในโปรเจกต์ คุณต้องทำตามขั้นตอนเหล่านี้: * เพิ่ม Page slice ภายใน `pages` layer * เพิ่ม Route ที่สอดคล้องกันในโฟลเดอร์ `routes` จาก `app` layer * เชื่อมต่อ Page จาก Slice เข้ากับ Route ในการสร้าง Page slice ลองใช้ [CLI](https://github.com/feature-sliced/cli): ``` fsd pages home ``` สร้างไฟล์ `home-page.svelte` ภายใน UI segment, เข้าถึงมันโดยใช้ Public API src/pages/home/index.ts ``` export { default as HomePage } from './ui/home-page.svelte'; ``` สร้าง Route สำหรับหน้านี้ภายใน `app` layer: ``` ├── src │ ├── app │ │ ├── routes │ │ │ ├── +page.svelte │ │ ├── index.html │ ├── pages │ │ ├── home │ │ │ ├── ui │ │ │ │ ├── home-page.svelte │ │ │ ├── index.ts ``` เพิ่ม Page component ของคุณภายในไฟล์ `+page.svelte`: src/app/routes/+page.svelte ``` ``` ## ดูเพิ่มเติม[​](#ดูเพิ่มเติม "ลิงก์ตรงไปยังหัวข้อ") * [Documentation on changing directory config in SvelteKit](https://kit.svelte.dev/docs/configuration#files) --- # เอกสารสำหรับ LLMs หน้านี้รวบรวมลิงก์และคำแนะนำสำหรับ LLM crawlers * Spec: ### ไฟล์[​](#ไฟล์ "ลิงก์ตรงไปยังหัวข้อ") * [llms.txt](/th/llms.txt) * [llms-full.txt](/th/llms-full.txt) ### หมายเหตุ[​](#หมายเหตุ "ลิงก์ตรงไปยังหัวข้อ") * ไฟล์ถูก Serve จาก Site root ไม่ว่าหน้าปัจจุบันจะอยู่ที่ Path ไหน * ในการ Deploy ที่มี Non-root base URL (เช่น `/documentation/`) ลิงก์ด้านบนจะถูก Prefix โดยอัตโนมัติ --- # Layers (เลเยอร์) Layers เป็นระดับแรกของลำดับชั้นการจัดระเบียบใน Feature-Sliced Design จุดประสงค์คือเพื่อแยกโค้ดตามระดับความรับผิดชอบที่มันต้องการและจำนวน Modules อื่นๆ ในแอปที่มันพึ่งพา ทุก Layer มีความหมายทาง Semantic พิเศษที่จะช่วยคุณตัดสินใจว่าควรจัดสรรความรับผิดชอบให้โค้ดของคุณมากแค่ไหน มีทั้งหมด **7 Layers** เรียงจากความรับผิดชอบและ Dependency มากที่สุดไปน้อยที่สุด: ![A file system tree, with a single root folder called src and then seven subfolders: app, processes, pages, widgets, features, entities, shared. The processes folder is slightly faded out.](/th/img/layers/folders-graphic-light.svg#light-mode-only) ![A file system tree, with a single root folder called src and then seven subfolders: app, processes, pages, widgets, features, entities, shared. The processes folder is slightly faded out.](/th/img/layers/folders-graphic-dark.svg#dark-mode-only) 1. App 2. Processes (เลิกใช้แล้ว - Deprecated) 3. Pages 4. Widgets 5. Features 6. Entities 7. Shared คุณไม่จำเป็นต้องใช้ทุก Layer ในโปรเจกต์ของคุณ — เพิ่มเฉพาะถ้าคุณคิดว่ามันสร้างคุณค่าให้โปรเจกต์ โดยทั่วไป Frontend projects ส่วนใหญ่จะมีอย่างน้อย Layers Shared, Pages, และ App ในทางปฏิบัติ Layers คือโฟลเดอร์ที่มีชื่อตัวพิมพ์เล็ก (เช่น `📁 shared`, `📁 pages`, `📁 app`) การเพิ่ม Layers ใหม่ *ไม่แนะนำ* เพราะความหมาย (Semantics) ของพวกมันถูกกำหนดเป็นมาตรฐานไว้แล้ว ## กฎการ Import บน Layers[​](#กฎการ-import-บน-layers "ลิงก์ตรงไปยังหัวข้อ") Layers ประกอบด้วย *Slices* — กลุ่มของ Modules ที่มีความเกาะเกี่ยว (Cohesive) สูง Dependencies ระหว่าง Slices ถูกควบคุมโดย **กฎการ Import บน Layers**: > *Module (ไฟล์) ใน Slice สามารถ Import Slices อื่นได้เฉพาะเมื่อพวกมันอยู่ใน Layers ที่ต่ำกว่าอย่างเคร่งครัดเท่านั้น* ตัวอย่างเช่น โฟลเดอร์ `📁 ~/features/aaa` คือ Slice ชื่อ "aaa" ไฟล์ข้างในนั้น `~/features/aaa/api/request.ts` ไม่สามารถ Import โค้ดจากไฟล์ใดๆ ใน `📁 ~/features/bbb` ได้ แต่สามารถ Import โค้ดจาก `📁 ~/entities` และ `📁 ~/shared` ได้ เช่นเดียวกับ Code พี่น้องใดๆ จาก `📁 ~/features/aaa` เช่น `~/features/aaa/lib/cache.ts` Layers App และ Shared เป็น **ข้อยกเว้น** ของกฎนี้ — พวกมันเป็นทั้ง Layer และ Slice ในเวลาเดียวกัน Slices แบ่งโค้ดตาม Business domain และสอง Layers นี้เป็นข้อยกเว้นเพราะ Shared ไม่มี Business domains และ App รวมทุก Business domains เข้าด้วยกัน ในทางปฏิบัติ หมายความว่า Layers App และ Shared ประกอบขึ้นจาก Segments และ Segments สามารถ Import กันเองได้อย่างอิสระ ## คำนิยามของ Layer[​](#คำนิยามของ-layer "ลิงก์ตรงไปยังหัวข้อ") ส่วนนี้อธิบายความหมายทาง Semantic ของแต่ละ Layer เพื่อสร้างสัญชาตญาณว่าโค้ดแบบไหนควรอยู่ที่นั่น ### Shared[​](#shared "ลิงก์ตรงไปยังหัวข้อ") Layer นี้สร้างรากฐาน (Foundation) ให้กับส่วนที่เหลือของแอป เป็นสถานที่สำหรับสร้างการเชื่อมต่อกับโลกภายนอก เช่น Backends, Third-party libraries, Environment และยังเป็นที่สำหรับกำหนด Libraries ของคุณเองที่มีขอบเขตชัดเจน Layer นี้ เหมือนกับ App layer *ไม่มี Slices* Slices ตั้งใจให้แบ่ง Layer เป็น Business domains แต่ Business domains ไม่มีอยู่ใน Shared นี่หมายความว่าไฟล์ทั้งหมดใน Shared สามารถอ้างอิงและ Import กันเองได้ นี่คือ Segments ที่คุณมักจะพบใน Layer นี้: * `📁 api` — API client และอาจรวมถึงฟังก์ชันเพื่อทำ Requests ไปยัง Backend endpoints เฉพาะ * `📁 ui` — Application's UI kit Components ใน Layer นี้ไม่ควรมี Business logic แต่โอเคถ้ามันจะมี Business-theme เช่น คุณสามารถวาง Company logo และ Page layout ที่นี่ Components ที่มี UI logic ก็อนุญาต (เช่น Autocomplete หรือ Search bar) * `📁 lib` — คอลเลกชันของ Internal libraries โฟลเดอร์นี้ไม่ควรถูกปฏิบัติเหมือน Helpers หรือ Utilities ([อ่านที่นี่ว่าทำไมโฟลเดอร์เหล่านี้มักกลายเป็นที่ทิ้งขยะ](https://dev.to/sergeysova/why-utils-helpers-is-a-dump-45fo)) แต่ Library ทุกอันในโฟลเดอร์นี้ควรมี Area of focus เดียว เช่น Dates, Colors, Text manipulation, ฯลฯ Area of focus นั้นควรถูก Document ในไฟล์ README Developers ในทีมของคุณควรรู้ว่าอะไรเพิ่มได้และเพิ่มไม่ได้ใน Libraries เหล่านี้ * `📁 config` — Environment variables, Global feature flags และ Global configuration อื่นๆ สำหรับแอปของคุณ * `📁 routes` — Route constants หรือ Patterns สำหรับ Matching routes * `📁 i18n` — Setup code สำหรับการแปล, Global translation strings คุณมีอิสระที่จะเพิ่ม Segments มากกว่านี้ แต่ต้องแน่ใจว่าชื่อของ Segments เหล่านี้อธิบายจุดประสงค์ของเนื้อหา ไม่ใช่แก่นแท้ของมัน ตัวอย่างเช่น `components`, `hooks`, และ `types` เป็นชื่อ Segment ที่แย่เพราะมันไม่ได้ช่วยเท่าไหร่เวลาคุณหาโค้ด ### Entities[​](#entities "ลิงก์ตรงไปยังหัวข้อ") Slices บน Layer นี้เป็นตัวแทนของ Concepts จากโลกความจริงที่โปรเจกต์กำลังทำงานด้วย โดยทั่วไป พวกมันคือคำศัพท์ที่ Business ใช้เพื่ออธิบาย Product ตัวอย่างเช่น Social network อาจทำงานกับ Business entities เช่น User, Post, และ Group Entity slice อาจประกอบด้วย Data storage (`📁 model`), Data validation schemas (`📁 model`), Entity-related API request functions (`📁 api`), รวมถึง Visual representation ของ Entity นี้ใน Interface (`📁 ui`) Visual representation ไม่จำเป็นต้องสร้าง UI block ที่สมบูรณ์ — จุดประสงค์หลักคือเพื่อ Reuse รูปลักษณ์เดิมข้ามหลายๆ หน้าในแอป และ Business logic ที่แตกต่างกันอาจถูกแนบเข้าไปผ่าน Props หรือ Slots #### ความสัมพันธ์ของ Entity[​](#ความสัมพันธ์ของ-entity "ลิงก์ตรงไปยังหัวข้อ") Entities ใน FSD คือ Slices และโดย Default แล้ว Slices ไม่สามารถรู้เรื่องของกันและกันได้ แต่ในชีวิตจริง Entities มักปฏิสัมพันธ์กัน และบางครั้ง Entity หนึ่งก็เป็นเจ้าของหรือประกอบด้วย Entities อื่น ด้วยเหตุนี้ Business logic ของปฏิสัมพันธ์เหล่านี้จึงควรเก็บไว้ใน Layers ที่สูงกว่า เช่น Features หรือ Pages เมื่อ Data object ของ Entity หนึ่งประกอบด้วย Data objects อื่นๆ โดยปกติแล้วเป็นความคิดที่ดีที่จะทำให้การเชื่อมต่อระหว่าง Entities ชัดเจนและหลบเลี่ยง Slice isolation โดยสร้าง Cross-reference API ด้วย `@x` notation เหตุผลคือ Connected entities จำเป็นต้องถูก Refactor พร้อมกัน ดังนั้นดีที่สุดคือทำให้การเชื่อมต่อนั้นไม่มีทางพลาดสายตา ตัวอย่างเช่น: entities/artist/model/artist.ts ``` import type { Song } from "entities/song/@x/artist"; export interface Artist { name: string; songs: Array; } ``` entities/song/@x/artist.ts ``` export type { Song } from "../model/song.ts"; ``` เรียนรู้เพิ่มเติมเกี่ยวกับ `@x` notation ในส่วน [Public API for cross-imports](/th/docs/reference/public-api.md#public-api-for-cross-imports) ### Features[​](#features "ลิงก์ตรงไปยังหัวข้อ") Layer นี้สำหรับ Interactions หลักๆ ในแอปของคุณ สิ่งที่ Users ของคุณสนใจที่จะทำ Interactions เหล่านี้มักเกี่ยวข้องกับ Business entities เพราะนั่นคือสิ่งที่แอปเป็น หลักการสำคัญสำหรับการใช้ Features layer อย่างมีประสิทธิภาพคือ: **ไม่ใช่ทุกอย่างจำเป็นต้องเป็น Feature** ตัวบ่งชี้ที่ดีว่าบางอย่างจำเป็นต้องเป็น Feature คือความจริงที่ว่ามันถูก Reuse ในหลายหน้า ตัวอย่างเช่น ถ้าแอปมีหลาย Editors และพวกมันทั้งหมดมี Comments ดังนั้น Comments คือ Reused feature จำไว้ว่า Slices คือกลไกสำหรับการหาโค้ดอย่างรวดเร็ว และถ้ามี Features เยอะเกินไป อันที่สำคัญจะถูกกลบหายไป ในอุดมคติ เมื่อคุณมาเริ่มโปรเจกต์ใหม่ คุณควรจะค้นพบฟังก์ชันการทำงานของมันโดยการดูผ่าน Pages และ Features เมื่อตัดสินใจว่าอะไรควรเป็น Feature ให้ Optimize สำหรับประสบการณ์ของคนมาใหม่ในโปรเจกต์เพื่อให้ค้นพบพื้นที่สำคัญใหญ่ๆ ของโค้ดได้อย่างรวดเร็ว Feature slice อาจประกอบด้วย UI เพื่อทำ Interaction เช่น Form (`📁 ui`), API calls ที่จำเป็นสำหรับ Action (`📁 api`), Validation และ Internal state (`📁 model`), Feature flags (`📁 config`) ### Widgets[​](#widgets "ลิงก์ตรงไปยังหัวข้อ") Widgets layer ตั้งใจไว้สำหรับ Blocks of UI ขนาดใหญ่ที่พึ่งพาตัวเองได้ (Self-sufficient) Widgets มีประโยชน์ที่สุดเมื่อพวกมันถูก Reuse ข้ามหลาย Pages หรือเมื่อ Page ที่มันอยู่มี Blocks อิสระขนาดใหญ่หลายอัน และนี่คือหนึ่งในนั้น ถ้า Block of UI ประกอบขึ้นเป็น Content ที่น่าสนใจส่วนใหญ่ของหน้า และไม่เคยถูก Reuse มัน **ไม่ควรเป็น Widget** และควรวางไว้ข้างในหน้านั้นโดยตรงแทน tip ถ้าคุณกำลังใช้ Nested routing system (เช่น Router ของ [Remix](https://remix.run)) มันอาจเป็นประโยชน์ที่จะใช้ Widgets layer ในวิธีเดียวกับที่ Flat routing system ใช้ Pages layer — คือเพื่อสร้าง Router blocks ที่สมบูรณ์ พร้อมด้วย Data fetching, Loading states, และ Error boundaries ที่เกี่ยวข้อง ในวิธีเดียวกัน คุณสามารถเก็บ Page layouts ไว้บน Layer นี้ได้ ### Pages[​](#pages "ลิงก์ตรงไปยังหัวข้อ") Pages คือสิ่งที่ประกอบขึ้นเป็น Websites และ Applications (หรือที่รู้จักว่า Screens หรือ Activities) หนึ่ง Page มักจะตรงกับหนึ่ง Slice อย่างไรก็ตาม ถ้ามีหลาย Pages ที่คล้ายกันมากๆ พวกมันสามารถถูกรวมกลุ่มเป็น Slice เดียวได้ ตัวอย่างเช่น Registration และ Login forms ไม่มีลิมิตว่าคุณสามารถวางโค้ดใน Page slice ได้มากแค่ไหน ตราบใดที่ทีมของคุณยังพบว่ามันง่ายที่จะนำทาง ถ้า UI block บนหน้าไม่ได้ถูก Reuse มันถูกต้องสมบูรณ์ที่จะเก็บมันไว้ข้างใน Page slice ใน Page slice คุณมักจะพบ Page's UI รวมถึง Loading states และ Error boundaries (`📁 ui`) และ Data fetching และ Mutating requests (`📁 api`) ไม่ใช่เรื่องปกติที่ Page จะมี Dedicated data model และเศษเสี้ยวของ State เล็กๆ น้อยๆ สามารถเก็บไว้ใน Components เองได้ ### Processes[​](#processes "ลิงก์ตรงไปยังหัวข้อ") caution Layer นี้ถูกเลิกใช้แล้ว (Deprecated) เวอร์ชันปัจจุบันของ Spec แนะนำให้หลีกเลี่ยงและย้ายเนื้อหาไปที่ `features` และ `app` แทน Processes คือทางหนีทีไล่ (Escape hatches) สำหรับ Multi-page interactions Layer นี้ถูกทิ้งไว้โดยไม่มีคำนิยามอย่างตั้งใจ Applications ส่วนใหญ่ไม่ควรใช้ Layer นี้ และเก็บ Router-level และ Server-level logic ไว้ที่ App layer พิจารณาใช้ Layer นี้เฉพาะเมื่อ App layer โตขึ้นจนใหญ่เกินไปที่จะดูแลรักษาไหวและต้องการแบ่งเบาภาระ ### App[​](#app "ลิงก์ตรงไปยังหัวข้อ") เรื่องราวระดับ App-wide ทั้งหมด ทั้งในแง่เทคนิค (เช่น Context providers) และในแง่ Business (เช่น Analytics) Layer นี้มักไม่มี Slices เช่นเดียวกับ Shared แต่จะมี Segments โดยตรงแทน นี่คือ Segments ที่คุณมักจะพบใน Layer นี้: * `📁 routes` — Router configuration * `📁 store` — Global store configuration * `📁 styles` — Global styles * `📁 entrypoint` — Entrypoint ของ Application code, Framework-specific --- # Public API Public API คือ *สัญญา (Contract)* ระหว่างกลุ่มของ Modules (เช่น Slice) กับโค้ดที่จะมาใช้งานมัน มันยังทำหน้าที่เป็นประตู (Gate) ที่อนุญาตให้เข้าถึง Object บางอย่างเท่านั้น และต้องผ่านทาง Public API นั้นๆ เท่านั้น ในทางปฏิบัติ มักจะถูก Implement ด้วยไฟล์ Index ที่มีการ Re-export: pages/auth/index.js ``` export { LoginPage } from "./ui/LoginPage"; export { RegisterPage } from "./ui/RegisterPage"; ``` ## อะไรที่ทำให้ Public API ดี?[​](#อะไรที่ทำให้-public-api-ดี "ลิงก์ตรงไปยังหัวข้อ") Public API ที่ดีจะทำให้การใช้งานและการ Integrate Slice นั้นเข้าไปในโค้ดอื่น สะดวกและเชื่อถือได้ ซึ่งสามารถทำได้โดยตั้งเป้าหมาย 3 ข้อนี้: 1. ส่วนอื่นๆ ของ Application ต้องได้รับความคุ้มครองจากการเปลี่ยนแปลงโครงสร้างภายใน Slice เช่น การทำ Refactoring 2. การเปลี่ยนแปลงสำคัญในพฤติกรรมของ Slice ที่ทำลายความคาดหวังเดิม ควรส่งผลให้เกิดการเปลี่ยนแปลงใน Public API 3. เฉพาะส่วนที่จำเป็นของ Slice เท่านั้นที่ควรถูกเปิดเผย ข้อสุดท้ายมีนัยสำคัญในทางปฏิบัติ มันอาจจะน่าดึงดูดใจที่จะสร้าง Wildcard re-exports ของทุกอย่าง โดยเฉพาะในช่วงแรกของการพัฒนา Slice เพราะ Object ใหม่ๆ ที่คุณ Export จากไฟล์ของคุณจะถูก Export ออกจาก Slice โดยอัตโนมัติ: Bad practice, features/comments/index.js ``` // ❌ BAD CODE BELOW, DON'T DO THIS export * from "./ui/Comment"; // 👎 don't try this at home export * from "./model/comments"; // 💩 this is bad practice ``` สิ่งนี้ทำร้ายความสามารถในการค้นพบ (Discoverability) ของ Slice เพราะคุณไม่สามารถบอกได้ง่ายๆ ว่า Interface ของ Slice นี้คืออะไร การไม่รู้ Interface หมายความว่าคุณต้องขุดลงไปลึกในโค้ดของ Slice เพื่อทำความเข้าใจว่าจะ Integrate มันอย่างไร อีกปัญหาคือคุณอาจเผลอเปิดเผยไส้ในของ Module โดยไม่ได้ตั้งใจ ซึ่งจะทำให้การ Refactor ยากขึ้นถ้ามีใครเริ่มมาพึ่งพามัน ## Public API สำหรับ Cross-imports[​](#public-api-for-cross-imports "ลิงก์ตรงไปยังหัวข้อ") Cross-imports คือสถานการณ์ที่มี Slice หนึ่ง Import จากอีก Slice หนึ่งที่อยู่ใน Layer เดียวกัน โดยปกติเรื่องนี้ถูกห้ามโดย [กฎการ Import บน Layers](/th/docs/reference/layers.md#import-rule-on-layers) แต่บ่อยครั้งก็มีเหตุผลที่สมควรที่จะทำ Cross-import ตัวอย่างเช่น Business entities ในโลกความจริงมักจะอ้างอิงถึงกันและกัน และมันดีที่สุดที่จะสะท้อนความสัมพันธ์เหล่านี้ในโค้ดแทนที่จะพยายามอ้อมค้อม เพื่อจุดประสงค์นี้ จึงมี Public API ชนิดพิเศษ หรือที่รู้จักในนาม `@x`-notation ถ้าคุณมี Entities A และ B, และ Entity B จำเป็นต้อง Import จาก Entity A, ดังนั้น Entity A สามารถประกาศ Public API แยกต่างหากสำหรับ Entity B โดยเฉพาะ * `📂 entities` * `📂 A` * `📂 @x` * `📄 B.ts` — Public API พิเศษสำหรับโค้ดภายใน `entities/B/` * `📄 index.ts` — Public API ปกติ จากนั้นโค้ดภายใน `entities/B/` สามารถ Import จาก `entities/A/@x/B`: ``` import type { EntityA } from "entities/A/@x/B"; ``` Notation `A/@x/B` ตั้งใจให้อ่านว่า "A crossed with B" note พยายามรักษา Cross-imports ให้น้อยที่สุด และ **ใช้ Notation นี้เฉพาะบน Entities layer เท่านั้น** ซึ่งเป็นที่ที่การกำจัด Cross-imports มักจะไม่สมเหตุสมผล ## ปัญหาเกี่ยวกับ Index files[​](#ปัญหาเกี่ยวกับ-index-files "ลิงก์ตรงไปยังหัวข้อ") Index files เช่น `index.js`, หรือที่รู้จักในนาม Barrel files เป็นวิธีที่พบบ่อยที่สุดในการกำหนด Public API มันสร้างง่าย แต่เป็นที่รู้กันว่าก่อให้เกิดปัญหากับ Bundlers และ Frameworks บางตัว ### Circular imports[​](#circular-imports "ลิงก์ตรงไปยังหัวข้อ") Circular import คือเมื่อไฟล์สองไฟล์หรือมากกว่า Import กันเองเป็นวงกลม ![Three files importing each other in a circle](/th/img/circular-import-light.svg#light-mode-only)![Three files importing each other in a circle](/th/img/circular-import-dark.svg#dark-mode-only) ในภาพ: สามไฟล์ `fileA.js`, `fileB.js`, และ `fileC.js` Import กันและกันเป็นวงกลม สถานการณ์เหล่านี้มักยากสำหรับ Bundlers ที่จะจัดการ และในบางกรณีอาจนำไปสู่ Runtime errors ที่ยากต่อการ Debug Circular imports สามารถเกิดขึ้นได้โดยไม่มี Index files แต่การมี Index file เป็นการเปิดโอกาสให้สร้าง Circular import โดยไม่ตั้งใจได้ง่ายขึ้น มักเกิดขึ้นเมื่อคุณมีสอง Objects ที่เปิดเผยใน Public API ของ Slice เช่น `HomePage` และ `loadUserStatistics` และ `HomePage` ต้องการเข้าถึง `loadUserStatistics` แต่ทำแบบนี้: pages/home/ui/HomePage.jsx ``` import { loadUserStatistics } from "../"; // importing from pages/home/index.js export function HomePage() { /* … */ } ``` pages/home/index.js ``` export { HomePage } from "./ui/HomePage"; export { loadUserStatistics } from "./api/loadUserStatistics"; ``` สถานการณ์นี้สร้าง Circular import เพราะ `index.js` Import `ui/HomePage.jsx`, แต่ `ui/HomePage.jsx` Import `index.js` เพื่อป้องกันปัญหานี้ พิจารณาหลักการสองข้อนี้ ถ้าคุณมีสองไฟล์ และไฟล์หนึ่ง Import อีกไฟล์หนึ่ง: * เมื่อพวกมันอยู่ใน Slice เดียวกัน ให้ใช้ *Relative* imports และเขียน Full import path เสมอ * เมื่อพวกมันอยู่ต่าง Slice กัน ให้ใช้ *Absolute* imports ตัวอย่างเช่น ใช้อเลียส (Alias) ### Bundle ขนาดใหญ่และ Tree-shaking ที่พังใน Shared[​](#large-bundles "ลิงก์ตรงไปยังหัวข้อ") Bundlers บางตัวอาจมีปัญหาในการทำ Tree-shaking (ลบโค้ดที่ไม่ได้ถูก Import) เมื่อคุณมี Index file ที่ Re-export ทุกอย่าง โดยปกติเรื่องนี้ไม่ใช่ปัญหาสำหรับ Public API ระดับ Slice เพราะเนื้อหาของ Module มักเกี่ยวข้องกันอย่างใกล้ชิด ดังนั้นคุณแทบจะไม่ค่อยต้องการ Import อย่างหนึ่งแล้ว Tree-shake อีกอย่างทิ้งไป อย่างไรก็ตาม มีสองกรณีที่พบบ่อยมากที่กฎปกติของ Public API ใน FSD อาจนำไปสู่ปัญหา — `shared/ui` และ `shared/lib` สองโฟลเดอร์นี้เป็นคอลเลกชันของสิ่งที่ไม่เกี่ยวข้องกันและมักไม่ได้ถูกใช้พร้อมกันในที่เดียว ตัวอย่างเช่น `shared/ui` อาจมี Modules สำหรับทุก Component ใน UI library: * `📂 shared/ui/` * `📁 button` * `📁 text-field` * `📁 carousel` * `📁 accordion` ปัญหานี้แย่ลงเมื่อหนึ่งใน Modules เหล่านี้มี Heavy dependency เช่น Syntax highlighter หรือ Drag'n'drop library คุณคงไม่อยากดึงสิ่งพวกนั้นเข้ามาในทุกๆ หน้าที่ใช้แค่บางอย่างจาก `shared/ui` เช่น ปุ่ม (Button) ถ้า Bundles ของคุณโตขึ้นจนไม่น่าพอใจเนื่องจาก Public API เดียวใน `shared/ui` หรือ `shared/lib` แนะนำให้แยก Index file สำหรับแต่ละ Component หรือ Library แทน: * `📂 shared/ui/` * `📂 button` * `📄 index.js` * `📂 text-field` * `📄 index.js` จากนั้นผู้ใช้ (Consumers) ของ Components เหล่านี้สามารถ Import พวกมันโดยตรงแบบนี้: pages/sign-in/ui/SignInPage.jsx ``` import { Button } from '@/shared/ui/button'; import { TextField } from '@/shared/ui/text-field'; ``` ### ไม่มีการป้องกันจริงจากการเลี่ยง Public API[​](#ไม่มีการป้องกันจริงจากการเลี่ยง-public-api "ลิงก์ตรงไปยังหัวข้อ") เมื่อคุณสร้าง Index file สำหรับ Slice คุณไม่ได้ห้ามใครไม่ให้เลี่ยงการใช้มันแล้วไป Import โดยตรงจริงๆ นี่เป็นปัญหาโดยเฉพาะกับ Auto-imports เพราะมีหลายที่ที่ Object สามารถถูก Import ได้ ดังนั้น IDE จึงต้องตัดสินใจแทนคุณ บางครั้งมันอาจเลือก Import โดยตรง ซึ่งทำลายกฎ Public API บน Slices เพื่อดักจับปัญหาเหล่านี้โดยอัตโนมัติ เราแนะนำให้ใช้ [Steiger](https://github.com/feature-sliced/steiger) ซึ่งเป็น Architectural linter พร้อม Ruleset สำหรับ Feature-Sliced Design ### ประสิทธิภาพของ Bundlers แย่ลงในโปรเจกต์ขนาดใหญ่[​](#ประสิทธิภาพของ-bundlers-แย่ลงในโปรเจกต์ขนาดใหญ่ "ลิงก์ตรงไปยังหัวข้อ") การมี Index files จำนวนมากในโปรเจกต์สามารถทำให้ Development server ช้าลงได้ ดังที่ TkDodo บันทึกไว้ใน [บทความของเขา "Please Stop Using Barrel Files"](https://tkdodo.eu/blog/please-stop-using-barrel-files) มีหลายสิ่งที่คุณทำได้เพื่อจัดการกับปัญหานี้: 1. คำแนะนำเดียวกับในปัญหา ["Bundle ขนาดใหญ่และ Tree-shaking ที่พังใน Shared"](#large-bundles) — แยก Index files สำหรับแต่ละ Component/Library ใน `shared/ui` และ `shared/lib` แทนที่จะมีไฟล์เดียวใหญ่ๆ 2. หลีกเลี่ยงการมี Index files ใน Segments บน Layers ที่มี Slices ตัวอย่างเช่น ถ้าคุณมี Index สำหรับ Feature "comments", `📄 features/comments/index.js`, ไม่มีเหตุผลที่จะมี Index อีกอันสำหรับ `ui` segment ของ Feature นั้นอย่าง `📄 features/comments/ui/index.js` 3. ถ้าคุณมีโปรเจกต์ที่ใหญ่มาก มีโอกาสสูงที่ Application ของคุณสามารถแยกเป็นก้อนใหญ่ๆ (Chunks) ได้หลายก้อน ตัวอย่างเช่น Google Docs มีความรับผิดชอบที่แตกต่างกันมากสำหรับ Document editor และสำหรับ File browser คุณสามารถสร้าง Monorepo setup ที่แต่ละ Package เป็น FSD root แยกต่างหาก โดยมีชุดของ Layers เป็นของตัวเอง บาง Packages อาจมีแค่ Shared และ Entities layers, บางอันอาจมีแค่ Pages และ App, บางอันอาจรวม Shared เล็กๆ ของตัวเอง แต่ยังคงใช้ Shared ใหญ่จากอีก Package ด้วยก็ได้ --- # Slices และ Segments ## Slices[​](#slices "ลิงก์ตรงไปยังหัวข้อ") Slices เป็นระดับที่สองในลำดับชั้นการจัดระเบียบของ Feature-Sliced Design จุดประสงค์หลักคือเพื่อจัดกลุ่มโค้ดตามความหมายที่มีต่อ Product, Business หรือแค่ต่อ Application ชื่อของ Slices ไม่ได้ถูกกำหนดเป็นมาตรฐานเพราะมันถูกกำหนดโดยตรงจาก Business domain ของ Application คุณ ตัวอย่างเช่น Photo gallery อาจมี Slices `photo`, `effects`, `gallery-page` ส่วน Social network อาจต้องการ Slices ที่ต่างออกไป เช่น `post`, `comments`, `news-feed` Layers Shared และ App ไม่มี Slices นั่นเป็นเพราะ Shared ไม่ควรมี Business logic เลย จึงไม่มีความหมายในแง่ Product และ App ควรประกอบด้วยโค้ดที่เกี่ยวข้องกับทั้ง Application เท่านั้น ดังนั้นการแบ่งแยกจึงไม่จำเป็น ### Zero coupling และ High cohesion[​](#zero-coupling-high-cohesion "ลิงก์ตรงไปยังหัวข้อ") Slices ตั้งใจให้เป็นกลุ่มของไฟล์โค้ดที่อิสระ (Independent) และมีความเกาะเกี่ยวสูง (Highly cohesive) ภาพกราฟิกด้านล่างอาจช่วยให้เห็นภาพคอนเซปต์ที่เข้าใจยากอย่าง *Cohesion (ความเกาะเกี่ยว)* และ *Coupling (การผูกมัด)*: ![](/th/img/coupling-cohesion-light.svg#light-mode-only)![](/th/img/coupling-cohesion-dark.svg#dark-mode-only) ภาพจาก Slice ในอุดมคติจะเป็นอิสระจาก Slices อื่นๆ ใน Layer เดียวกัน (Zero coupling) และประกอบด้วยโค้ดส่วนใหญ่ที่เกี่ยวข้องกับเป้าหมายหลักของมัน (High cohesion) ความเป็นอิสระของ Slices ถูกบังคับใช้โดย [กฎการ Import บน Layers](/th/docs/reference/layers.md#import-rule-on-layers): > *Module (ไฟล์) ใน Slice สามารถ Import Slices อื่นได้เฉพาะเมื่อพวกมันอยู่ใน Layers ที่ต่ำกว่าอย่างเคร่งครัดเท่านั้น* ### กฎ Public API บน Slices[​](#กฎ-public-api-บน-slices "ลิงก์ตรงไปยังหัวข้อ") ภายใน Slice โค้ดสามารถจัดระเบียบแบบไหนก็ได้ที่คุณต้องการ นั่นไม่ก่อให้เกิดปัญหาตราบใดที่ Slice จัดเตรียม Public API ที่ดีสำหรับ Slices อื่นเพื่อใช้งาน สิ่งนี้ถูกบังคับใช้ด้วย **กฎ Public API บน Slices**: > *ทุกๆ Slice (และ Segment บน Layers ที่ไม่มี Slices) ต้องมีคำนิยามของ Public API* > > *Modules ภายนอก Slice/Segment นี้สามารถอ้างอิงถึง Public API เท่านั้น ไม่ใช่โครงสร้างไฟล์ภายในของ Slice/Segment* อ่านเพิ่มเติมเกี่ยวกับเหตุผลของ Public APIs และแนวทางปฏิบัติที่ดีที่สุดในการสร้างมันได้ใน [Public API reference](/th/docs/reference/public-api.md) ### Slice groups[​](#slice-groups "ลิงก์ตรงไปยังหัวข้อ") Slices ที่เกี่ยวข้องกันอย่างใกล้ชิดสามารถจัดกลุ่มทางโครงสร้างใน Folder ได้ แต่พวกมันควรใช้กฎการแยกตัว (Isolation rules) เดียวกันกับ Slices อื่นๆ — ไม่ควรมีการ **แชร์โค้ด (Code sharing)** ใน Folder นั้น ![Features \"compose\", \"like\" and \"delete\" grouped in a folder \"post\". In that folder there is also a file \"some-shared-code.ts\" that is crossed out to imply that it\'s not allowed.](/th/assets/images/graphic-nested-slices-b9c44e6cc55ecdbf3e50bf40a61e5a27.svg) ## Segments[​](#segments "ลิงก์ตรงไปยังหัวข้อ") Segments เป็นระดับที่สามและระดับสุดท้ายในลำดับชั้นการจัดระเบียบ และจุดประสงค์ของพวกมันคือเพื่อจัดกลุ่มโค้ดตาม "ธรรมชาติทางเทคนิค (Technical nature)" มีชื่อ Segment มาตรฐานอยู่ไม่กี่ชื่อ: * `ui` — ทุกอย่างที่เกี่ยวกับการแสดงผล UI: UI components, Date formatters, Styles, ฯลฯ * `api` — Backend interactions: Request functions, Data types, Mappers, ฯลฯ * `model` — Data model: Schemas, Interfaces, Stores, และ Business logic * `lib` — Library code ที่ Modules อื่นใน Slice นี้ต้องการ * `config` — Configuration files และ Feature flags ดู [หน้า Layers](/th/docs/reference/layers.md#layer-definitions) สำหรับตัวอย่างว่าแต่ละ Segments เหล่านี้อาจถูกใช้ทำอะไรได้บ้างใน Layers ที่แตกต่างกัน คุณยังสามารถสร้าง Custom segments ได้ด้วย ที่ที่พบบ่อยที่สุดสำหรับ Custom segments คือ App layer และ Shared layer ซึ่งเป็นที่ที่ Slices ไม่ค่อยสมเหตุสมผล ตรวจสอบให้แน่ใจว่าชื่อของ Segments เหล่านี้อธิบายจุดประสงค์ของเนื้อหา ไม่ใช่แก่นแท้ของมัน ตัวอย่างเช่น `components`, `hooks`, และ `types` เป็นชื่อ Segment ที่แย่เพราะมันไม่ได้ช่วยเท่าไหร่เวลาคุณมองหาโค้ด --- ### ตรรกะทางธุรกิจที่ชัดเจน (Explicit business logic) สถาปัตยกรรมที่ทำความเข้าใจได้ง่ายด้วยขอบเขตของโดเมน ---